


5 Methods to Compress Images to 2MB: Online, PC, and Mobile
When handling digital storage, image files are usually ignored since they often have significantly smaller file sizes compared to audio and video files. However, since photos are easy to pile up and store, they can eventually occupy a significant amount of storage space, especially when you are storing high-resolution media files. In this article, we will review five reliable image compression tools that you can use to compress images to under 2MB using online tools, desktop software, and mobile apps.

- GUIDE LIST
- Method 1: Fast & Free – ArkThinker Free Image Compressor (Target 2MB)
- Method 2: Smart Auto-Optimized – TinyPNG (Best for Web)
- Method 3: Interactive Slider – Optimizilla Image Compressor (Visual Quality Control)
- Method 4: Professional Precision – Adobe Photoshop (Exact Target Size)
- Method 5: PicsArt – How to Compress Photos to 2MB on Android & iOS
- Part 6. Pro Guide: How to Guarantee Under 2MB Every Time (Without Losing Too Much Quality)
- Part 7. FAQs About Compressing Images to Exactly 2MB
Image Compressor Features Comparison
| Image Compressor | Supported File Type | Compression Method | Maximum File Upload | Quality Loss | Pricing |
| ArkThinker Free Image Compressor | JPG, PNG, SVG, GIF | Lossless compression. | 5MB per file, up to 40 images. | None | Free |
| TinyPNG | PNG, JPG, WebP, AVIF | Smart lossy compression with palette adjustments. | 5MB (Free) 75MB (Pro) | Minimal | Free – $39.00/Year |
| Optimizilla | JPG, PNG | Adjustable lossy compression. | 20MB per file, up to 20 images. | Noticeable loss | Free |
| Adobe Photoshop | JPG, PNG, GIF, TIFF, WebP, AVIF, and more. | Manual export settings. | No upload limit. | None | $22.99/Month |
| PicsArt | JPG/JPEG, PNG, WebP. | Adjustable lossy compression. | 100MB per file. | Minimal | Free – $5.00/Month |
Method 1: Fast & Free – ArkThinker Free Image Compressor (Target 2MB)
Best Used For: Users looking for online tools with good image quality retention.
We will start this guide by featuring the most optimal online tool for image quality retention with ArkThinker Free Image Compressor. Among the options on this list, this online tool is popular for its near-lossless compression when handling JPG, PNG, SVG, GIF, and other image formats.
On top of its innate advantages as an online tool, such as requiring no setup and installation, the program is also equipped with additional features for the practicality of its users. Some of the most notable are watermark-free images, virus-free converted files, and automatic compression.
All of these features allow the program to be a reliable option for both experienced users and beginners. To learn how to use the program, make sure to read our three-step guide below.
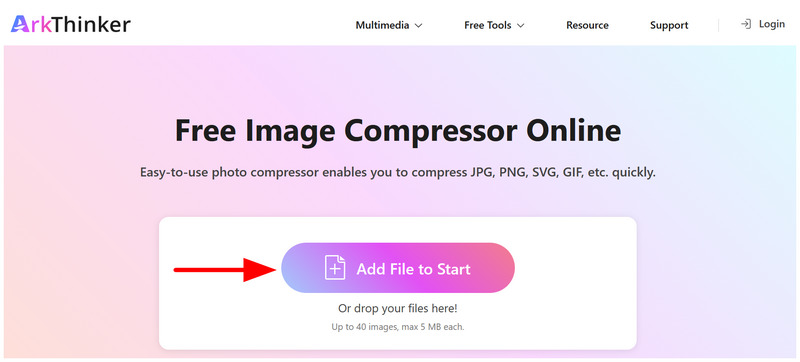
Go to the ArkThinker Free Image Compressor website and select the Add File to Start button or drag-and-drop your image to the Upload Box.
Once uploaded, the Image will be automatically compressed and can be saved on your device by selecting the Download button.
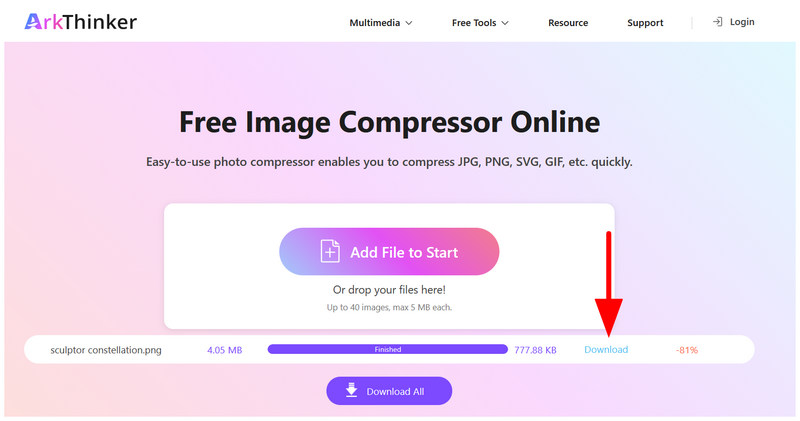
Among the options on this list, ArkThinker Free Image Compressor offers the highest compression rate, making it the best program for users who want to maximize their storage space by compressing images to less than 2MB. However, compressing the file to exactly 2MB will be tricky.
Method 2: Smart Auto-Optimized – TinyPNG (Best for Web)
Best Used For: Compressing images to be used for website design and development.
When looking for image files to be used for web development and designing, TinyPNG Online Tool may be the choice for you. On top of being used as a practical tool to compress images to 2MB online, this software works great for users who prefer automated conversion. With their automated settings, your converted files will be optimized to be used as website assets.
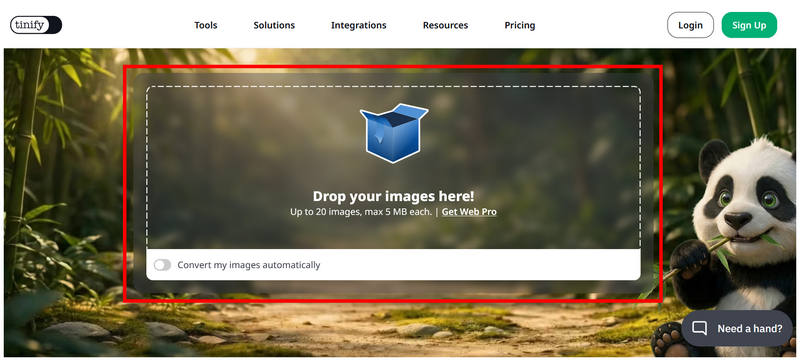
Open TinyPNG’s website and upload your image by clicking or dropping your file into the Upload Box.
After the image has been uploaded, it will be automatically compressed. Select Download All Images to save the file back to your computer.
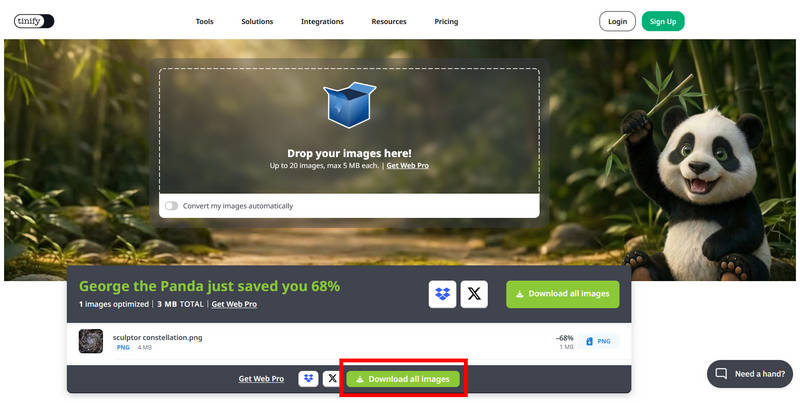
Unfortunately, the program lacks any manual adjustment, which makes it lacking in adjustment tools to accurately compress files to exactly 2MB.
Method 3: Interactive Slider – Optimizilla Image Compressor (Visual Quality Control)
Best Used For: Manual compression control using its adjustable color slider tool.
With the two methods above being designed for automated conversion, the third method we will highlight is another online tool that offers a manual quality editor that gives control to adjusting the compression rate. This is none other than Optimizilla Image Compressor online.
The manual slider tool of the software allows the program to adjust the color levels and change the color of images. Unfortunately, tinkering with your file’s color is a significant visual element that will surely cause your photo’s quality to have a noticeable decline.
Go to Optimizilla Image Compressor and click on Select Files. Wait for your image to be uploaded, then select Compress to proceed.
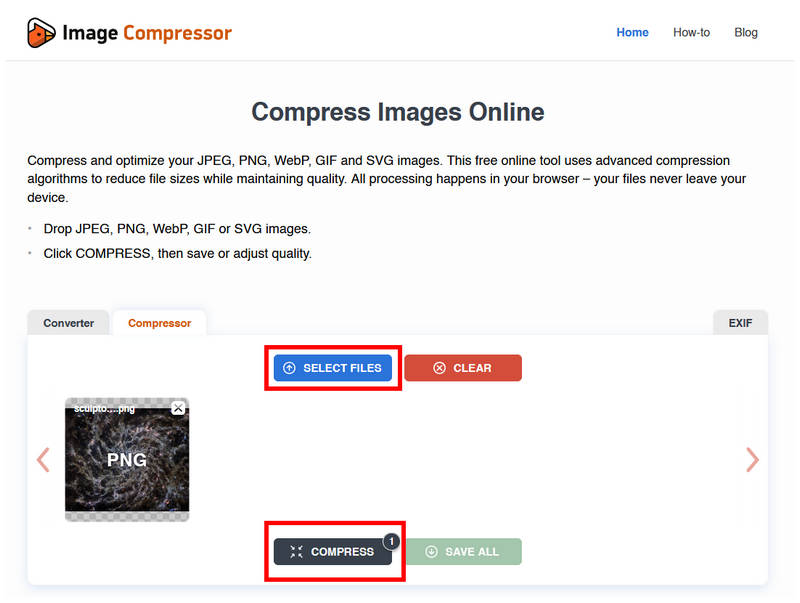
Wait for your image to be compressed. Once done, you can use the Color Slider option to edit your image file, which will affect its compression rate. Otherwise, select Save All to save your compressed image back to your device.
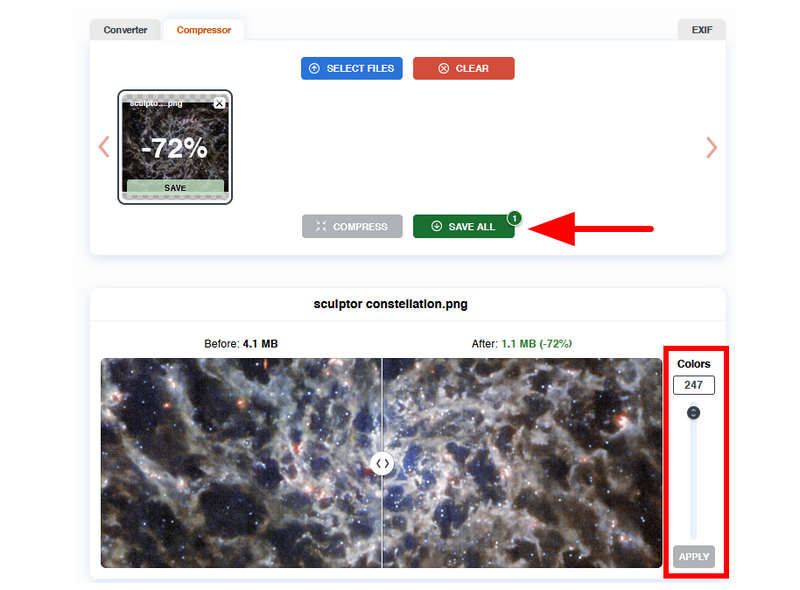
When using the Color Slider setting of Optimizilla, be careful to never go overboard since aggressive adjustments will not be able to compress images to 2mb without losing quality. Instead, the quality loss will be very apparent.
Method 4: Professional Precision – Adobe Photoshop (Exact Target Size)
Best Used For: Manual adjustment of photo export settings for accurate file size.
To compress your edited images to the exact target size of 2MB, traditional photo editors are a solid option, and Adobe Photoshop should be your best choice. Using its advanced Export settings, this program offers accurate file size adjustment when exporting edited image files. This makes the program a good choice for adjusting image file size for professional use, such as compressing images to meet email file size limits.
However, using the tool as a photo editor is a different story. It is one of the most complex and hard-to-use photo editor program. Fortunately, editing is a different matter, and you can use the export settings without adjusting your image.
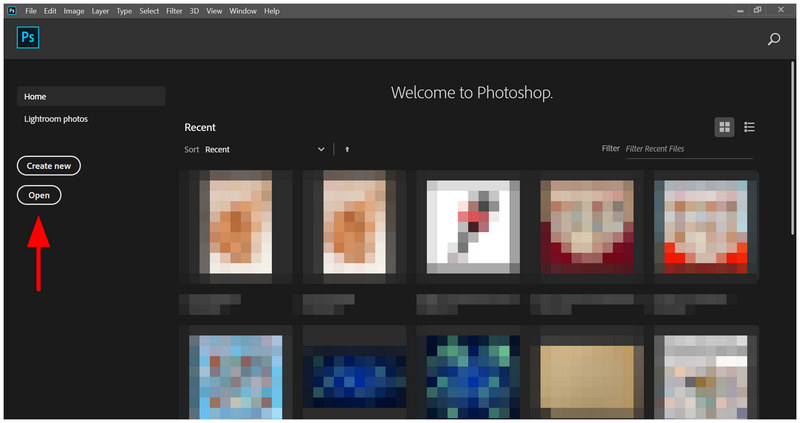
Open Adobe Photoshop and select Open to import your image file for compression.
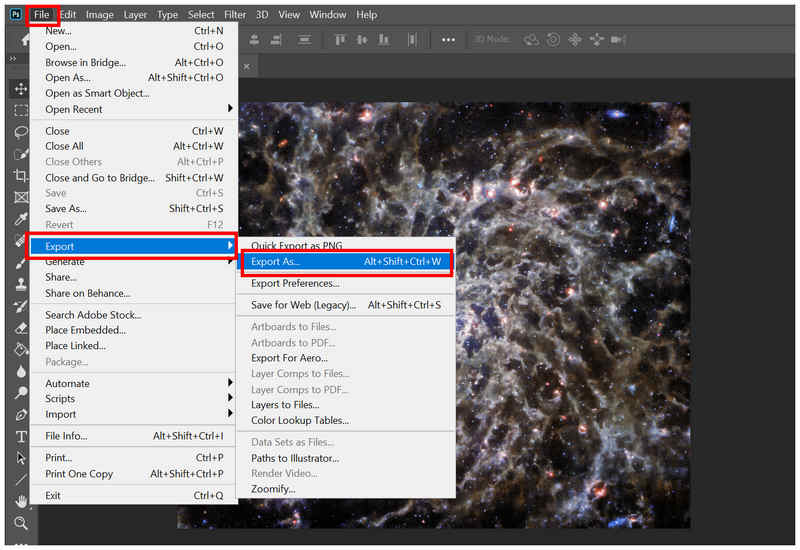
With the image for compression now uploaded, select File, Export, and click on Export As to open the exporting settings.
In the Export settings, set the Format to JPG. Then, select Quality to access the Slider tool. You can then manually adjust it until your image is at exactly 2MB in file size. Click on Export to begin producing the image now compressed at exactly 2MB.
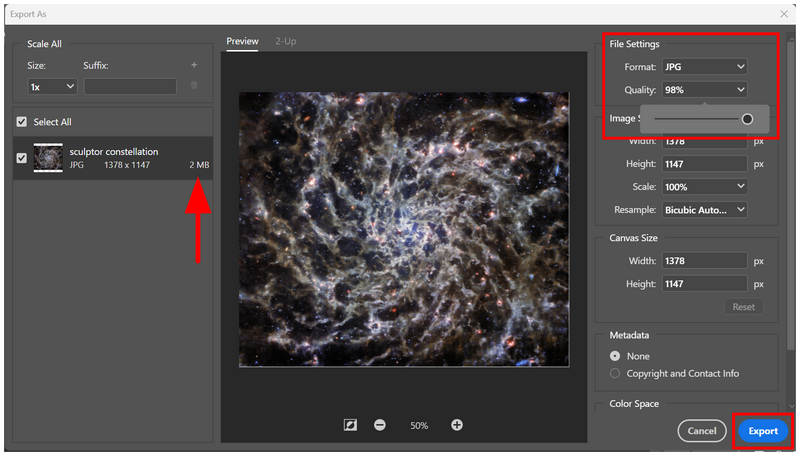
Keep in mind that the quality adjustment slider is only available when saving your image file to JPG format. Fortunately, this is not a problem since JPG is universally compatible with any devices, operating systems, and software.
Method 5: PicsArt – How to Compress Photos to 2MB on Android & iOS
Best Used For: Mobile-based editing and image compression adjustments.
Finally, the last method we will highlight is one of the most popular mobile-based editors, PicsArt. Similar to Photoshop, it also has an Export setting which can be adjusted accurately. As such, it makes it a good option for exact compression directly on your mobile device.
Since it is a mobile app, the software’s export settings are not as complex and advanced as Photoshop, making it more beginner-friendly.
Open PicsArt and tap on the Add Button to import the image you want to compress.
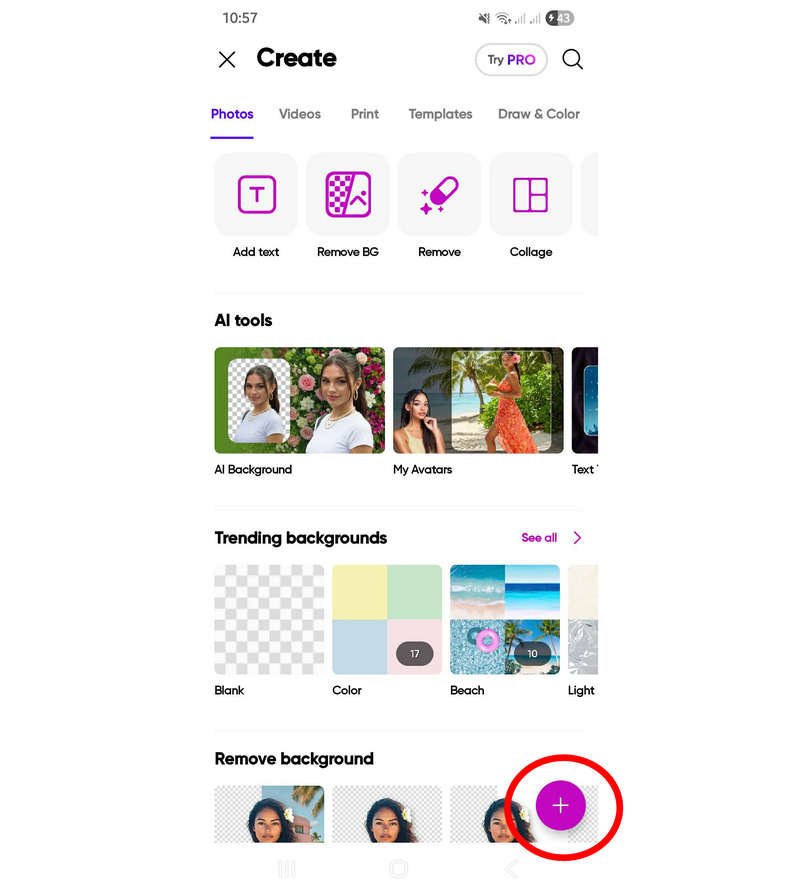
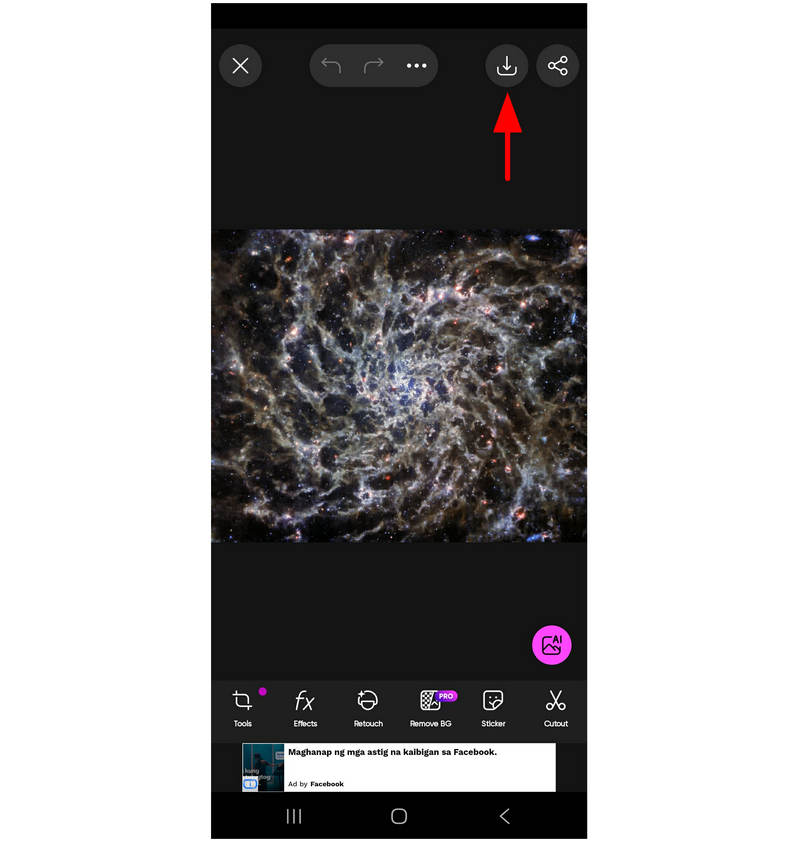
Once the image file has been uploaded, select the Export button.
In the Export settings, select Resolution to access the Image Quality slider. If you are satisfied with the compression rate, tap on Download Another Copy to save the image to your device.
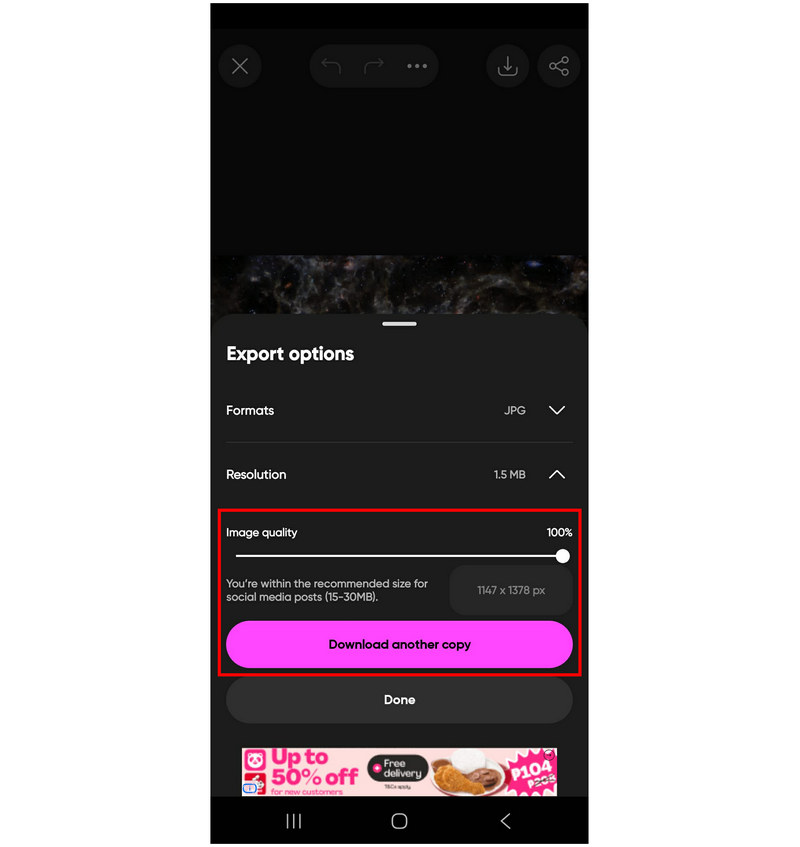
If you are subscribed to PicsArt paid plans, you can adjust the Image Quality slider to further compress your image file. In the free version, the Download button is labeled as Upgrade to Download.
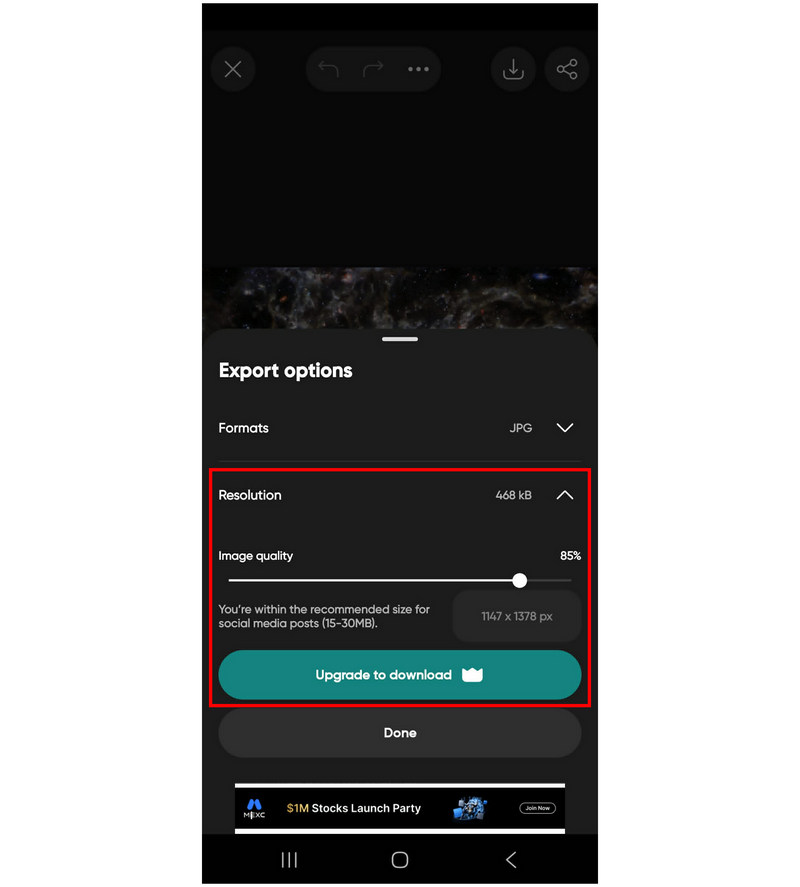
When using the program, keep in mind that its free version is very unreliable due to banner ads and pop-up ads from the moment you first upload your image up to the exporting process. The heavy ad presence dramatically affects the program’s workflow efficiency.
Part 6. Pro Guide: How to Guarantee Under 2MB Every Time (Without Losing Too Much Quality)
Use Lossless Converters
The safest option to guarantee image quality is by using lossless multimedia converters. This is important since lossless and lossy images have a significant quality difference. Among the options on this list, ArkThinker Free Image Compressor is a good freeware option. For premium users, Adobe Photoshop’s export settings are our recommended solution.
Set the Conversion Setting to High Quality
If you are using a multimedia converter, make sure to set the conversion setting to High Quality if it is available in your selected software. Editing the settings of your tool is the most accessible solution to ensure the quality of your files for compression.
Aim for Minimal Quality Loss
Since file compression is an aggressive media modification, you have to keep this in mind when setting your expectations. Aiming for minimal quality loss instead of an exact quality is a more advisable goal.
Part 7. FAQs About Compressing Images to Exactly 2MB
What image format is the most compressed?
JPG is the most efficient format when compressing image files. Compressed JPGs may have their file size lowered, but their quality has minimal reduction. This makes the format one of the best choices for file compression.
Are PNGs larger than JPGs?
Yes, they are. PNGs are larger than JPG images on average. The larger file size is a trade-off since PNGs have better quality.
Should I use online tools for image compression?
Yes, you should. Compressing images using online tools is safe for basic multimedia adjustments. However, avoid processing personal media files on this software since some web-based options upload files to their servers.
What is the most reliable mobile app for compressing images?
Most mobile-based editors have built-in compression features. These are usually accessible in their export settings. Some examples of these tools are PicsArt, Canva Mobile, Lightroom Mobile, and more.
Is it safe to aggressively compress large photos?
No, it is not advisable. Unless you don’t mind quality loss, aggressive compression will result in poor image quality. Find the balance between quality and compression.
Conclusion
With five of the most popular multimedia tools to compress images to 2MB discussed, we hope that this article has provided you with useful information in your pursuit to improve file management by reducing your photo sizes to a manageable 2MB per file. Among the options on this list, we highly suggest using ArkThinker Free Image Compressor Online to ensure that your compressed media files will have minimal quality reduction.
What do you think of this post? Click to rate this post.
Excellent
Rating: 4.9 / 5 (based on 701 votes)


