


How to Compress JPG on Windows, Mac, Online
Ever tried to send a photo to a friend or upload it to a school project site, only to get hit with the dreaded " File too large" error? Been there, done that. I remember trying to email a bunch of vacation photos to my cousin and watching my email client freeze like it was stuck. That’s when I realized: I needed to compress JPG files.
If you’re a student, a casual photographer, or just someone who wants their images to load faster and take up less space, this guide is for you. In this guide, we will explain what JPG files are, why compression matters, and how to shrink JPEG file size using free tools.
Part 1. What Is a JPG Image File
JPEG vs JPG: What’s the Difference
Okay, first things first. You’ve probably seen both " .jpg" and " .jpeg" file extensions floating around. Spoiler alert: they’re basically the same thing.
• JPEG is short for Joint Photographic Experts Group, and that’s actually the name of the team who came up with the format. So next time you save a photo as a JPEG, you’re using a little piece of their legacy.
• JPG is just a shortened version used by older Windows systems that required three-letter extensions.
So whether your image ends in .jpg or .jpeg, it’s the same type of file. No need to stress.
Why We Need to Compress JPG
JPGs are great because they balance quality and file size. But sometimes, even JPGs can be too bulky, especially if they’re high-resolution photos from your phone or camera.
Here’s why you might want to compress JPG files:
• Keep things light and tidy, and smaller file sizes mean more breathing room on your device or cloud.
• Speed up website loading if you’re uploading images online.
• Make emailing or sharing easier, especially when there’s a file size limit.
• Improve performance in apps or presentations that use lots of images.
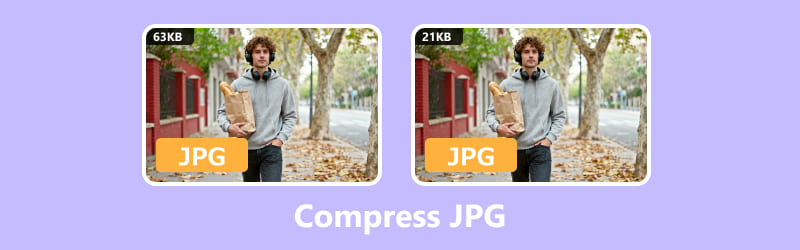
In short, JPG compression helps you minimize JPEG size without sacrificing too much quality.
If you have small icon or logo images, SVG is another recommend format with clear quality and small size. If you need, learn from this post to convert JPG to SVG.
Part 2: How Do I Reduce the Size of a JPG
Now for the fun part, and how to actually shrink JPEG file size. I’ve tried a bunch of methods, and here are my favorites:
1. Compress JPG Online with ArkThinker Image Compressor Online
If you just want something quick and hassle-free, compress JPG online tools are your best friend. I tested out ArkThinker Image Compressor Online, and honestly, it was a lifesaver when I had a last-minute assignment to upload.
Features I love:
• Compresses JPG, PNG, GIF, and more.
• No watermark added.
• Works on phones, tablets, and computers.
• Batch compression (up to 40 images at once!).
Head to ArkThinker in your browser
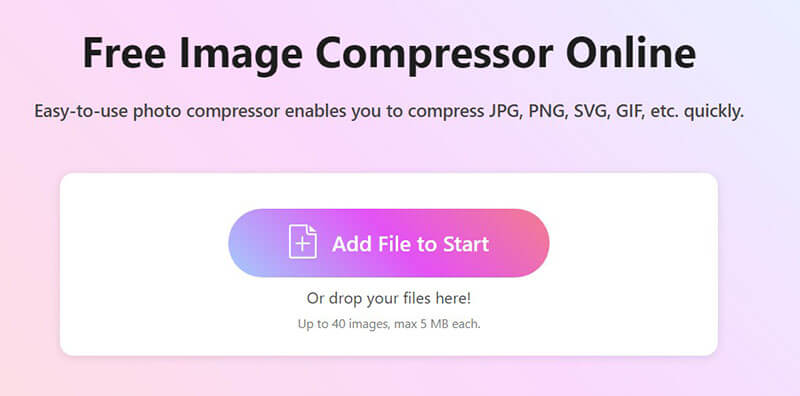
Whether you're curled up with your laptop or scrolling on your phone, just open your browser and swing by the ArkThinker Image Compressor Online. No downloads, no fuss, and everything runs right in your browser, so it’s ready whenever you are.
Upload your images
Click the "Add Files to Start" button to begin, or if you’re feeling fancy, drag and drop your JPG or PNG files straight into the upload area.
You’re free to upload as many as 40 images in one go, and just keep each file under 5MB. Super useful when you’ve got a batch of photos that could use a quick size makeover.
Compress and download your compressed images
No need to press extra buttons, and ArkThinker gets to work right away. Once your images are compressed, you’ve got two easy options to download:
• Save each image one by one
• Or click "Download All" to get everything bundled neatly in a ZIP file
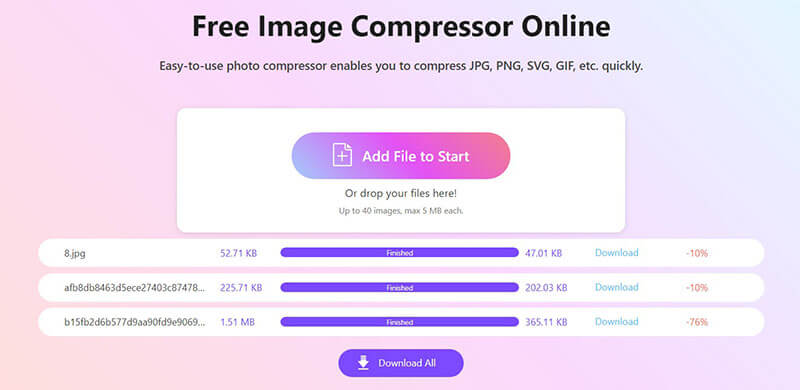
Tip: If you’re compressing images for a school project or blog, check the quality after downloading. ArkThinker does a great job preserving clarity, but it’s always good to double-check.
2. Use Windows Photos App
If you’re on Windows 10 or 11, the built-in Photos app can also help reduce image sizes. It’s not exactly a dedicated jpg compression tool, but it works if you just need a smaller version.
Open your image
Right-click the photo file, choose Open with > Photos.
Access the resize tool
In the Photos app, click the three-dot menu (⋯) in the top-right corner, then select Resize Image.

Choose your size
You’ll see options like:
• Best for emails and messages
• Define custom dimensions (for manual control)
You can also adjust quality as lower quality means smaller file size. Make sure " Maintain aspect ratio" is checked to avoid distortion.
Save your resized image
Click the Save button, and click a location to save the new version. Now your image is now compressed by resolution and quality.
This method reduces resolution, which indirectly shrinks the file size. It’s great for casual use but not ideal if you need to maintain high quality.
3. Use Windows Paint App
Windows Paint is a simple, built-in app that’s been around forever, and surprisingly, it can help you compress JPG files, too. While it doesn’t offer advanced compression settings like online tools, you can reduce the image size by resizing the picture in Paint manually.
Open your Image in Paint
Right-click your JPG file and choose Open with > Paint.
Alternatively, launch Paint from the Start menu and use File > Open to select your image.
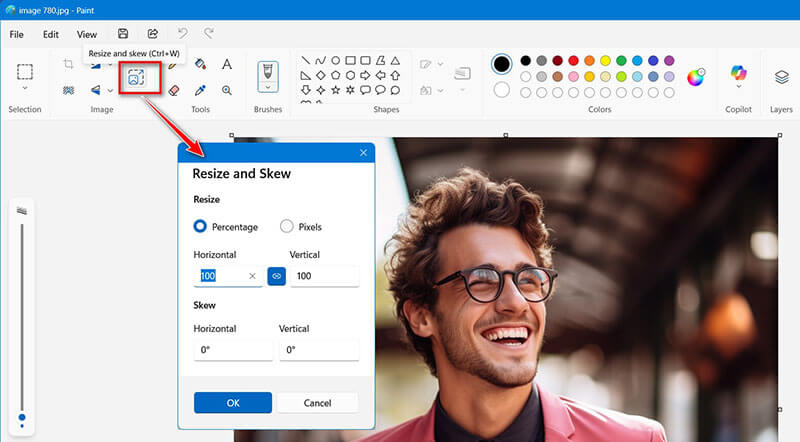
Resize the image
Click the Resize and skew button in the toolbar (usually near the top). A pop-up will appear with two options: Percentage and Pixels.
• Choose Percentage if you want to shrink the image proportionally (e.g., 50% smaller).
• Choose Pixels if you want to set a specific width and height.
Make sure the "Maintain aspect ratio" box is checked to avoid stretching.
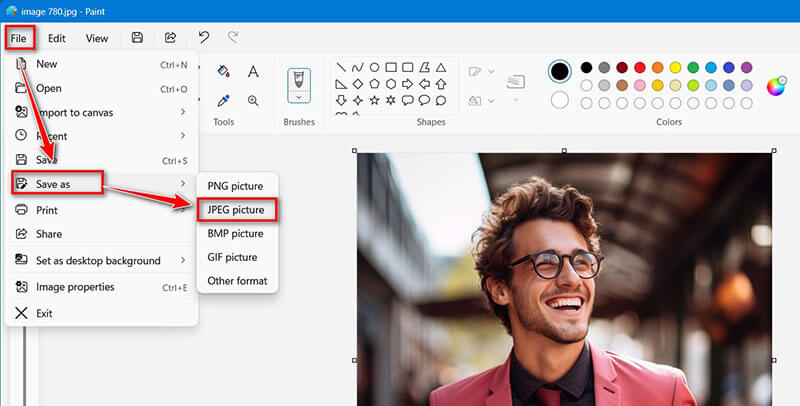
Save the compressed image
Head to File > Save As, select JPEG picture, and then give your file a fresh name or choose a different spot to save it. That way, your original stays safe and untouched.
Paint is surprisingly effective for quick edits. Just don’t expect fancy compression algorithms, and it’s basic but gets the job done.
4. Use Mac Preview
Mac Preview comes pre-installed on macOS and is usually your go-to for opening images and PDFs. But here’s a bonus: it’s surprisingly great for shrinking JPG file sizes too. Just a few clicks let you resize the image or fine-tune the export quality, and no need to install anything extra. It’s a quick, fuss-free way to get your JPEGs down to a more manageable size.
Open your image in Preview
Find your JPG file in Finder. Double-click it, and it should open in Preview by default.
If it doesn’t, right-click the file, choose Open With > Preview.
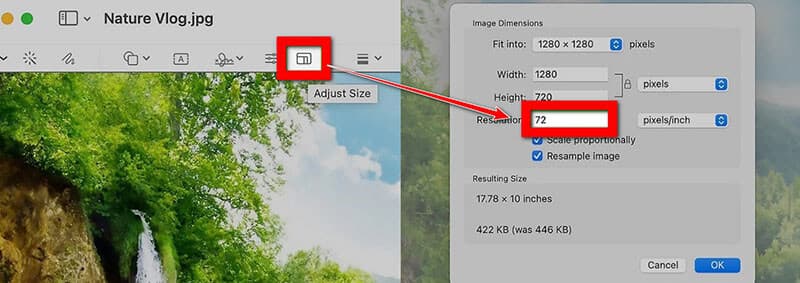
Resize the image (Optional but helpful)
In the top menu, click Tools > Adjust Size. Then a window will pop up showing the current dimensions. You can reduce the width and height manually or choose a preset.
Also, make sure "Scale proportionally" is checked to avoid distortion.
Finally, click OK to apply the changes.
Tip: Resizing is a great way to minimize JPEG size before exporting. For web use or school projects, 1200 pixels wide is usually plenty.
Export JPG with compression
Go to File > Export (not “Save As”, and this gives you more control).
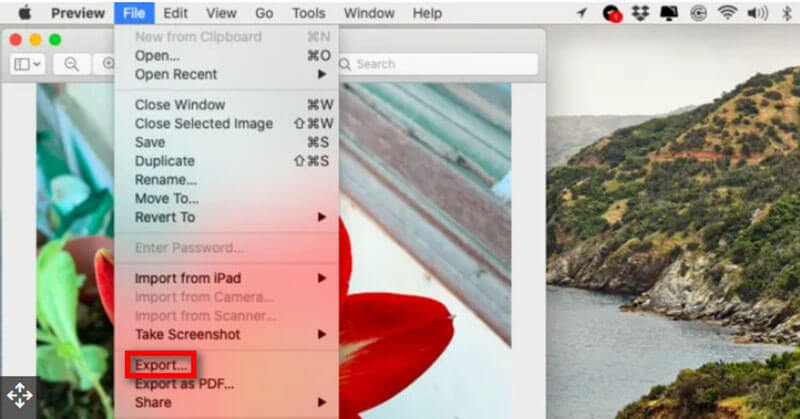
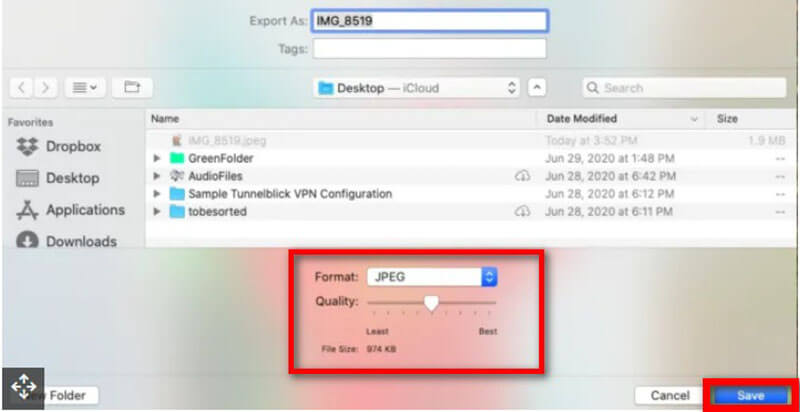
In the export window:
• Choose JPEG as the format.
• Use the Quality slider to adjust compression, and slide left for smaller file size, right for better image quality.
• You’ll see an estimated file size below the slider.
Choose a new name or location so you don’t overwrite the original., and click Save.
After that, you can find the exported image in Finder to see the new file size.
Tip: Preview gives you a nice balance between quality and size. Slide too far left, though, and your image might look fuzzy, and so test before finalizing.
Part 3. FAQs
Q: Will compressing JPGs ruin the image quality?
A: Not necessarily. Tools like ArkThinker use smart compression to minimize JPEG size without obvious quality loss.
Q: Can I compress JPGs on my phone?
A: Yes! ArkThinker Image Compressor Online works on mobile browsers, so you can compress JPG online from your iPhone or Android.
Q: What’s the best way to compress multiple images?
A: Use ArkThinker Image Compressor Online’s batch compression or Mac’s Automator. Both let you shrink JPEG file size for many images at once.
Q: Is it safe to use online compressors?
A: Most reputable tools (like ArkThinker Image Compressor Online) don’t store your images and use secure connections. Just avoid sketchy sites.
Conclusion
Compressing JPG files doesn’t have to be a tech headache. Whether you’re trying to upload a school project, share vacation photos, or just free up space on your device, there’s a method for you. From built-in apps like Windows Photos and Mac Preview to online tools like ArkThinker, you can easily shrink JPEG file size and get smaller file size JPEGs without losing quality.
So next time you’re stuck with a bulky image, don’t panic, and just compress JPG online with ArkThinker and keep moving forward. Your storage (and your sanity) will thank you.
What do you think of this post? Click to rate this post.
Excellent
Rating: 4.7 / 5 (based on 477 votes)