


How to Remove Audio from Video on Mobile, PC, and Online
When capturing video footage for editing projects, it is common for video editors to remove the raw audio from clips to apply more appropriate audio overlays or background music. As such, learning how to remove audio from a video is a key video editing skill and vital regardless of the video editor you use. In this article, we will provide a detailed guide on removing audio from videos using multiple options available on editing tools, whether via muting, audio stripping, or separating the audio track from the video file. We will explore multiple solutions for editors available on mobile devices, desktop computers, and browser-based video editors.

- GUIDE LIST
- Part 1. Remove Audio from Video on iPhone & iPad
- Part 2. Remove Sound from Video on Android
- Part 3. Remove Audio from Video on Windows & Mac
- Part 4. Remove Audio from Video Online Free
- Part 5. Advanced Tip: How to Completely Delete Audio Track
- Part 6. FAQs About Removing Audio from Video
Part 1. Remove Audio from Video on iPhone & iPad
We will start this guide by covering how to erase audio from videos in the native iOS Photos App. Since iOS devices’ gallery software includes basic editing tools, audio file editing is built in.
To learn how to remove audio from video captures on iPhone or iPad, make sure to read our guide below.
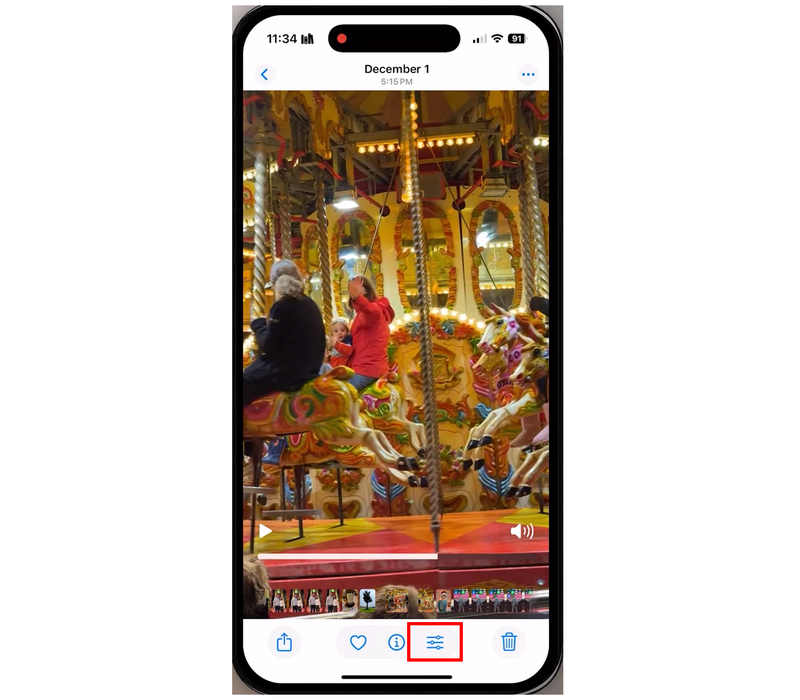
Open the Photos app and select the video you want to mute. Then select the Edit button.
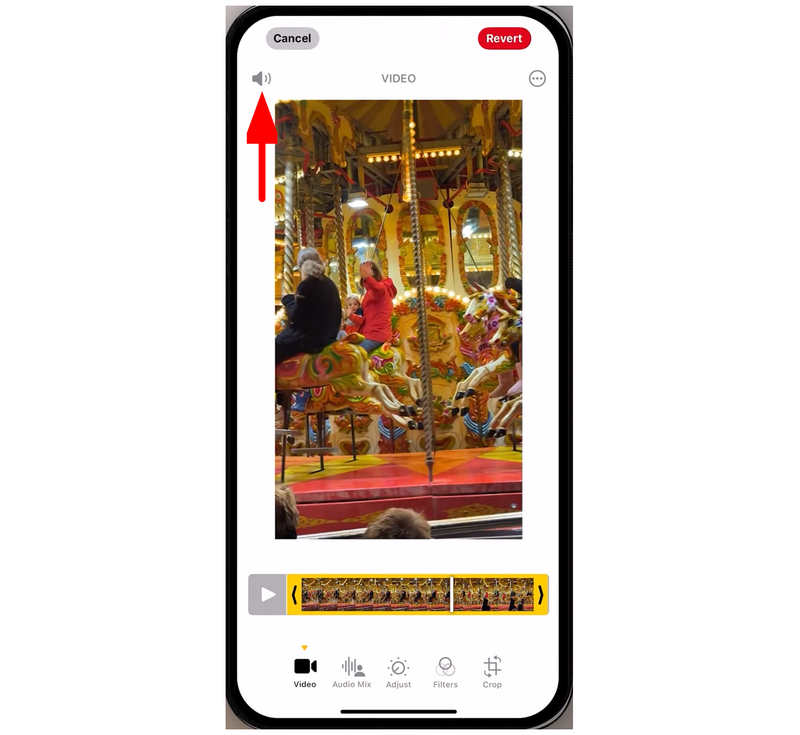
In the video editor menu, tap the Speaker icon in the upper-left section of the screen.
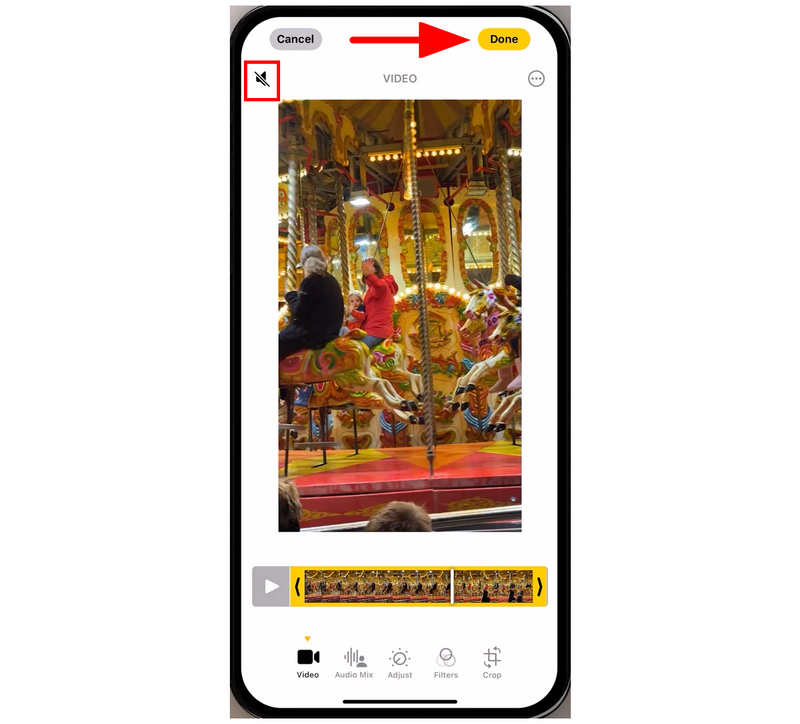
When the video is muted, the speaker icon will change to a Speaker with a diagonal line, which indicates that it is now muted. Tap on Done to confirm the editing adjustments.
Compared to Android options, Apple users who want to learn how to remove audio from a video have an easier time. The absence of volume sliders is a good addition for more direct background noise removal.
Part 2. Remove Sound from Video on Android
Google Photos
Google Photos for mobile can serve as an alternative gallery app for all Android devices. Fortunately, it has a dedicated video editing menu with basic media adjustments, including a video mute option.
To help users learn how to use the tool, we provided a tutorial for this application so Android users can use it on any device as long as they use Google Photos as their gallery app of choice. This makes the Photos app a reliable audio remover for videos.
Open Google Photos and open the video you want to mute. Then, select the Edit option in the video.
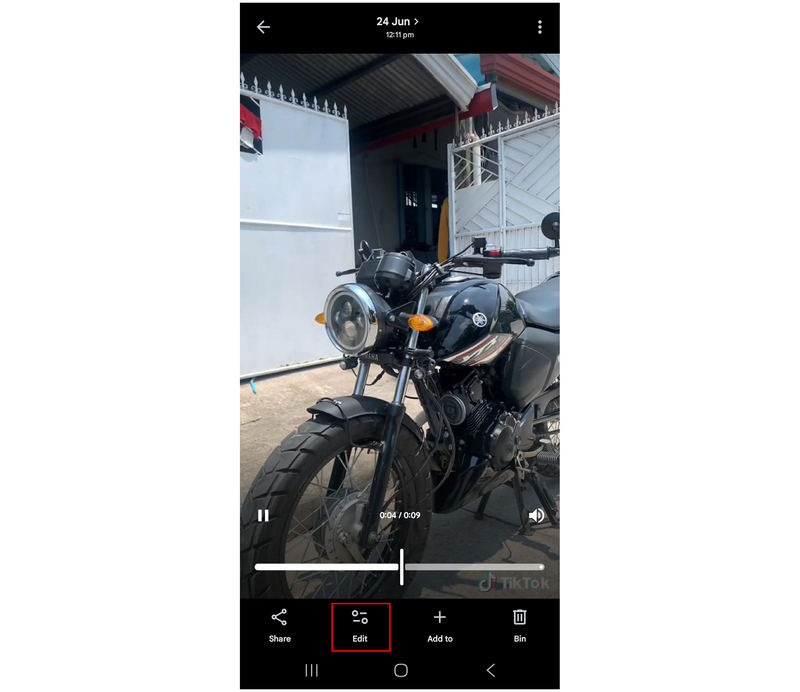
In Google Photos’ Edit menu, swipe left among the Video tools to find the Mute option.
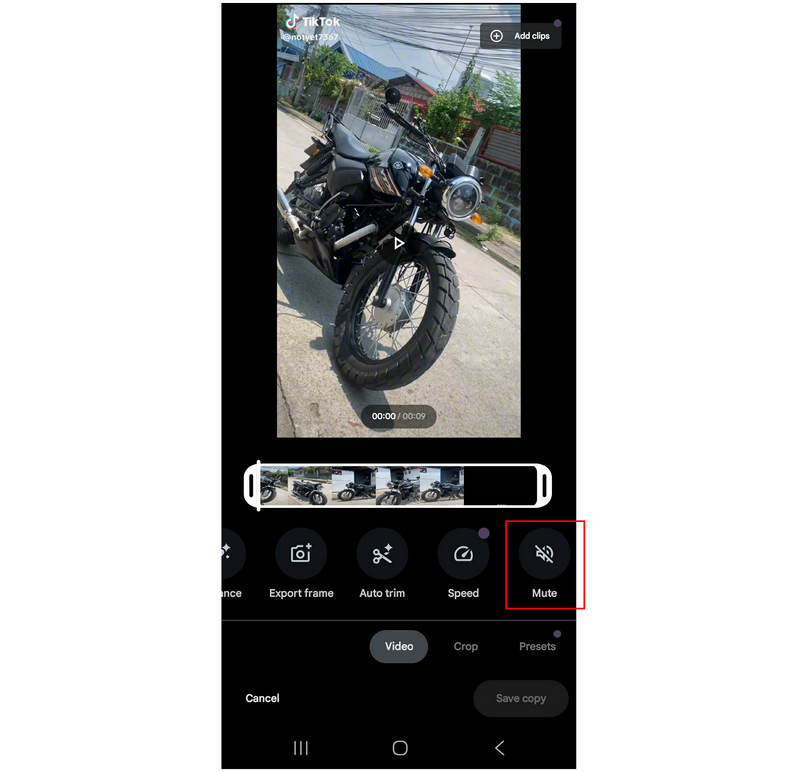
Tap the Mute option to mute the video. Then, select Save Copy to create a copy of the video you edited now with its audio removed.
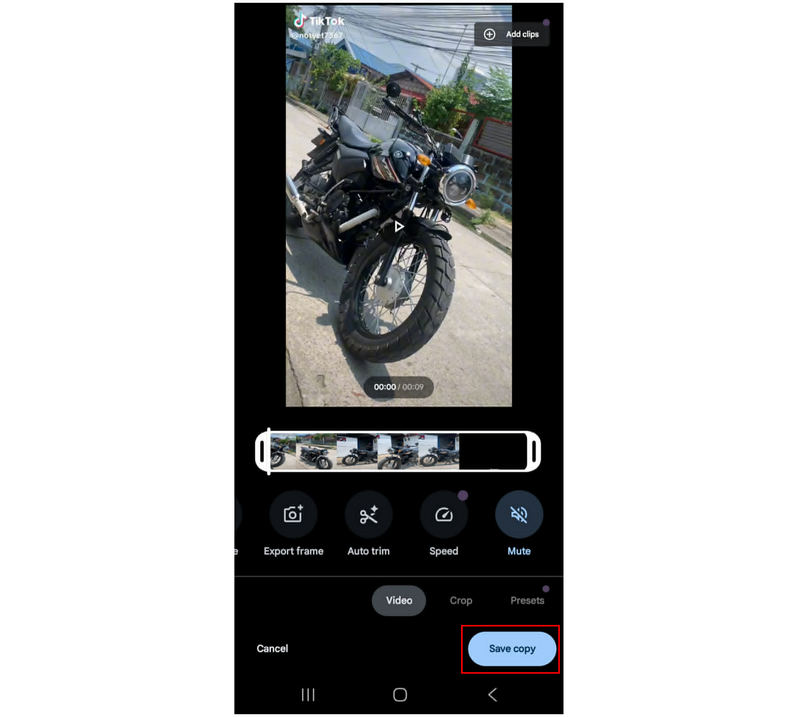
To make video editing in Google Photos simple, Google's move to provide a dedicated Mute option in the stock video editor is a good one. This makes removing commentary audio from video way easier.
Samsung Gallery
With Samsung being the most popular Android device brand, we decided to add a tutorial on using the edit function in its Gallery app. Unfortunately, some Samsung Gallery apps do not offer volume editing.
The lack of a dedicated volume option in some Samsung Gallery apps is apparent on their entry-level to midrange smartphones. In a basic Samsung smartphone, only the video rotate option is available in the Edit menu. If that is the case in your device, we recommend using Google Photos instead.
Open the video you want to mute, then select the Edit button.
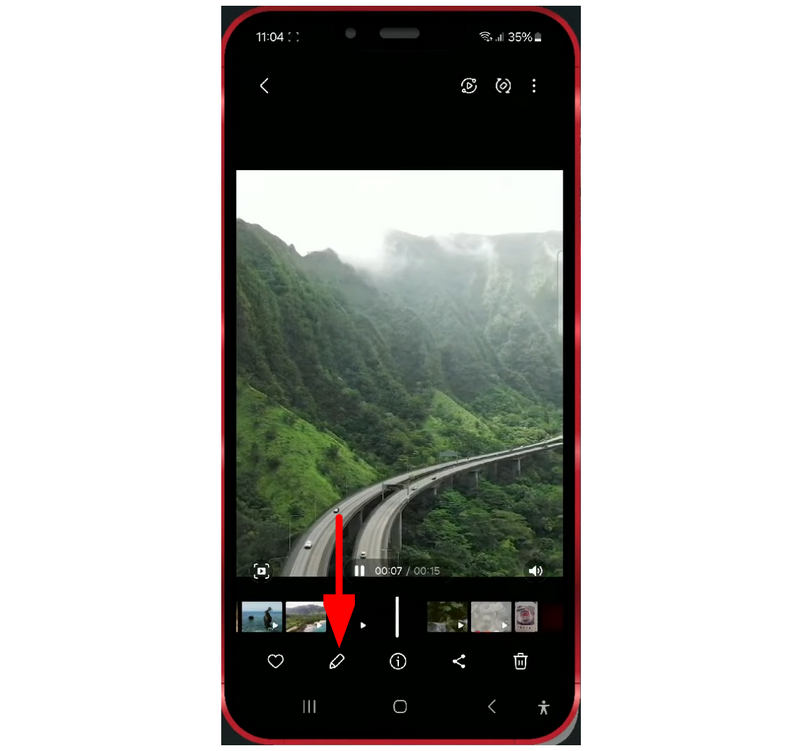
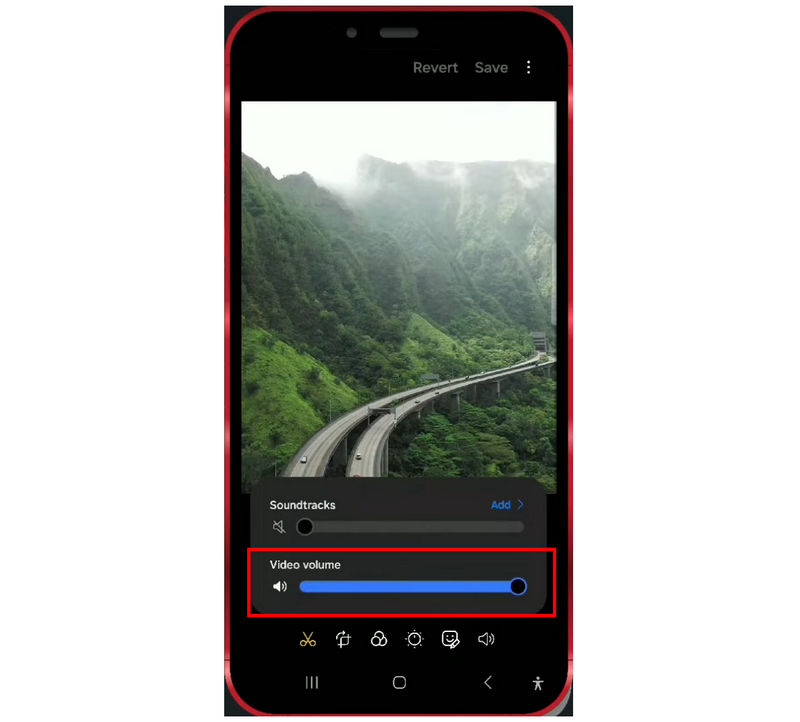
In the Samsung Gallery video editor, select the Volume option.
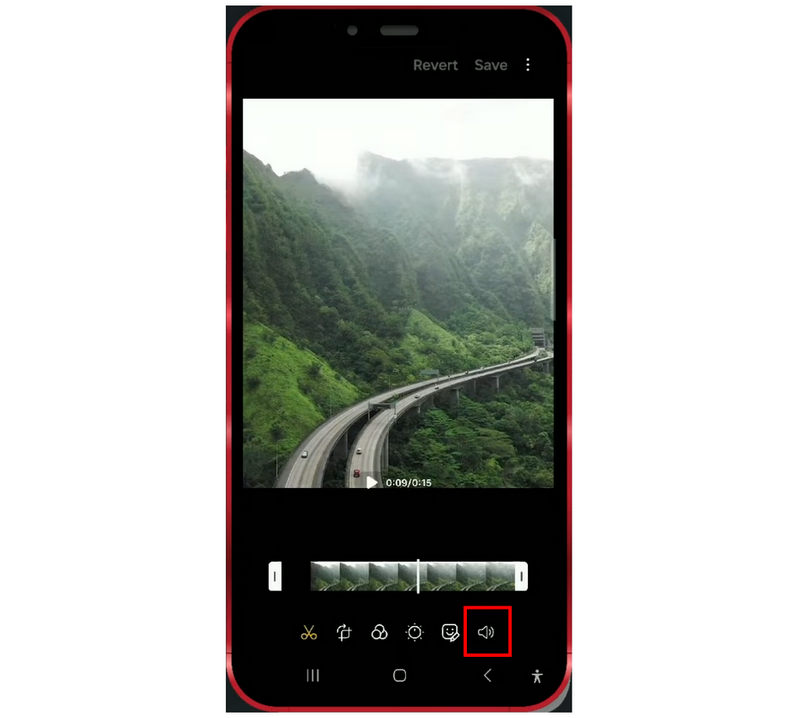
Adjust the Video Volume slider to the left to reduce the volume or mute it completely.
Once the video is muted, tap Save to start producing the video now with audio removed.
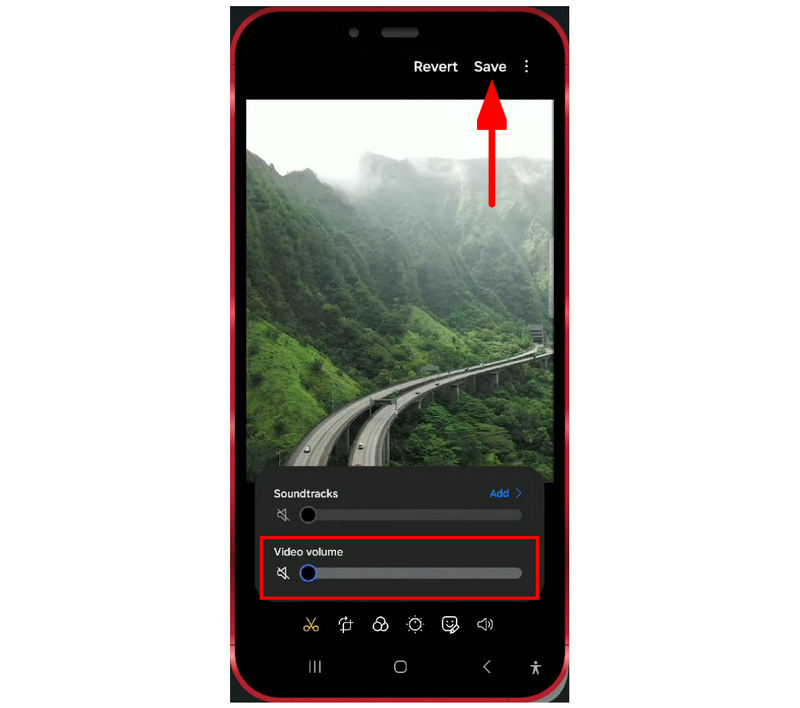
Although Samsung Gallery lacks a dedicated mute button, the video volume slider offers more options. In addition to removing sound from a video, you can also use Samsung Gallery to reduce the volume of video files.
Part 3. Remove Audio from Video on Windows & Mac
Windows Clipchamp
The built-in video editing tool in Windows, the Clipchamp app, works well for basic edits to video files. This includes removing video noise, which can be applied once the video you are editing is added to the editing timeline.
Windows Clipchamp is a good bridging software to learn the basics of advanced video editing tools when transitioning from beginner-friendly editing solutions. The program has managed to strike a balance by using a drag-and-drop system, well-labelled editing tools, and a traditional editing timeline.
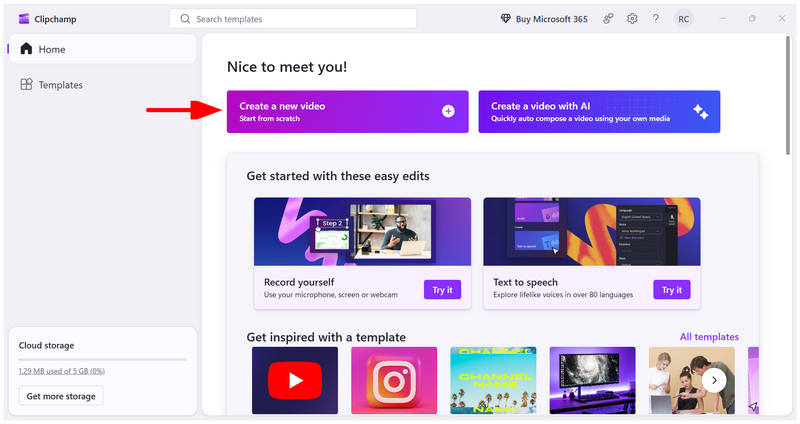
Open Clipchamp and select Create a New Video to begin a new video project.
In Clipchamp’s main editor, select Import.
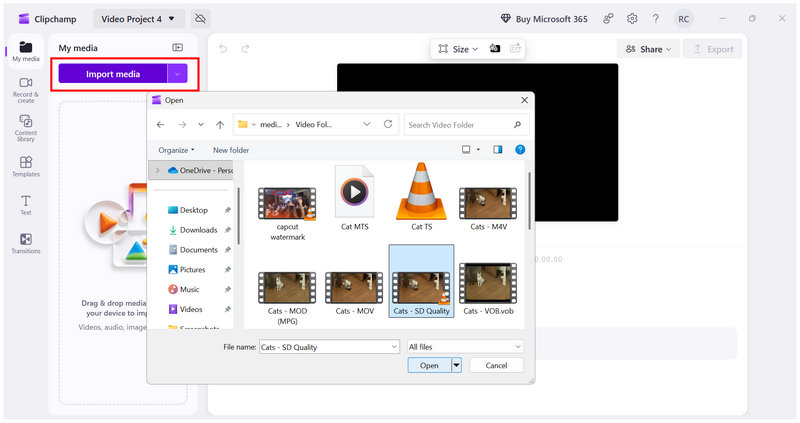
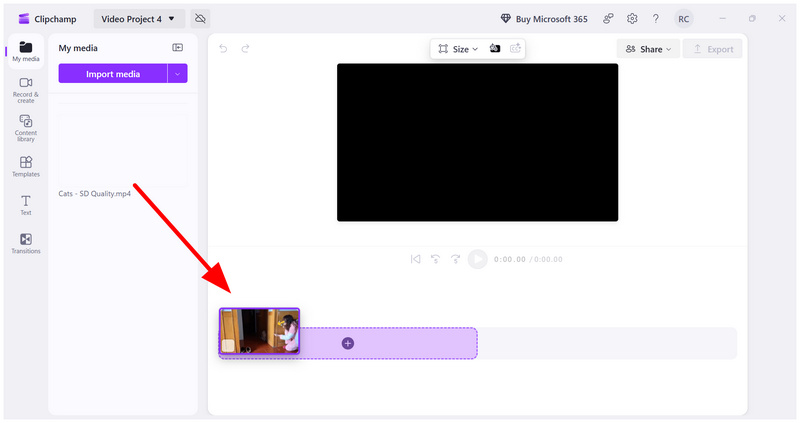
With the video imported, click and drag the video file to the Editing Timeline.
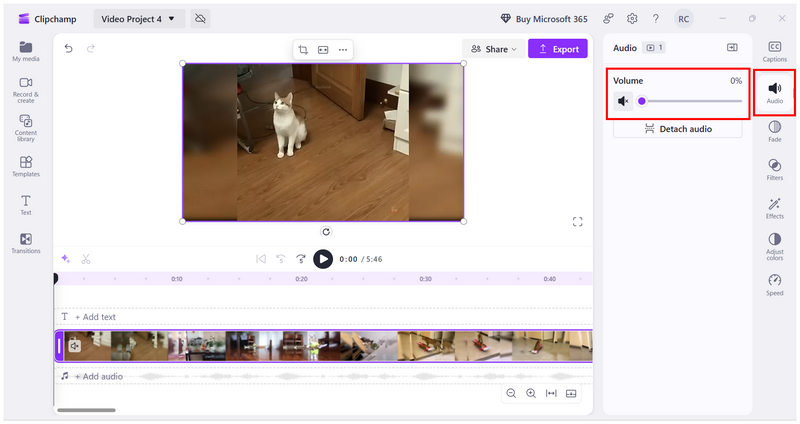
With the video now imported into the Editing Timeline, select Audio and set the Volume Slider to zero. Your video is now muted.
If you are a complete beginner, Clipchamp is a good starting point for learning the basics of video editing, though its features are more limited than those of the best video noise remover tools. Given its design principles, muting video files in the program was also made as simple as possible.
Mac QuickTime
For Apple users, the QuickTime App was designed as a general multimedia tool for opening media files, browsing images, and performing basic editing. With that in mind, the program’s edit function offers a straightforward Remove Audio option made for muting videos.
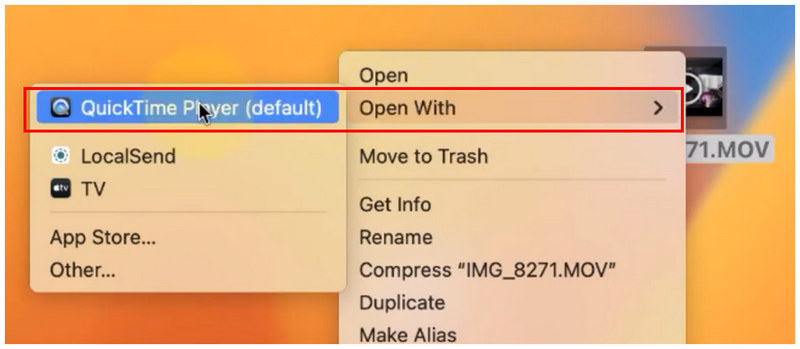
Find the video you want to edit in your local files, then right-click it. Then, hover over Open With and select QuickTime Player.
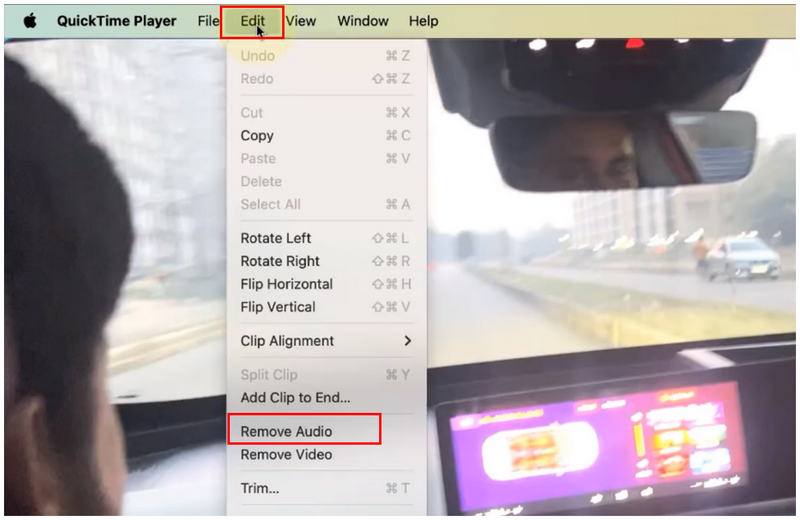
In QuickTime Player, select Edit, then select Remove Audio.
To save the audio removal adjustment, click on File, then Save.
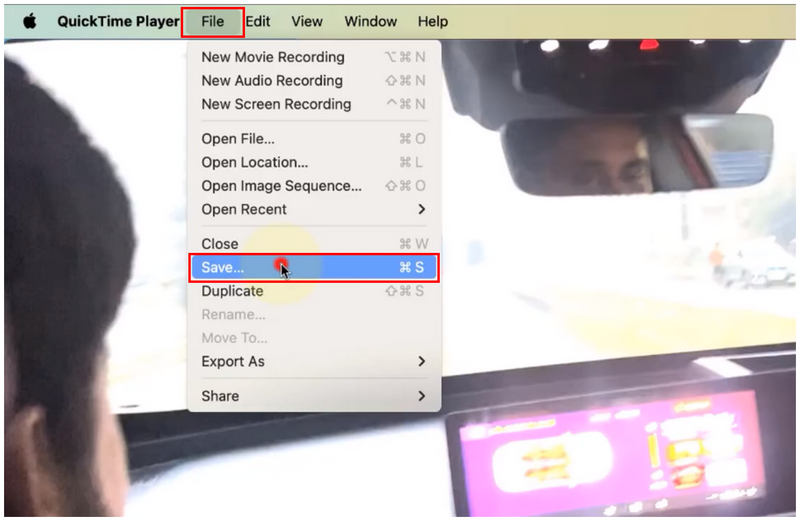
In the save file pop-up menu, edit the Export As tab to rename the video file for easier identification. Then set the save location by editing the Where option, and click Save to begin exporting the video now, with audio removed.
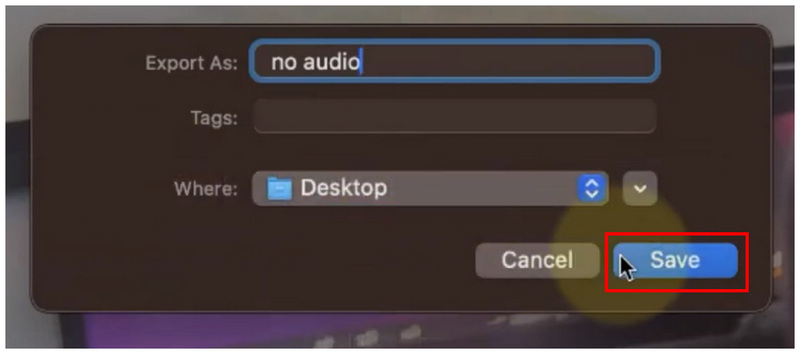
Exporting edited videos on QuickTime is safe from unwanted overriding. Instead, the tool exports a new copy of the videos it edits. You will be able to preserve the original video with audio.
ArkThinker Video Converter Ultimate (Windows & Mac)
With two of the built-in video editor options on Windows and Mac now discussed, let us move on to the versatile multimedia editing tool in ArkThinker Video Converter Ultimate, which includes a dedicated audio channel editor for removing the audio track.
Although it was designed to convert media files to different formats, ArkThinker’s Convert tab offers versatile output settings that let you disable the audio track in converted files.
As such, you can use the tool to remove audio from a video by removing the embedded audio channel. For an easier time learning and understanding how it functions, make sure to read our three-step guide below.
Do not forget to download the software to make it easy to learn how to use it.
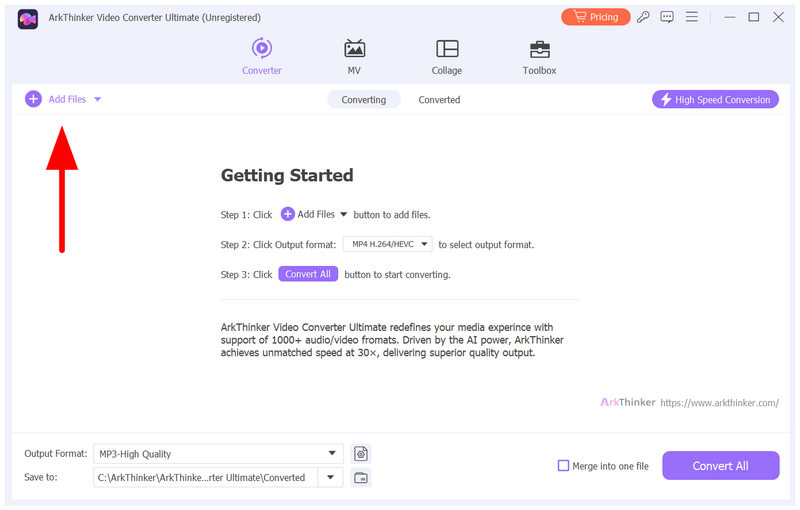
Open ArkThinker Video Converter Ultimate and select Add Files to import the video you want to edit.
With the video imported, click the Audio Channel dropdown menu in the Output settings. Set the channel to Audio Track Disabled.
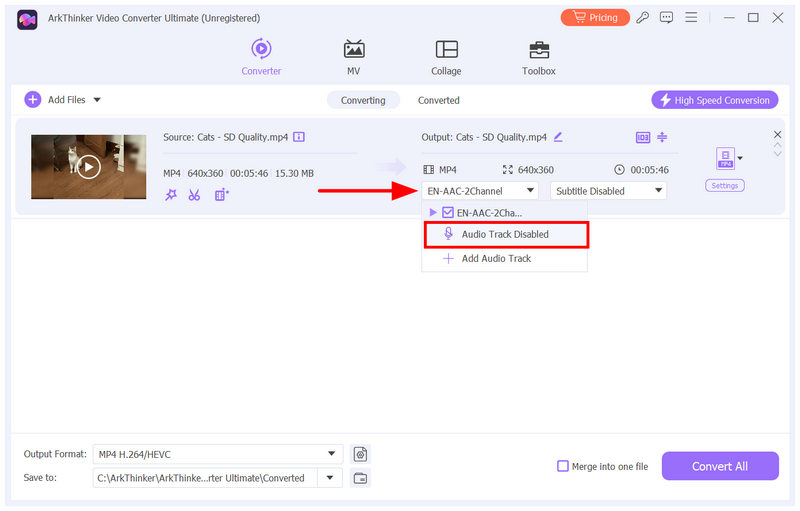
Now that the Output file’s audio channel is disabled, double-check if the Output Format you will use is the same as your source’s file type. Finally, click Convert All to start producing your video now, with its audio channel completely removed.
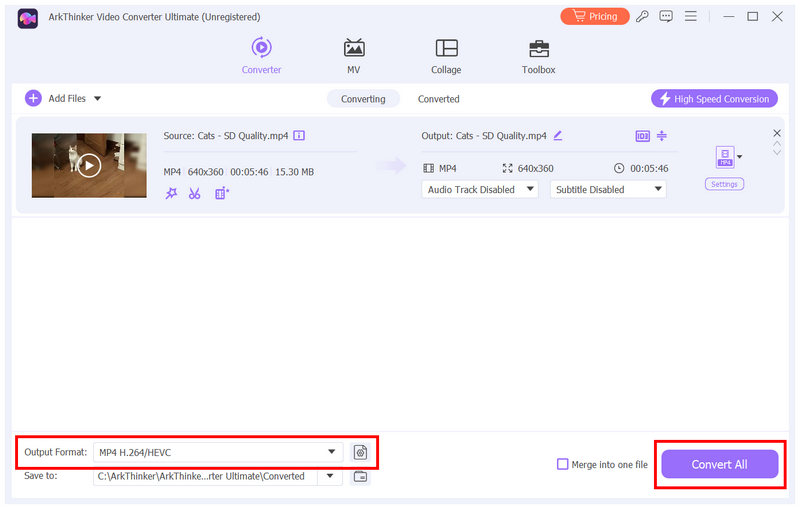
Since ArkThinker Video Converter Ultimate does not use an editing timeline or advanced settings, it is the most efficient and easiest option for beginners to mute video files.
Part 4. Remove Audio from Video Online Free
Canva
We will start with the browser-based solutions with Canva; although better known as a photo editor, it has a functional video editing feature that can be used to mute audio in a video file. Moreover, the program’s interface is easy to use, making it practical to remove audio from a video in Canva.
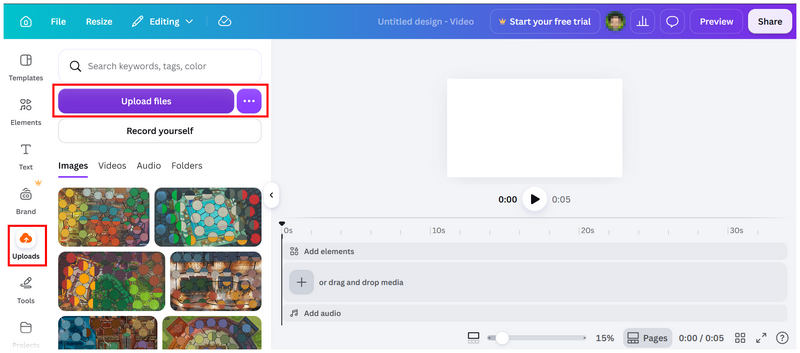
Go to Canva’s video editor and select Upload to import the video file from which you want to remove the audio.
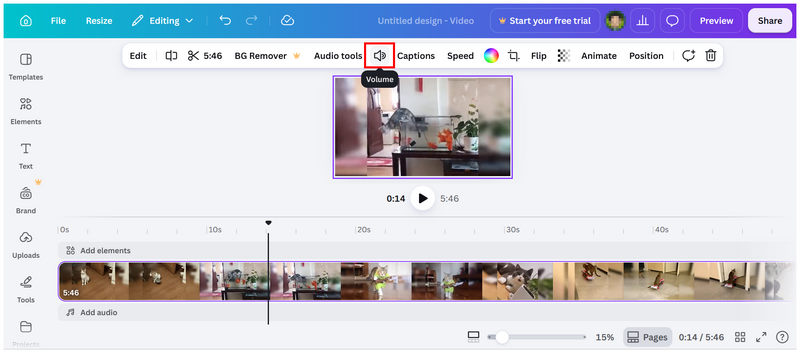
With the video now uploaded, select it in the editing timeline. Then, click on Volume.
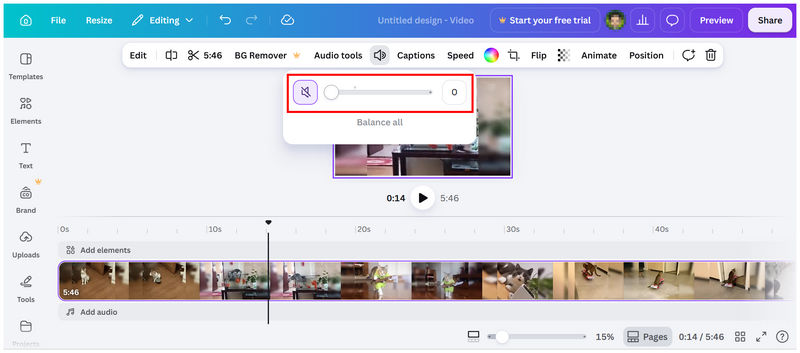
In the Volume menu, set the Volume Slider to the left to mute your audio.
If you are already familiar with video editing software, Canva makes for a good choice. It also serves as an alternative to Adobe Express for removing audio from video and can even be a good volume booster, since its volume slider lets you increase the volume.
Kapwing
The next option for removing audio from video online is Kapwing. Unlike Canva, this program is a dedicated video editor. This makes it more straightforward to use since it was designed exclusively for video editing. For advanced users, Kapwing can also be used to extract audio from MP4 and other video files.
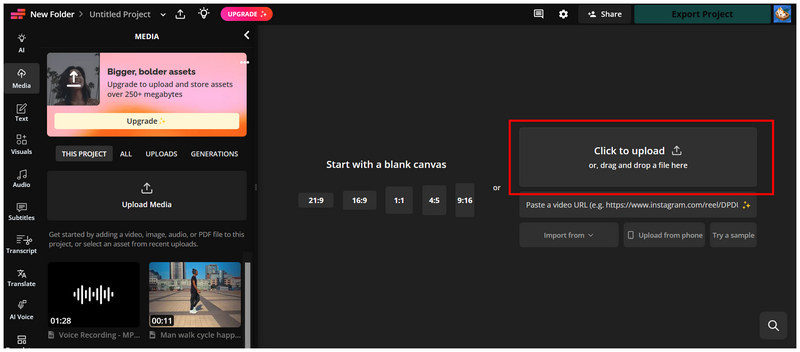
Go to the Kapwing online video editor and select Click to Upload to import the video for editing.
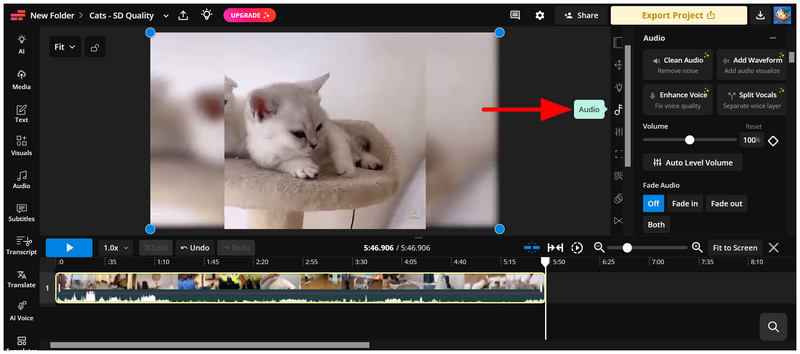
Once the video file is added, select it, then click on Audio settings on the right side of the editor menu.
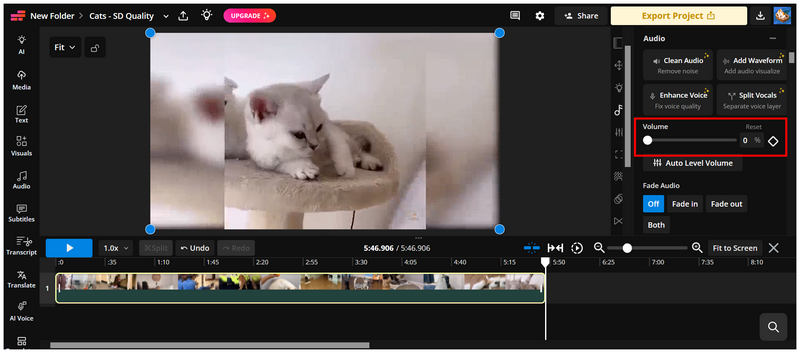
In the Audio settings tab, set the Volume Slider to 0 to mute the video.
Among online video editors, Kapwing is one of the easiest to use. As such, it is our recommended option for video editing beginners who want to use online tools.
Part 5. Advanced Tip: How to Completely Delete Audio Track
FFmpeg Command
Aside from video editors, advanced solutions such as FFmpeg commands can also be used to delete audio tracks completely. Although this is not advisable for beginners, it is by far the most practical and fastest option for editing media files.
Open your operating system’s terminal software. In Windows, open Command Prompt. In macOS, open Terminal.
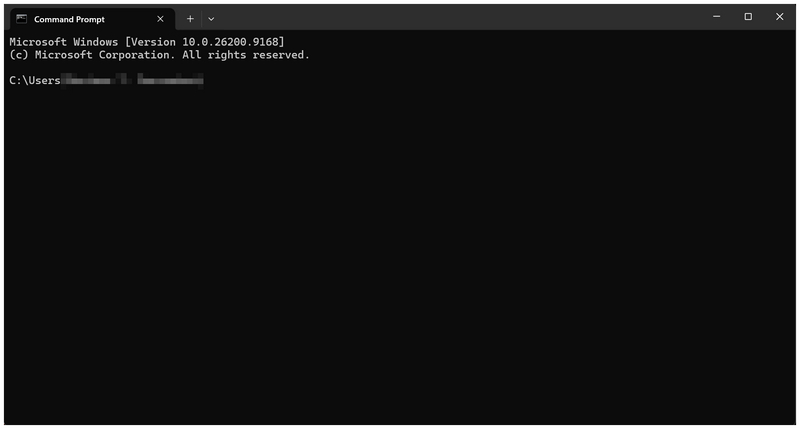
In your command-line app, copy and paste the following command: ffmpeg -i input.mp4 -an -c:v copy output.mp4
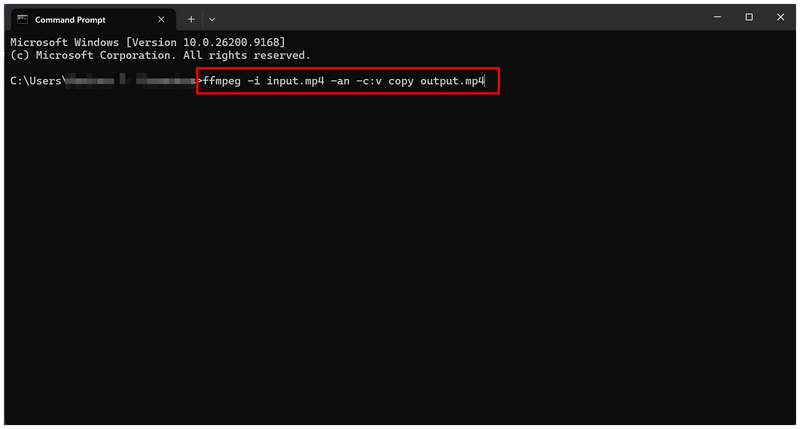
Once the command is pasted, replace “input.mp4” with the name of the video you want to edit. Then, change the “output.mp4” filename to set the name of your new muted video.
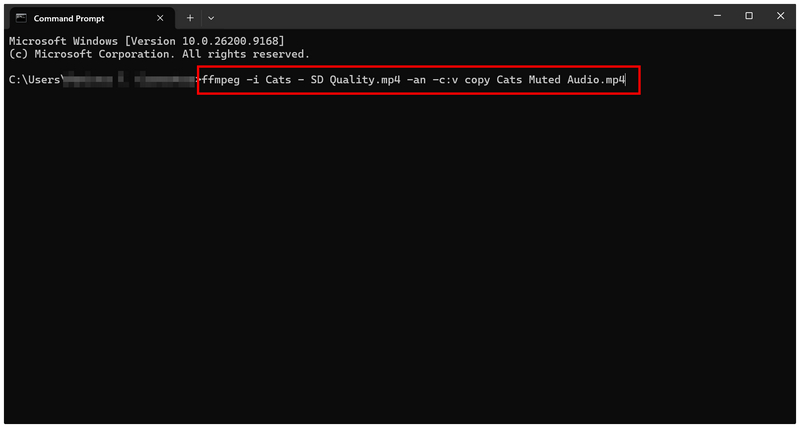
Take note that we do not recommend FFmpeg for beginners, as using command lines is very complex to learn, let alone apply effectively.
VLC Media Player
VLC Media Player is a famous free media player that supports a wide range of formats. It also serves as a video editor that lets you remove audio from a video. The built-in Convert/Save feature lets you create a duplicate video file with the audio stream removed while preserving your original file. If you have VLC installed on your computer, it is a flexible option for removing audio from video files.
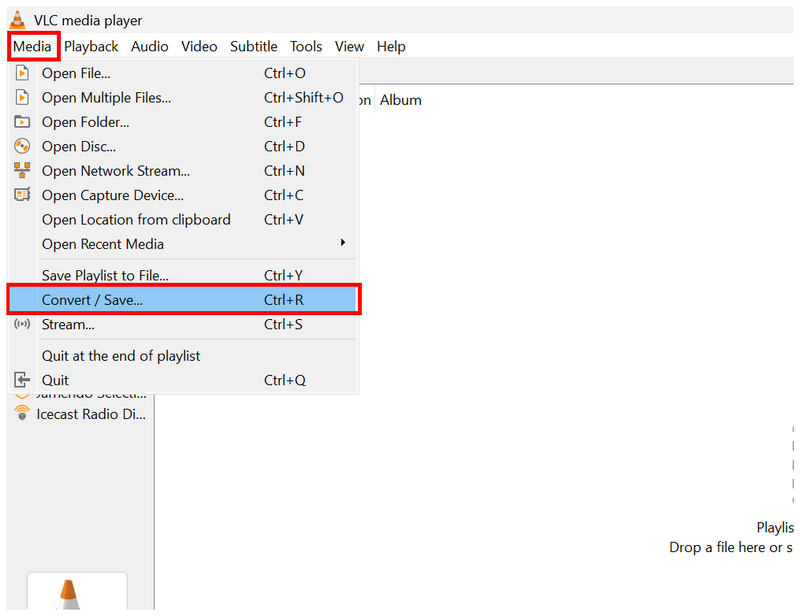
Open VLC Media Player and select Media, then choose Convert/Save.
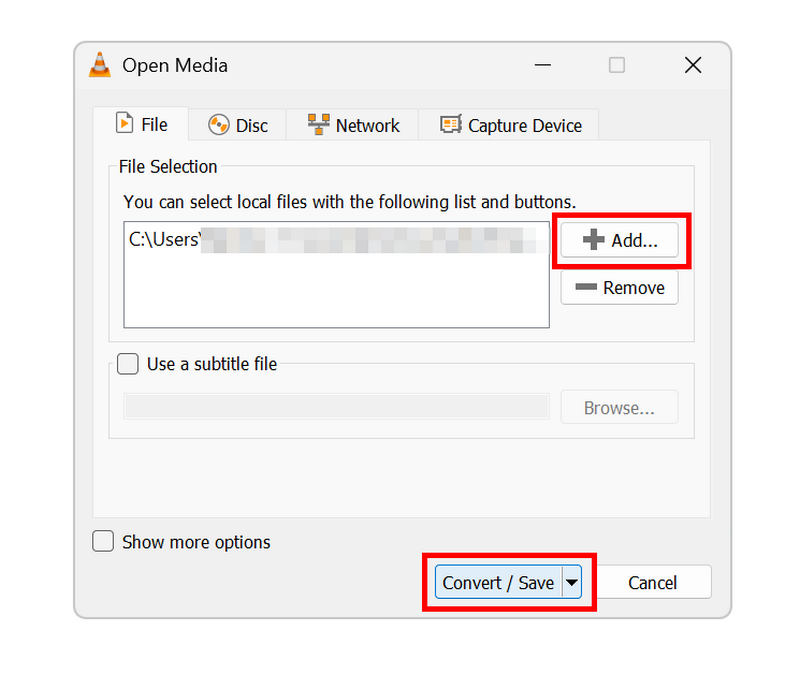
In the Open Media option, select Add to import the video for editing. Then select Convert/Save once the file has been added.
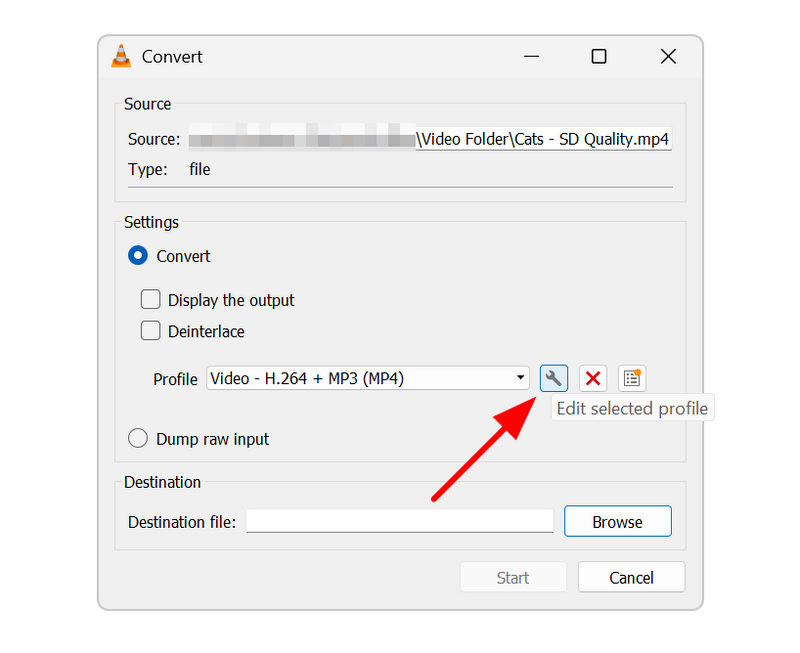
In the Convert menu, select the Wrench icon in the Profile you will use for conversion.
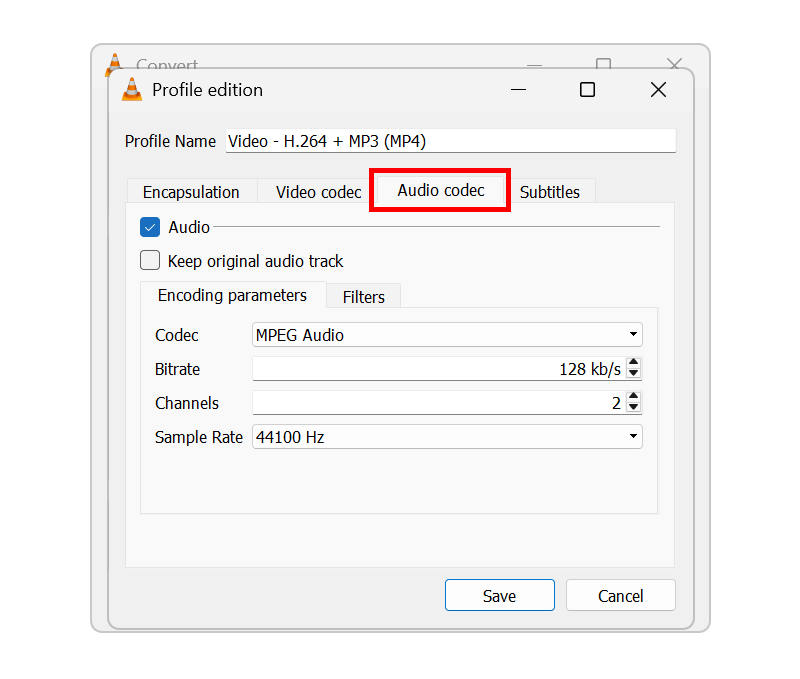
In the Profile settings, go to Audio Codec.
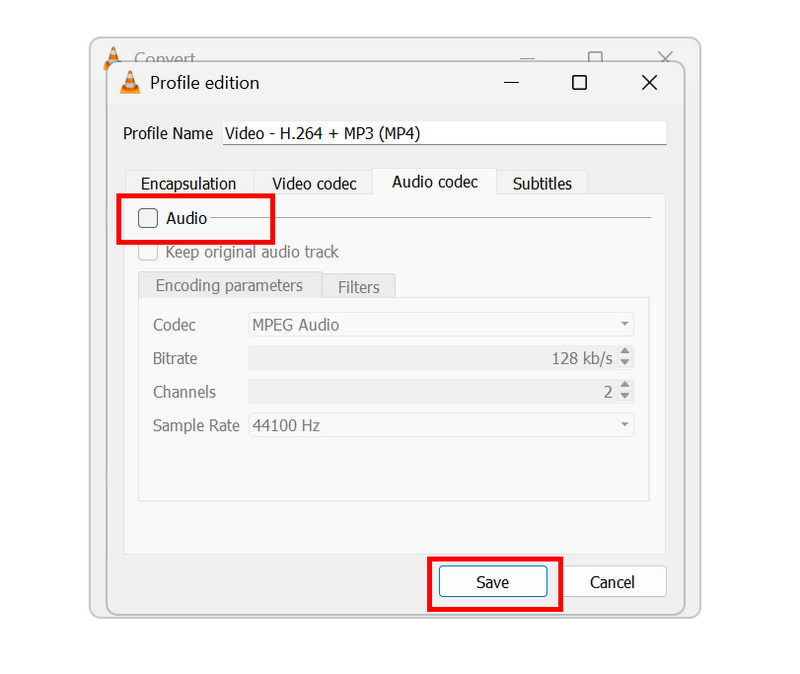
Then, uncheck the Audio checkbox to disable it. Click Save to confirm.
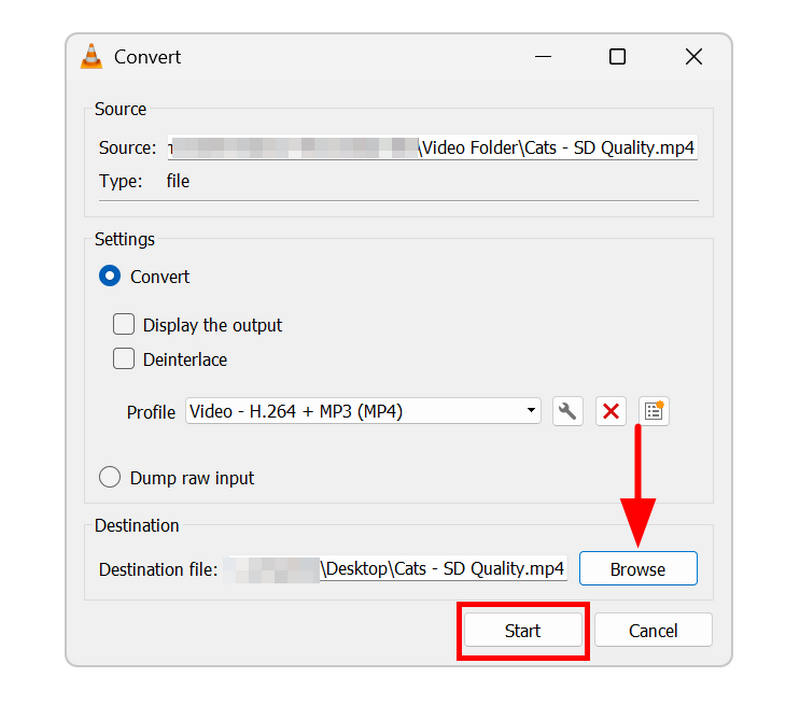
Back in the Convert settings, click on Browse to set the save location of your muted video. Then click Start to begin producing the video with its audio fully removed.
This makes the program a solid option for users who do not want to adopt new software and prefer to rely on what they already have.
Part 6. FAQs About Removing Audio from Video
Does muting a video reduce its file size?
No, it does not. If it does, the file size reduction is negligible. Reducing the duration or editing the quality is the more effective solution to reduce file size.
How to remove background noise while keeping the human voice/dialogue?
You have to use advanced video editors to remove background noise cleanly. Good options are professional tools like Adobe Premiere Pro. Professional-grade editors can be used to separate audio tracks.
Can I restore the original audio after deleting it?
It depends on the editor you will use. To avoid permanent deletion, always export the edited video as a new file. Besides, keeping a file backup will always be a wise choice.
Are video editors the only option for removing audio from videos?
No, they are not. However, they are the most popular choice. In this article, we have added the multimedia editing tool to ArkThinker Video Converter Ultimate to remove audio.
What is the easiest tool to remove audio from video?
The easiest solution is to use non-video editing programs. In this article, we have provided three solutions: ArkThinker Video Converter Ultimate, VLC, and FFmpeg commands. Among the three, ArkThinker’s is the easiest.
Conclusion
Now that we have reviewed and provided detailed tutorials on removing audio from videos using video editing tools, multimedia programs, and advanced command-based editing. We hope you can now select the option that best fits your technical skills and audio-video editing needs. Among these programs, we highly recommend ArkThinker Video Converter Ultimate for its sheer versatility and practical uses. To experience sheer practicality, you may download the software using the link below.
What do you think of this post? Click to rate this post.
Excellent
Rating: 4.9 / 5 (based on 703 votes)


