


2 відомі методи видалення водяного знака в GIMP із зображення
У вас є зображення, яке містить водяний знак, і плануєте його видалити? Ну, ці водяні знаки зазвичай псують красу певної фотографії. Тому деякі не могли використовувати його, коли забажали, через водяні знаки. GIMP — це один із багатьох способів видалення водяних знаків. З цим ми надали покроковий посібник із використання GIMP про те, як видалити водяні знаки. Мало того, що ми також поділилися альтернативою, яку ви можете спробувати. Таким чином, у вас буде інший варіант. Читайте та гортайте тут.

- СПИСОК ПОСІБНИКІВ
- Частина 1. Як видалити водяний знак за допомогою GIMP
- Частина 2. Найкраща альтернатива GIMP
- Частина 3. Поширені запитання про те, як видалити водяний знак за допомогою GIMP
Частина 1. Як видалити водяний знак за допомогою GIMP
Видалення водяних знаків дійсно стало звичайною необхідністю. Хтось робить це для особистого використання, а хтось для творчих проектів. Маючи це на увазі, GIMP є одним із інструментів, які багато хто використовує для такого типу потреб. GIMP означає GNU Image Manipulation, який є популярним редактором зображень в Інтернеті. Він пропонує безкоштовні підходи для видалення небажаних водяних знаків. У цій частині ми обговоримо два ефективні методи видалення водяних знаків із зображень за допомогою GIMP. Без зайвих слів, давайте продовжимо.
Спосіб 1. Використовуйте інструмент клонування
Метод інструмента Clone — це найпростіший спосіб видалити водяні знаки з ваших зображень. Це спосіб копіювання подібної частини фотографії. Після цього ви вставите його у свій водяний знак і змішаєте. Ось як:
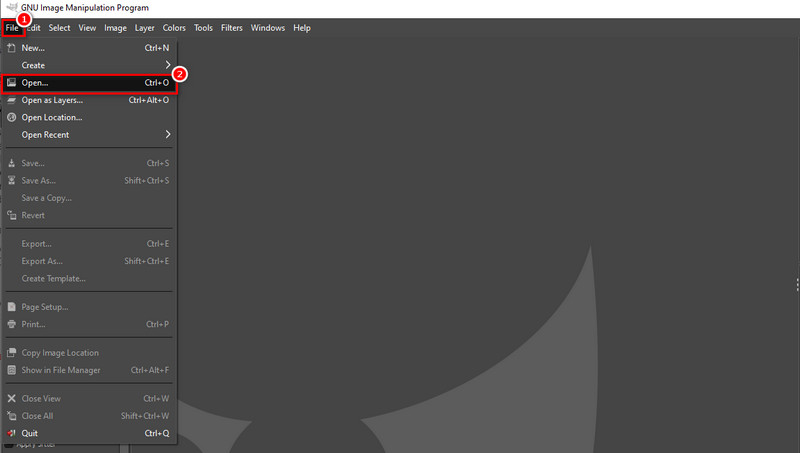
Переконайтеся, що програмне забезпечення GIMP завантажено та встановлено на вашому комп’ютері. Перейдіть на вкладку «Файл» і натисніть опцію «Відкрити» у спадному меню. Ви також можете натиснути CTRL+O, щоб завантажити зображення.
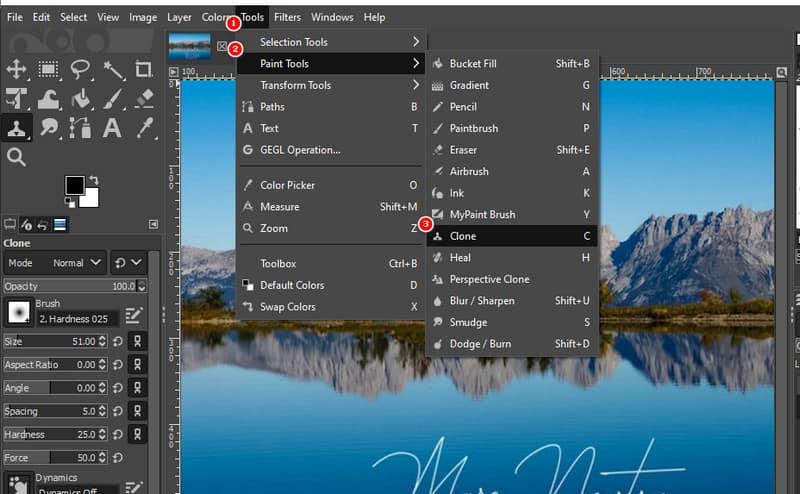
Після цього перейдіть на вкладку Інструменти та виберіть Інструменти малювання. Потім натисніть опцію «Клонувати». Налаштуйте розмір пензля відповідно до частини навколо водяного знака. Тепер виділіть і скопіюйте схожу область зі свого зображення. Роблячи це, натисніть клавішу CTRL.
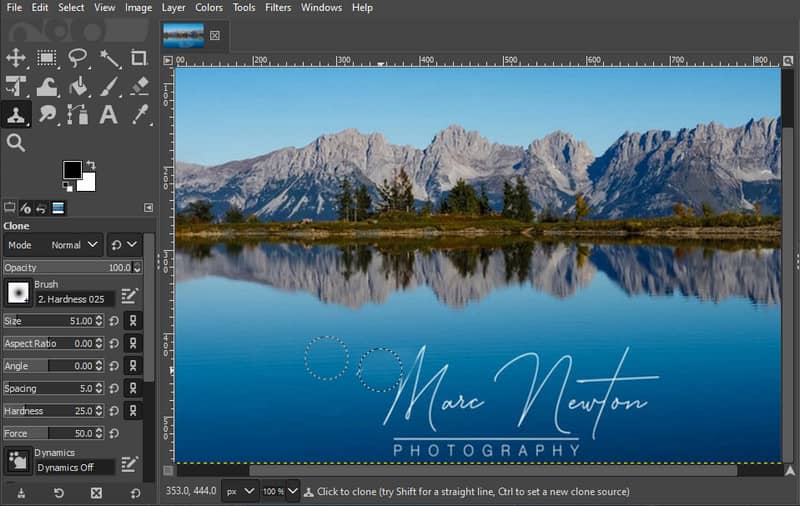
Тепер почніть видаляти водяний знак, зафарбовуючи водяний знак у вибрану вами область. Зробіть це, відпустивши клавішу CTRL, переміщаючи курсор, щоб намалювати водяний знак. Обов’язково змішайте його з вибірковими пікселями, щоб він виглядав гладким.
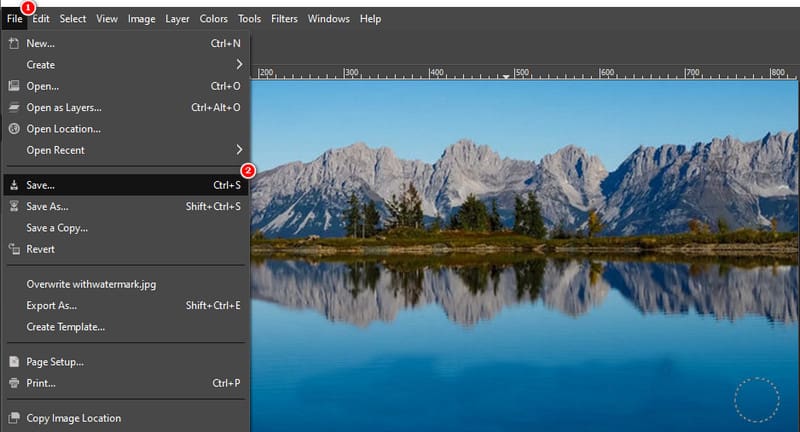
Коли ви закінчите, настав час зберегти зображення без водяного знака. Перейдіть на вкладку «Файл» і виберіть опцію «Зберегти». Нарешті виберіть папку призначення для експорту файлу. І це все!
Спосіб 2. Ресинтез за допомогою фільтра вибору Heal
Resynthesizer – це плагін, який ви встановили у своєму GIMP. Він надає різні інструменти для редагування ваших зображень. З його допомогою ви також можете видалити водяний знак у GIMP. Спочатку переконайтеся, що плагін resynthesizer встановлено. Коли все буде готово, ось як видалити водяний знак у GIMP за допомогою Heal Selection:
Виберіть інструмент вибору, який ви хочете використовувати відповідно до ваших уподобань. Для виділення області водяного знака можна скористатися інструментом «Вільне виділення» або «Ножиці».
Після вибору перейдіть на вкладку «Фільтри» та виберіть опцію «Покращення». У спадному меню, яке підкаже, виберіть опцію «Вибір лікування».

З’явиться діалогове вікно, у якому потрібно вказати процес відновлення. Налаштуйте параметри відповідно до ваших потреб. Задовольнившись, натисніть OK, щоб вилікувати вибрану область із фотографії.
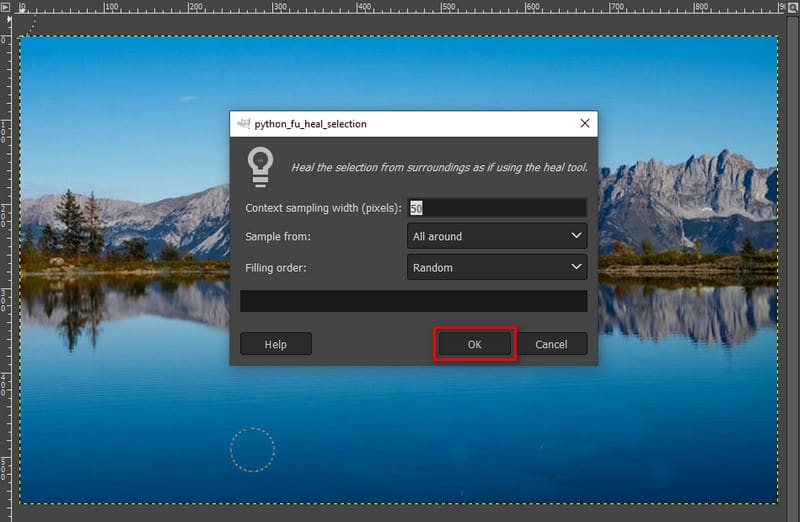
Коли все буде готово, збережіть зображення без водяного знака. Нарешті, ви можете використовувати його для своїх потреб.
Частина 2. Найкраща альтернатива GIMP
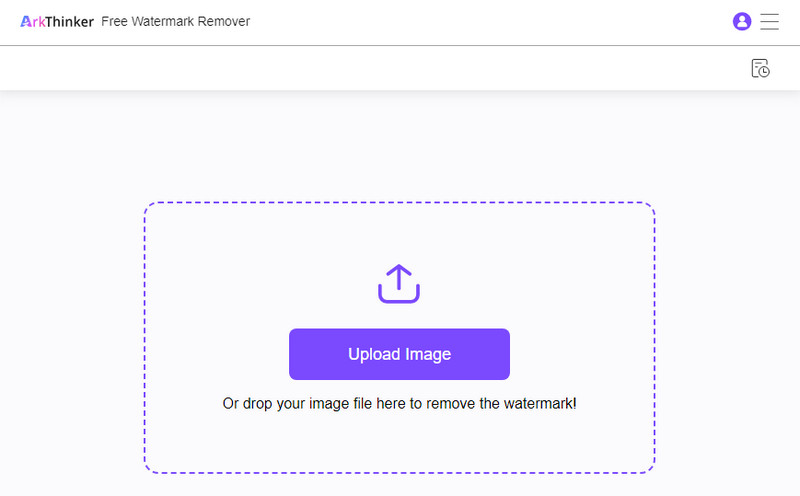
Якщо ви вважаєте описані вище методи складними та шукаєте альтернативу GIMP, ми допоможемо вам! Однією з найкращих альтернатив, яку ми рекомендуємо, є ArkThinker Безкоштовний засіб для видалення водяних знаків онлайн. Це спеціальний засіб для видалення водяних знаків, який може видаляти логотипи, текст, штампи тощо. Інструмент також підтримує різні типи форматів зображень, такі як JPG, JPEG, PNG тощо. Він також застосовує технологію AI для видалення водяних знаків із ваших фотографій. Таким чином, він відновлює вихідне зображення після видалення водяного знака. Крім того, він підтримує якість ваших фотографій. Тепер ось як видалити водяний знак за допомогою цієї платформи:
Завантажте фотографію з водяним знаком.
Перейдіть на офіційний сайт ArkThinker Безкоштовний засіб для видалення водяних знаків онлайн. Опинившись там, натисніть кнопку «Додати файл до пуску», щоб почати. Тепер виберіть «Завантажити зображення», щоб додати зображення з водяним знаком.
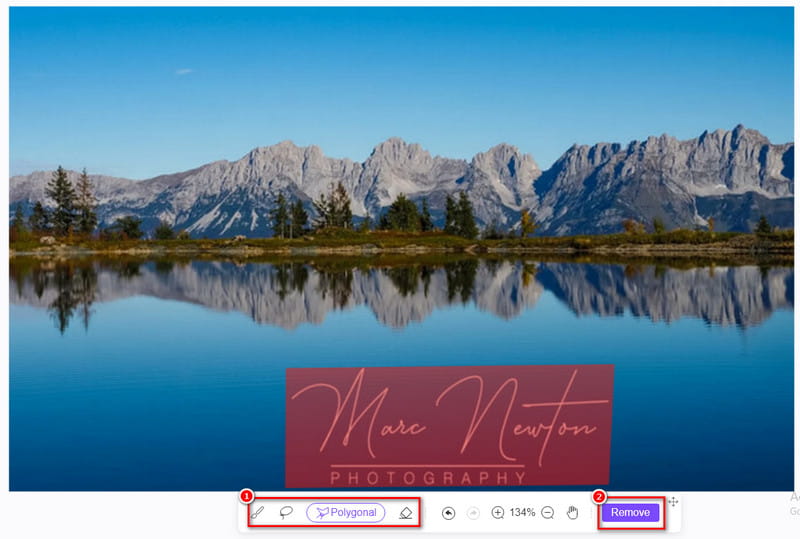
Виберіть і видаліть водяний знак.
Використовуючи такі інструменти виділення, як «Ласо», «Багатокутник» і «Пензель», щоб вибрати частину водяного знака. Після завершення вибору натисніть кнопку Видалити. Потім почнеться процес видалення.
Збережіть фото.
Коли ви задоволені, натисніть кнопку «Завантажити», щоб експортувати зображення. Крім того, ви можете спочатку обрізати його перед збереженням.

Частина 3. Поширені запитання про те, як видалити водяний знак за допомогою GIMP
Чи безпечно використовувати видалення водяного знака GIMP?
Звичайно так! Сам GIMP безпечний для встановлення та використання на вашому комп’ютері. Перейдіть на офіційний веб-сайт, щоб завантажити його. Що стосується видалення водяного знака, то воно також безпечне, якщо використовувати його відповідально та в межах закону. Завжди переконайтеся, що ви маєте право змінювати зображення.
Як видалити напівпрозорий водяний знак за допомогою GIMP?
Для видалення напівпрозорих водяних знаків GIMP використовує ресинтезатор. Але зауважте, що у вашому браузері має бути встановлено плагін resynthesizer. Тепер ось як видалити напівпрозорий водяний знак за допомогою GIMP:
Крок 1. Завантажте зображення з водяним знаком на інструмент. Використовуйте маркер виділення (безкоштовний інструмент або ножиці), щоб вибрати водяний знак.
Крок 2. Далі перейдіть до «Фільтрів» і натисніть «Покращити» в опції. Після цього виберіть у підменю опцію «Зцілити». Потім надайте необхідні відомості.
Крок 3. Нарешті натисніть кнопку OK, щоб продовжити. Тоді у вас є зображення без водяного знака. Збережіть відредаговане зображення на комп’ютері.
Чи можна використовувати GIMP для видалення водяних знаків із відео?
GIMP — це переважно редактор зображень, а його інструменти розроблені для статичних зображень. Для видалення водяних знаків із відео може знадобитися програмне забезпечення для редагування відео, і процес може бути складнішим.
Чи можливо GIMP додати новий водяний знак до зображення?
Так, GIMP дозволяє додавати водяні знаки до зображень. Ви можете створити текстовий або графічний водяний знак і налаштувати його прозорість, положення та розмір. Це часто робиться, щоб захистити вашу власну роботу або додати бренд.
Висновок
Підводячи підсумок, це як видалити водяний знак за допомогою GIMP використовуючи 2 способи. Окрім цього, ви повинні знати найкращу альтернативу для видалення водяних знаків. І це те ArkThinker Безкоштовний засіб для видалення водяних знаків онлайн. Це інструмент, який може видалити майже всі типи водяних знаків на ваших фотографіях. Хороша річ у ньому те, що він 100% безкоштовний. Крім того, вам не потрібні навички, щоб допомогти вам позбутися водяних знаків. Щоб дізнатися більше про його можливості, спробуйте скористатися ним сьогодні!
Що ви думаєте про цю публікацію? Натисніть, щоб оцінити цю публікацію.
Чудово
Рейтинг: 4.9 / 5 (на основі 470 голоси)
Знайти більше рішень
Видалити водяний знак Adobe Stock із зображення [Повний посібник] Топ-2 способи швидкого видалення водяного знака Getty Images Як за допомогою Photoshop ефективно видалити водяний знак Як додати водяний знак до відео на різних пристроях 2024 Видаліть водяний знак із відео за допомогою 4 засобів для видалення водяних знаків Повний посібник із видалення водяного знака Wondershare FilmoraВідносні статті
- Редагувати зображення
- Як редагувати та обрізати анімовані GIF-файли 4 ефективними способами
- 10 GIF-конвертерів для перетворення між зображеннями/відео та GIF-файлами
- Найкращі інструменти GIF-редактора, які підходять для будь-яких комп’ютерів і пристроїв
- Як створити GIF із зображень на комп’ютері та мобільному телефоні
- Швидкі кроки щодо додавання тексту до GIF за допомогою інструментів створення підписів
- Додайте музику до GIF: додайте музику до свого GIF після конвертації
- GIF Resizer: найкращі інструменти для зміни розміру вашого анімованого GIF
- [6 інструментів] Як налаштувати зміну циклу GIF і відтворювати його назавжди
- GIF Cutter: як вирізати GIF простими та швидкими методами
- Як видалити водяний знак Alamy із зображень (100% працює)