


How to Convert HEIC to JPG on Mac Using 5 Options (2026)
When it comes to image quality and compression efficiency, the modern HEIC image format for iPhone is among the best. Although these images are well supported on Mac computers, opening them on devices outside the Apple ecosystem can be challenging, making it practical to convert HEIC to JPG on Mac before exporting. With that in mind, this article aims to provide a detailed guide to using five of the most reliable methods to improve the compatibility of your HEIC images by converting them to JPG. All of our featured methods operate natively on macOS devices for user convenience.

- GUIDE LIST
- Method 1. The Preview App Export Trick (Easiest)
- Method 2. Using macOS “Quick Actions” (Right-click Batch Convert)
- Method 3. Drag and Drop via “Photos” App
- Method 4. Automator Script to Create Quick Action (For Power Users)
- Method 5. Third-Party FREE Online Tool for Automated Conversion
- Part 6. FAQs About Converting HEIC to JPG on Mac
| HEIC to JPG Conversion Methods | Conversion Speed | EXIF Data Retention | Batch Processing Capability | Ease of Use |
| Apple Preview App | Standard | Partial Data Preservation | ❌ | Easy |
| Finder Quick Actions | Fast | Standard Data Preservation | ✅ | Very Easy |
| Apple Photos | Standard | Complete Data Preservation | ✅ | Easy |
| Automator Script | Very Fast | Adjustable Data Retention | ✅ | Hard |
| ArkThinker Free HEIC Converter Online | Fast | Partial Data Preservation | ✅ | Very Easy |
Method 1. The Preview App Export Trick (Easiest)
Best Used For: One-off format conversions or for converting a small group of files.
We will start this guide by presenting the easiest way to convert HEIC to JPG on Mac: the built-in Preview App. If you plan on converting a single HEIC image or only a handful of files, the built-in solution of using Preview’s Export function should be your go-to tool for converting to JPG.
On top of being the easiest, it is also the most accessible since you will most likely view your image using the app. Simply select the File tab, then export it to JPG. To learn how to use this program, please read our three-step tutorial below.
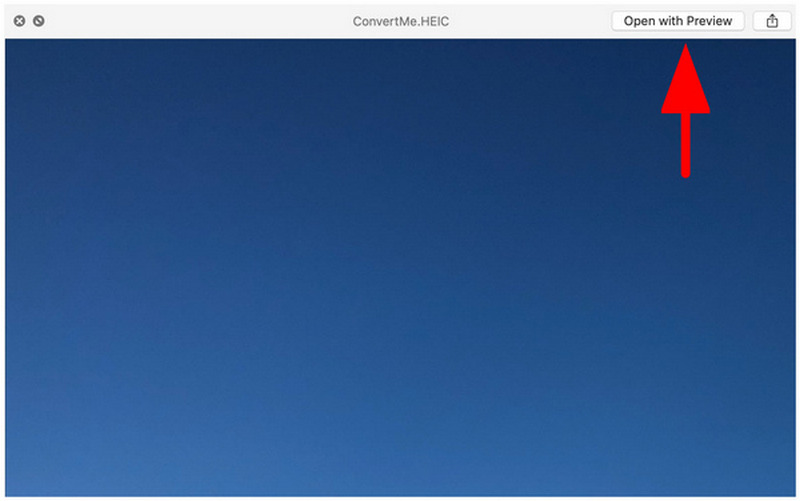
Open the HEIC image you want to open using the Preview app.
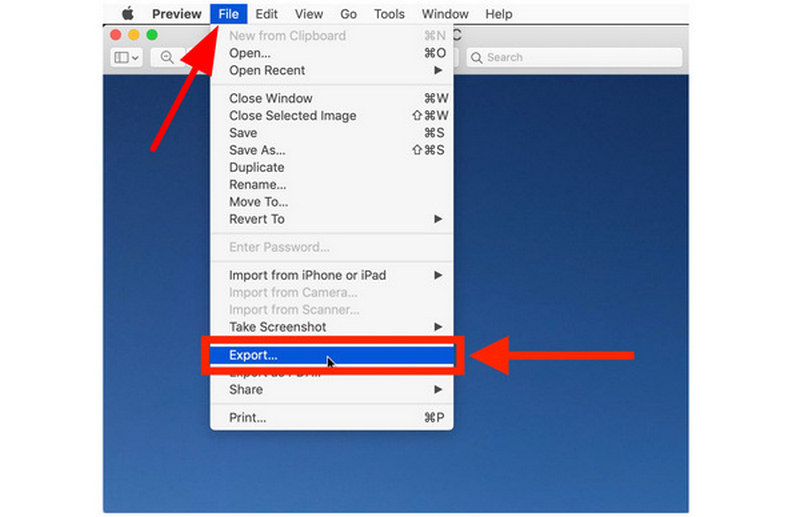
Next, click File, then select Export.
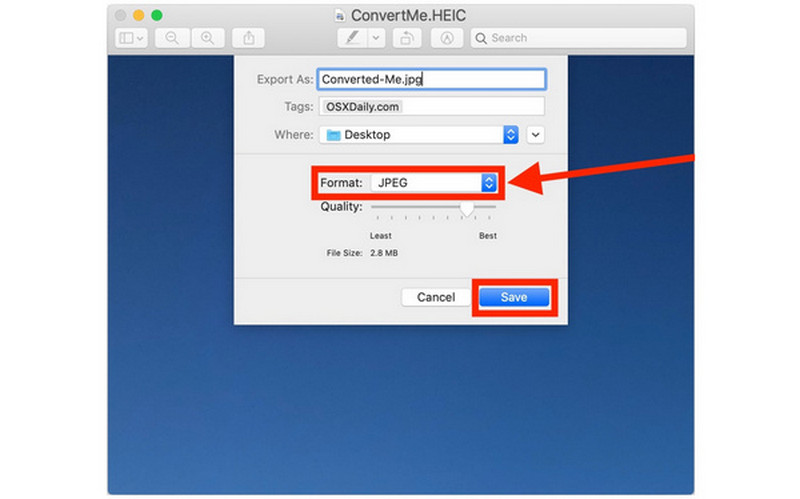
Finally, set the Format to JPEG in your Export menu. Then click on Save.
If you want the quickest solution, the first method with Preview will always be a safe choice. However, if you plan to batch-convert more than a handful of images, please proceed to the next options we will highlight.
Method 2. Using macOS “Quick Actions” (Right-click Batch Convert)
Best Used For: Fast bulk conversions directly in the Finder software.
Although not as fast as Preview when it comes to individual file conversion, the Quick Actions feature of macOS offers more efficient HEIC-to-JPG conversion when you are handling a large quantity of files.
This is more practical if you move all the images you want to convert into a single folder, select them all, and then right-click to batch-convert them. For an easier time learning how to convert from HEIC to JPG on Mac using Quick Actions, please read our guide below.
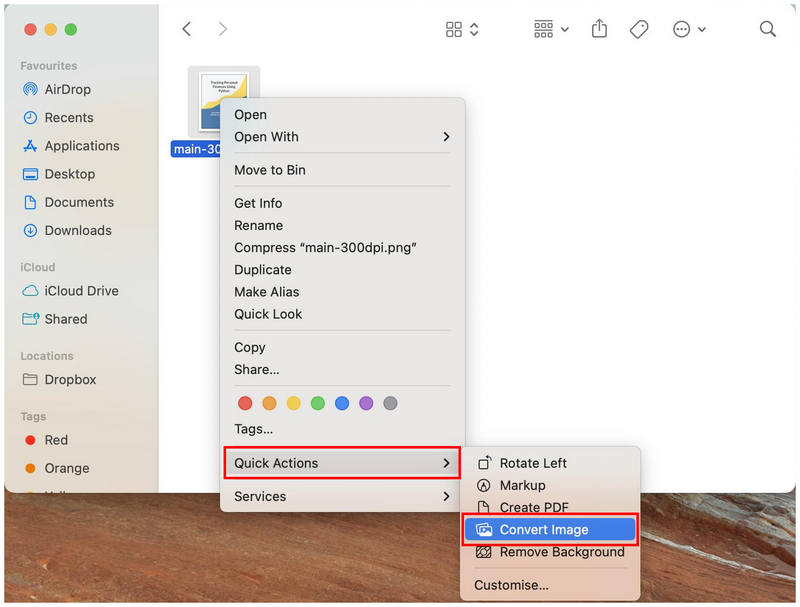
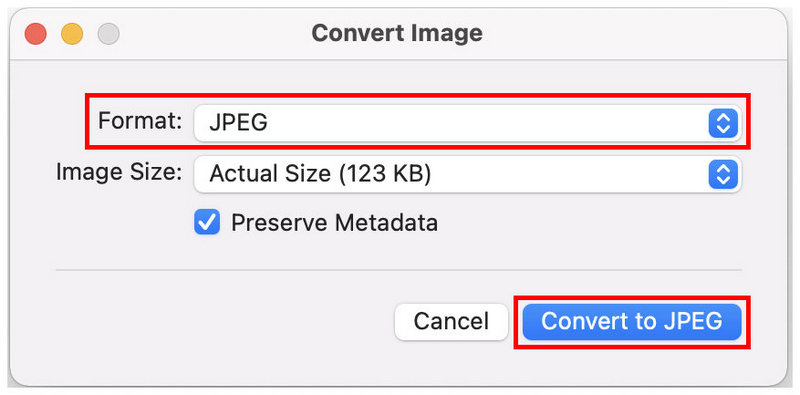
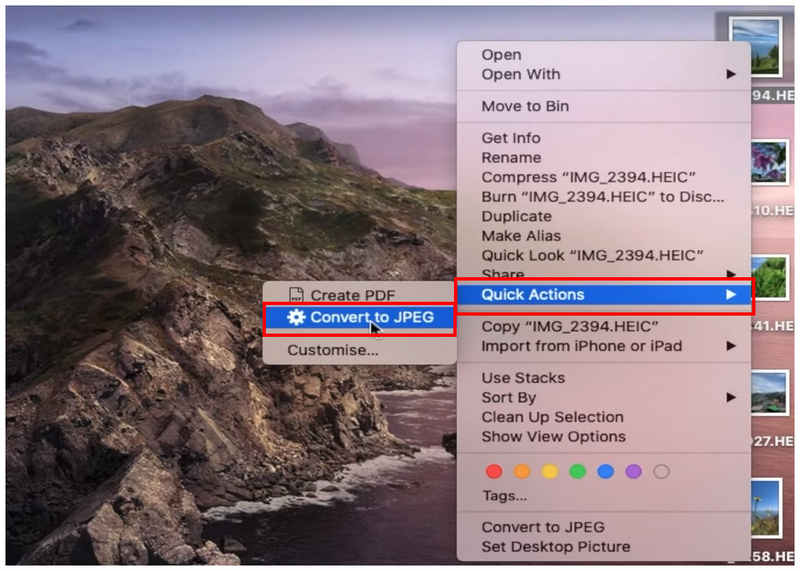
Right-click on the image or images you want to convert, then hover your mouse over Quick Actions. Then, choose Convert Image.
In the Convert Image menu, set the Format to JPEG and customize the Image Size to your needs. With the format set, click Convert to JPEG to begin converting the image to the selected format.
Although it requires a few more clicks than Preview, Quick Actions could still work better for individual files. This feature is also suitable for other multimedia adjustments, such as image compression. However, you won’t be able to double-check whether the image you plan to convert is the right file. That is the advantage of Preview.
Method 3. Drag and Drop via “Photos” App
Best Used For: Preserving the EXIF data from converted HEIC files.
For more technical users who want to preserve the detailed metadata of their images, the Photos app is the best for converting file formats while still maintaining the EXIF data from the original file in the converted one.
Use this method to preserve the image’s capture time and date, original quality, the device that captured it, and other advanced technical details that may be removed when you use Preview or Quick Actions for HEIC-to-JPG conversion.
If you want to learn how to save HEIC as JPG on Mac while preserving EXIF data, please read our guide below.
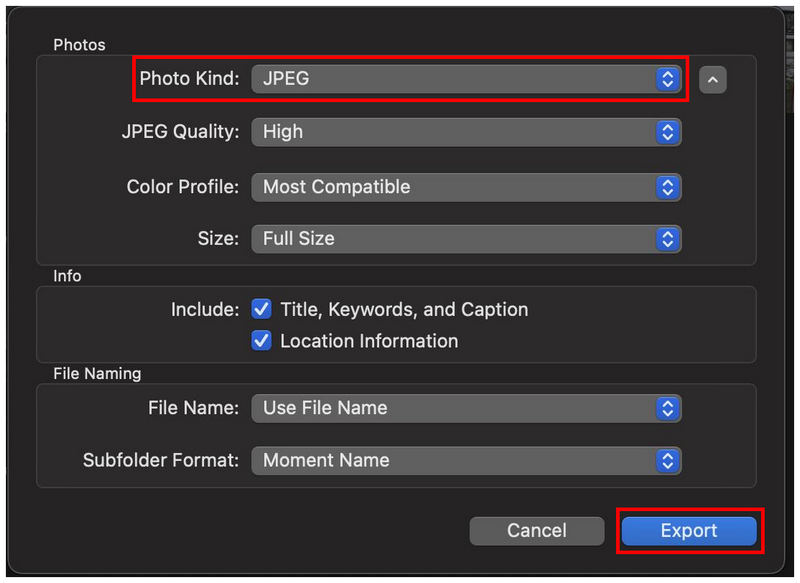
Open your Photos app and then select the images you want to convert. Then select File in the taskbar, and hover your cursor over Export. Then select the method you want to use.

In the file export menu, set the Photo Kind to JPEG. Finally, click on Export to begin converting your selected HEIC images into the format you have set.
Although EXIF data preservation is not as important to casual multimedia users, these details could be crucial if you plan to use your images professionally. One example of the importance of preserving EXIF information is when your image will be used in digital forensics.
Method 4. Automator Script to Create Quick Action (For Power Users)
Best Used For: Converting a large batch of HEIC images.
Last but not least among built-in Apple converters, we have the Automator Script creator for adding the “Convert to JPG” function to the Quick Actions tab. Similar to our first method, this option creates a new Quick Action, but instead of using the Convert option, you can create one that automatically converts the files you select to JPG.
Although this requires a few setups, this method might be the most practical once you move past the initial barrier to entry. Read our guide below to learn how to make a HEIC into a JPG on a Mac using a new Quick Function on your Mac computer.
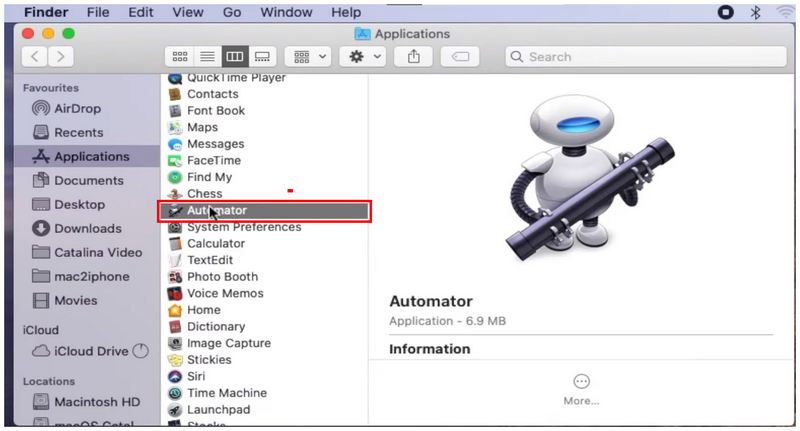
Open Apple Finder and search for the Automator app to open it.
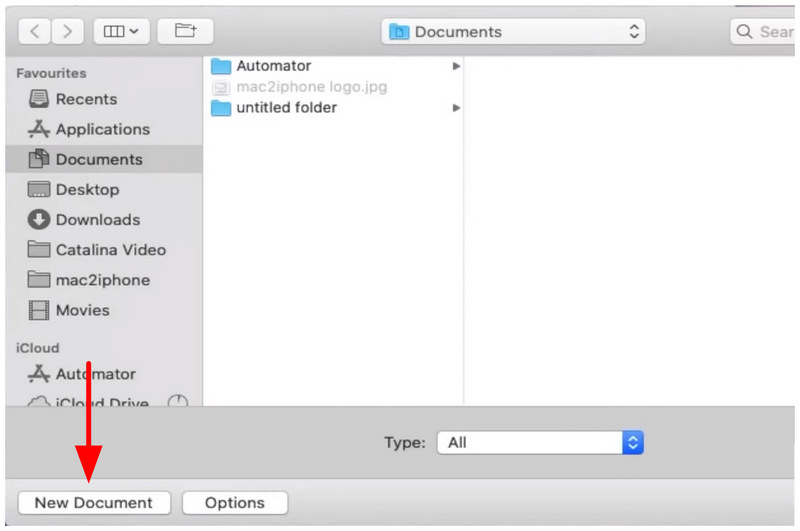
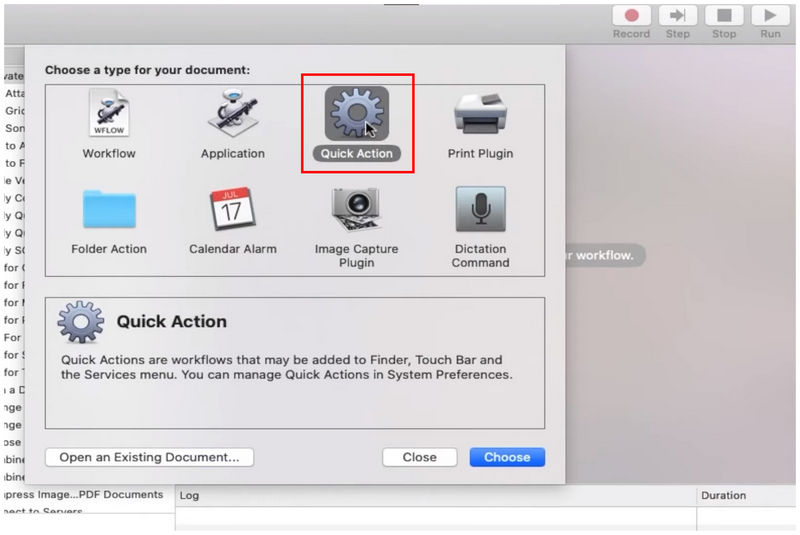
In Automator’s main menu, select New Document.
Then select Quick Action among the document types.
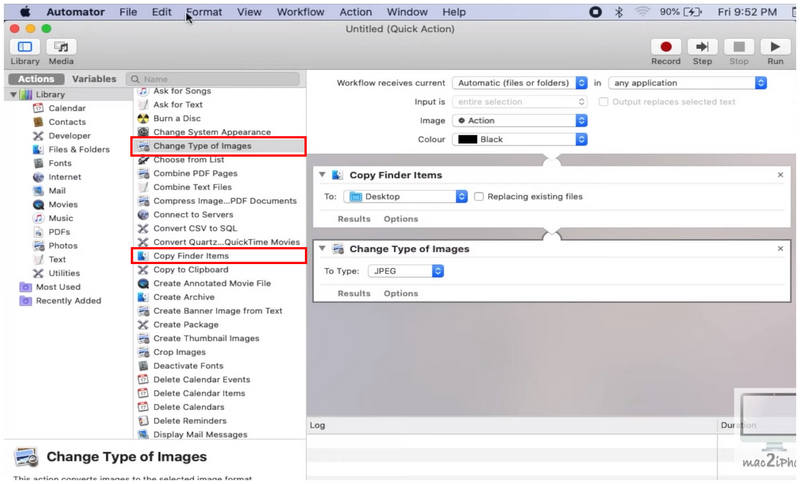
In the Quick Action creator menu, add Copy Finder Items and Change Type of Images. In the latter function, set the file type to JPEG.
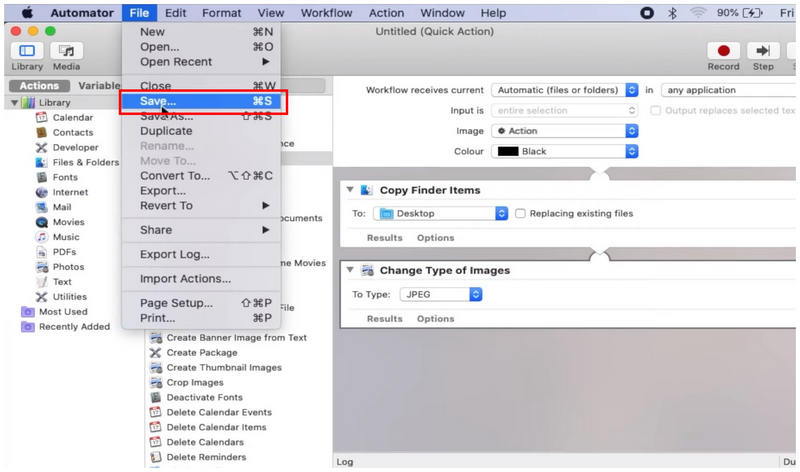
With the new Quick Action function now set, click File and Save.
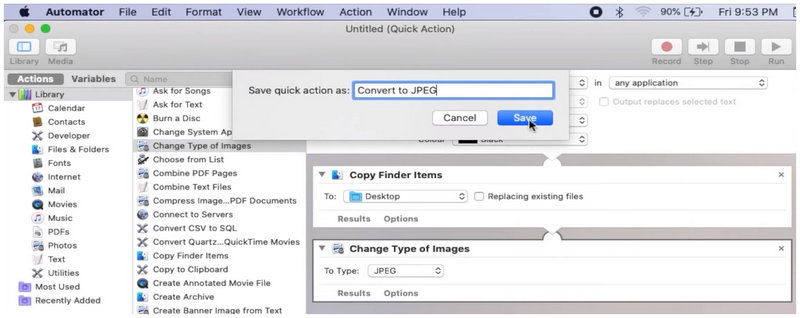
Then, name your newly created Quick Action option.
With the Quick Action now saved, right-click on the HEIC file you want to convert. Then, hover over Quick Actions and select the newly created function you added. After choosing the Convert to JPEG action, a copy of the HEIC file will be created and saved as a JPEG.
Since you now have access to Convert to JPEG as a quick action, you can easily select the images you want to convert and right-click them to convert them to the format you want automatically.
Method 5. Third-Party FREE Online Tool for Automated Conversion
Best Used For: Third-party HEIC conversion without installation.
With the built-in solutions for image format conversion now discussed, let us move on to the most reliable third-party option for automated image format conversion: ArkThinker Free HEIC Converter Online.
As an online tool, this software offers the most reliable solution, as it does not require any download or installation to use on your computer. Instead, you can simply upload the files you want to convert to the online tool, then wait a few seconds for the converted JPG file to be downloaded back onto your device.
Unlike other online programs, you can also ensure that the files you will process in ArkThinker Free HEIC Converter Online are all protected and safe since images uploaded on their servers are deleted almost immediately once you download them.
This is a notable privacy measure since security and privacy are the weakest link when using online tools. To learn how to use this method to convert HEIC to JPG, please read our simple guide below.
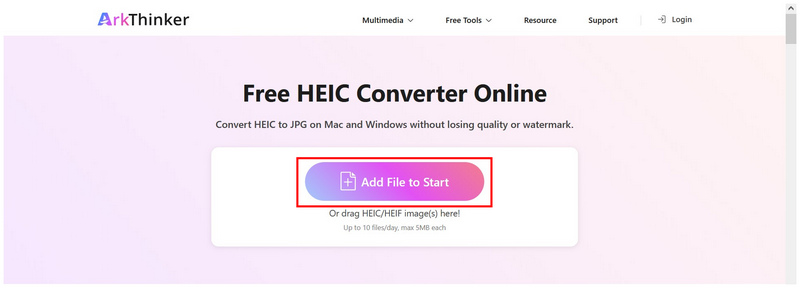
Click on the link to proceed to ArkThinker Free HEIC Converter Online’s website. In the main window of the online tool, select the Add Files to Start button to upload the HEIC file you want to convert. For batch conversion, you may drag and drop up to 10 files at once.
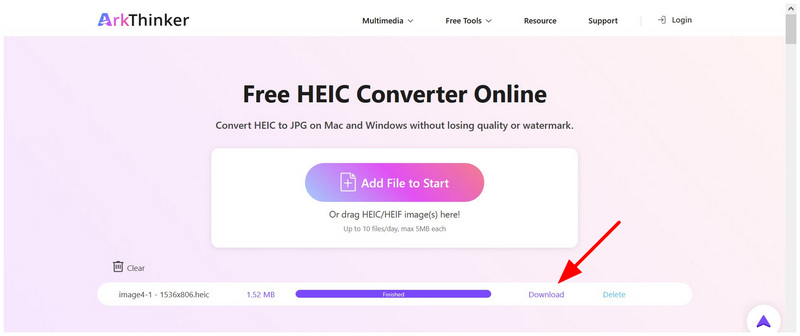
When your HEIC images are imported into the online tool, simply wait a few seconds for them to be converted. Once done, select the Download button to save the JPG files back to your computer.
Within a few seconds, you can now ensure that your exclusive HEIC file will be converted into the much more accessible JPG format. This is the main advantage of using online tools. Fortunately, you won’t have to overthink your privacy, since it doesn’t store uploaded data on its servers for long.
Part 6. FAQs About Converting HEIC to JPG on Mac
How to turn HEIC to JPG on Mac ?
There are multiple options for built-in HEIC to JPG conversion on Mac. The easiest is the Export option in the Preview app. For bulk conversion, the Convert option in Quick Actions is another good option.
How to convert multiple HEIC to JPG on Mac?
The easiest way to bulk convert on Mac is the Quick Actions feature. All you have to do is select the files you want to convert and then use the Quick Actions function. For easier file selection, put them in a single folder and press Command+A to select all.
Are HEIC images high-quality?
Yes, they are. HEIC is designed to be high-quality. They are also compressed more efficiently than other image formats. To preserve the quality of your HEIC photo, use tools that support a lossless image conversion.
What should I convert my HEIC file into?
When converting HEIC, you have two good options. Use JPG for maximum compatibility but lower quality. You may also use PNG for higher quality, but it comes at a larger file size.
Can I use HEIC for photo editing?
Yes, you can. HEIC can be accessed on photo editor apps. Traditional photo editors have superb format compatibility.
Conclusion
Now that we have discussed five of the most reliable methods for converting HEIC images to JPG directly on your Mac, we hope you can share these image files without worrying about compatibility. If you want a third-party online image converter alternative, consider ArkThinker Free HEIC Converter Online as your first choice.
What do you think of this post? Click to rate this post.
Excellent
Rating: 4.9 / 5 (based on 560 votes)