


How to Compress an Image to Shrink Your Photos
Have you ever tried to upload a photo to your website, email, or social media, only to get that frustrating message saying the file is too large? You’re not alone! Image compression is one of those handy tricks that can save you time and space. It’s not only useful for website optimization but also for everyday tasks like sending pictures through email or saving storage space on your phone or computer.
If you've ever wondered how to reduce image file size without losing quality, then you're in the right place. In this article, we’ll explore four simple and effective methods to compress images and make a picture take up less space. Whether you're on a Mac, PC, or using software like Photoshop, we’ve got you covered. So, let’s dive into how you can shrink the file size of a picture while keeping it sharp!

- GUIDE LIST
- Part 1: What is Image Compression and Its Benefits
- Part 2: How to Reduce Image File Size in 4 Methods
- Part 3: FAQs
Part 1. What is Image Compression and Its Benefits
Before we jump into the methods, it’s important to understand what image compression really is. Essentially, image compression is the process of reducing the size of an image file by removing unnecessary data. Think of it like squeezing a balloon by removing the excess air, you make it smaller, but the core structure (your image) stays the same.
Check the benefits of compressing an image:
1. Faster Load Times: Compressed images load faster, which is crucial for websites and blogs. It reduces your website’s overall load time, improving user experience.
2. Save Storage Space: Whether you're dealing with hundreds of photos on your phone or thousands of files on your computer, compressed images take up much less space, freeing up valuable storage.
3. Easier Sharing: Large images can be a hassle to send through email or upload to social media. Compressing your images makes them easier to share without worrying about file size limits.
4. Better Website Performance: For web designers, having smaller images means your website will perform better on mobile devices, where speed is especially important.
Now that we’ve covered the basics, let’s explore the four methods you can use to shrink the size of your image files.
Part 2: How to Reduce Image File Size in 4 Methods
Method 1: ArkThinker Image Compressor Online - Best Method for Quick and Easy Compression
If you're looking for the easiest way to compress an image without diving into complicated software, ArkThinker Image Compressor Online is a great tool. This web-based tool lets you compress photos without needing to download any software, making it an excellent choice for quick fixes.
Here are the detailed steps to compress an image online with ArkThinker:
Open the ArkThinker Image Compressor Online in your browser—whether you're on a computer or your phone.
Click the "Add Files to Start" button, or simply drag and drop your JPG or PNG images into the upload area.
You can upload up to 40 images at once, with each file no larger than 5MB.
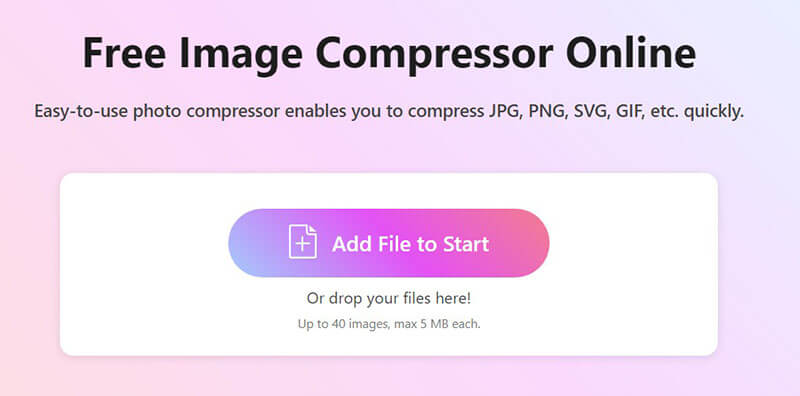
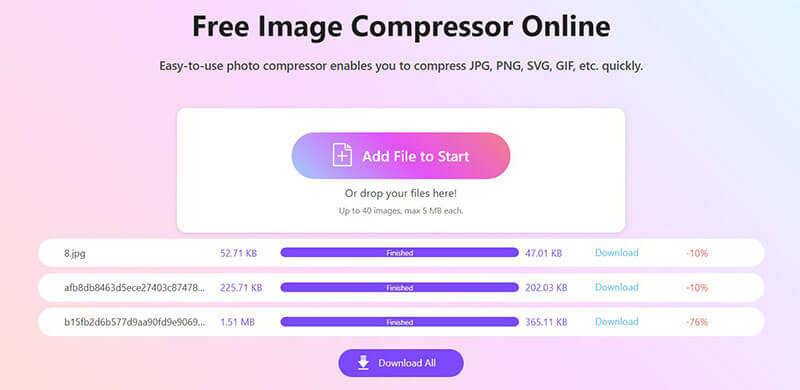
The compression process kicks off automatically, and no extra clicks needed.
When it's done, you can either download each image individually or hit "Download All" to grab everything in one go as a ZIP file.
- Free and easy to use.
- No software installation required.
- Works on any device with an internet connection.
- Supports multiple file formats like JPEG, PNG, and GIF.
- Limited control over compression quality.
- Requires an internet connection.
- Uploading large files can take a bit longer.
Tip: If you’re in a hurry and don’t want to deal with software, ArkThinker is your best bet. It’s straightforward and works well for most everyday needs.
Method 2: Compress an Image Using Microsoft Word
You might not realize it, but you can also compress an image directly within Microsoft Word. This can be especially handy if you’re preparing a document with multiple images that need to be smaller in size.
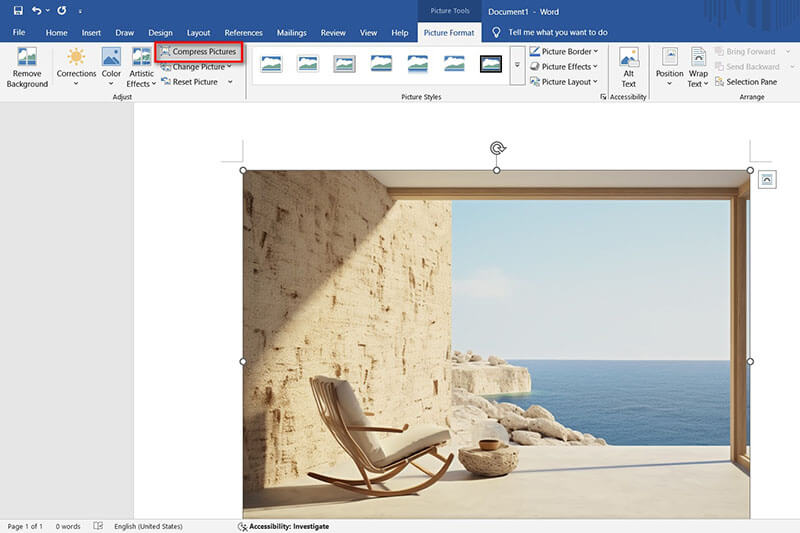
Open your Word document. Go to the Insert tab on the ribbon. Then click Pictures and choose from This Device or Online Pictures to insert the picture you want to compress.

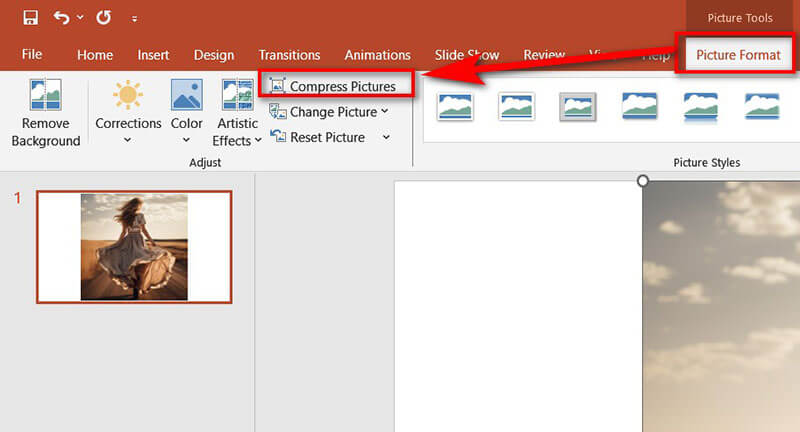
Click on the image you just inserted. This will activate the Picture Format tab (or Format tab in older versions).
In the Picture Format tab, look for the Adjust group. Click Compress Pictures.
Here, a dialog box will appear with several options like Compress Options, Resolution Options, etc.
Under the Compression Options, you can apply only to this picture, if you want to reduce only this one picture file size. Otherwise, uncheck it to compress all the images.
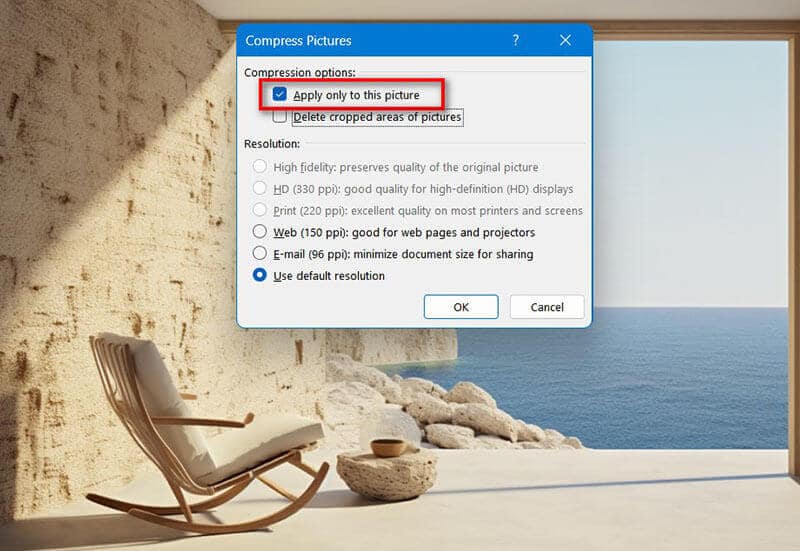
For the resolution options, choose the resolution based on how you plan to use the document:
| Option | Description | Best For |
|---|---|---|
| High fidelity | No compression | Printing or archiving |
| HD (330 ppi) | Good quality | High-quality prints |
| Print (220 ppi) | Standard quality | Regular printing |
| Web (150 ppi) | Medium quality | Online sharing |
| Email (96 ppi) | Smallest size | Email attachments |
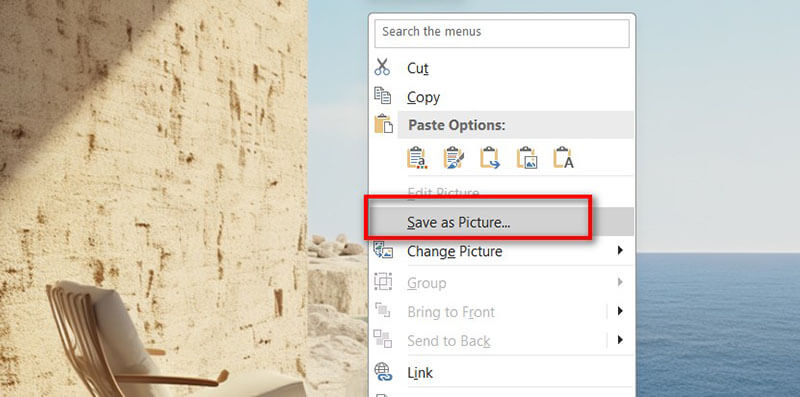
Click OK to apply the compression, and right-click your mouse to select Save as Picture to preserve the compressed images.
- Great for reducing image sizes within documents.
- Easy to use for Word document users.
- No need for extra software.
- Only useful within the context of Word documents.
- Limited compression options compared to dedicated tools.
Tip: If you’re working on a report or presentation and want to make your images smaller, this method can save you a lot of time without needing to leave Word.
Method 3: Compress an Image in PowerPoint
If you often work with PowerPoint presentations, you’ll be happy to know that PowerPoint also has an image compression feature. This can help you shrink the size of your slides without losing image clarity.
The steps of using PPT to compress images are the similar to those on Word.
Open your PowerPoint presentation. Go to the Insert tab on the ribbon.
Click Pictures and choose to load this image from This Device or Online Pictures.
Click on the image you want to compress. This activates the Picture Format tab (or Format tab in older versions) to open the Compression Dialog.
In the Picture Format tab, locate the Adjust group. Click Compress Pictures.
A dialog box will appear with several options like Word with compression and resolution options.
To compress an image in PowerPoint, you need to check and select Apply only to this picture, if you only want to compress one image file. Otherwise, you just need to uncheck this option. Click OK to apply the compression.

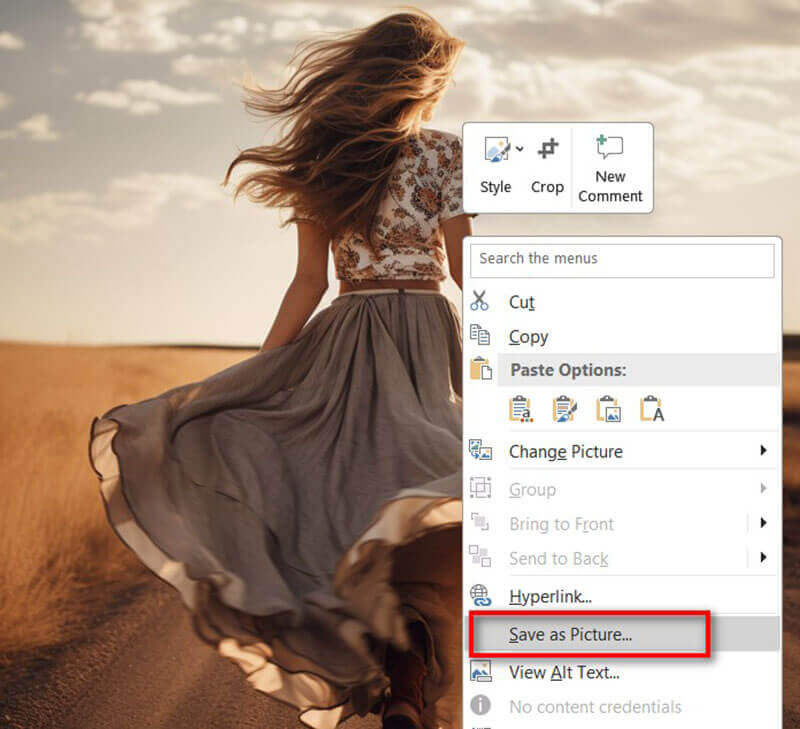
Save your presentation to preserve the changes. Then right-click this image to save this picture on your computer.
PowerPoint is not only a presentation maker, it also offers some image and video editing tools like resize an image, crop a video in PowerPoin, etc
- Convenient for presentations and slides.
- Can compress multiple images at once.
- Only works within PowerPoint.
- Might slightly reduce image quality when using higher compression.
Tip: If you’re putting together a slide deck for work or school, compressing images in PowerPoint will help keep your file size manageable and improve presentation performance.
Method 4: Compress an Image Using Photoshop
For those who want to retain maximum control over the quality of their image, Photoshop is the go-to option. While it’s a bit more complex, Photoshop offers the most flexibility when it comes to image compression without sacrificing too much detail.
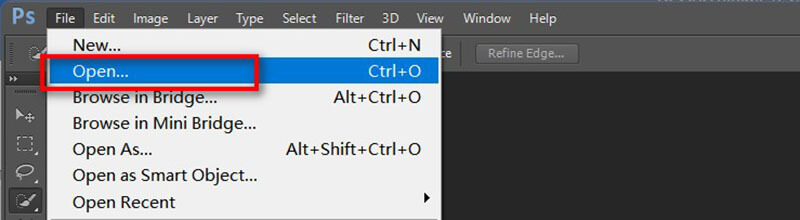
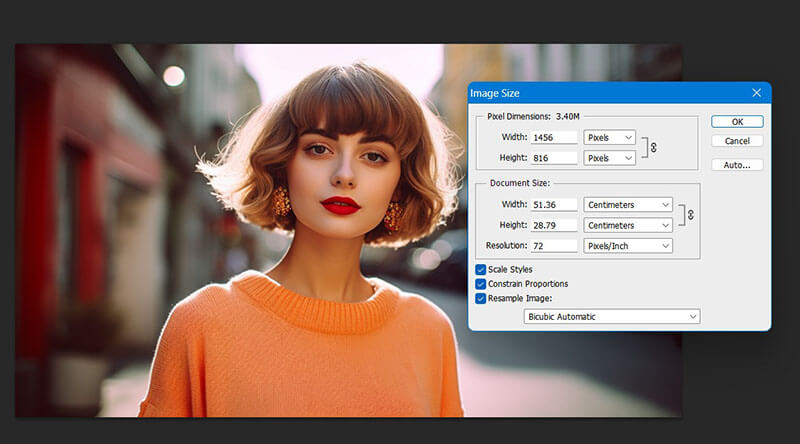
Launch Adobe Photoshop. Go to File > Open. After that, select the image you want to compress and click Open.
This step is optionally. Reducing dimensions can significantly lower file size.
Go to Image > Image Size.
In the dialog box:
• Adjust Width and Height (in pixels).
• Ensure Resample is checked to maintain quality.
• Choose a resampling method like Bicubic Sharper for downsizing.
Click OK to save the changes.
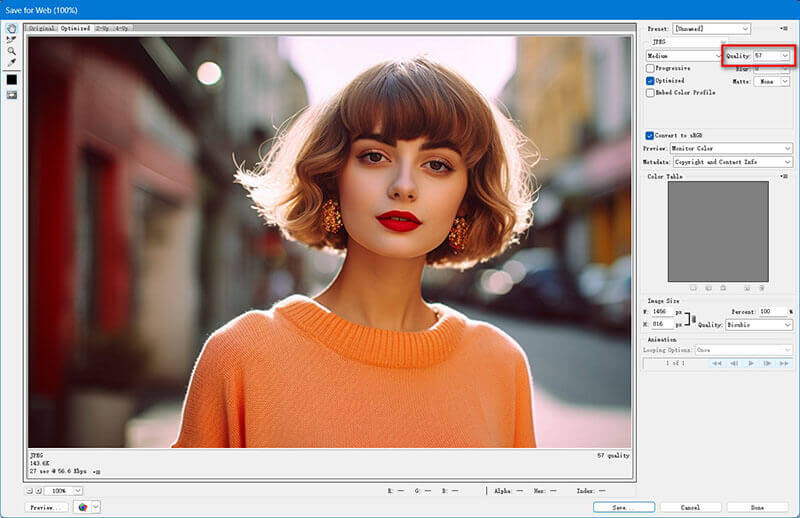
This is the main compression step.
Option A: Save for Web (Legacy)
• Go to File > Export > Save for Web (Legacy).
• In the dialog box:
Choose a format: JPEG (best for photos), PNG-8 (for simple graphics), or GIF.
Then adjust Quality slider (lower = smaller file). Tick Optimize to reduce size further.
Preview file size at the bottom left, and click Save, choose location and filename.
Option B: Export As
• Go to File > Export > Export As.
• Choose format (JPEG, PNG, etc.), and adjust Quality slider.
• Optionally resize dimensions, and click Export All and save the compressed image file.
Tip: If your image quality is not good after compression, you can also use Photoshop to improve the photo quality.
- Offers precise control over the image quality.
- Ideal for professional use where quality matters.
- Works for a variety of file types and compressions.
- Photoshop is not free (requires a subscription).
- More complex for beginners.
Tip: Photoshop is perfect for professionals who need to tweak every aspect of their image. It’s definitely overkill for simple tasks, but if you want the best possible outcome, it’s worth the effort.
Part 3: FAQs
How do you make a photo smaller file size?
You can use online tools like ArkThinker, software like Photoshop, or even Word and PowerPoint to reduce the file size by compressing the image and removing unnecessary data.
How to shrink the file size of a picture?
The best way is to use one of the methods above: online tools for quick results, or PowerPoint/Word for document-based compression.
How to compress an image without losing quality?
Use tools like ArkThinker, Photoshop, or adjust the compression settings in Word or PowerPoint for optimal results without losing too much detail.
Conclusion
Image compression doesn’t have to be a hassle. Whether you’re looking to compress an image for a website, email, or just to save some space on your device, there are several easy ways to shrink file sizes. From online tools like ArkThinker to built-in options in Word, PowerPoint, and Photoshop, you have multiple methods to choose from depending on your needs.
If you want a quick, no-fuss way to compress photos without losing quality, I highly recommend giving ArkThinker Image Compressor Online a try. It’s fast, efficient, and works for most image formats. Give it a shot today and make your image file sizes more manageable!
What do you think of this post? Click to rate this post.
Excellent
Rating: 4.8 / 5 (based on 495 votes)