


How to Compress an Image to Shrink Your Photos
Ever tried sending a PowerPoint file only to be hit with the dreaded file too large error? Been there, done that. Whether it’s for a school project, a client pitch, or a team update, oversized presentations can be a real pain. I remember once trying to email a deck for a group assignment, only to realize it was over 100MB, and thanks to all the high-res images we’d proudly inserted. Lesson learned: compressing images in PowerPoint is not just helpful, it’s essential.
That is what this guide will tell: how to compress images in PowerPoint. Whether you're prepping for a client presentation, submitting work online, sharing slides on mobile, or collaborating with teammates, this page has got you covered.

- GUIDE LIST
- Part 1: How to Compress Pictures in PowerPoint
- Part 2: Best PowerPoint Image Compressor Alternative
- Part 3: Which Method Is Better
- Part 4: Tips to Keep Your PowerPoint Lightweight
- Part 5: FAQs
Part 1: How to Compress Pictures in PowerPoint
Microsoft PowerPoint actually has a built-in feature to reduce file size. It’s like a hidden gem that not everyone knows about, but it can make a huge difference.
Here’s how you do it:
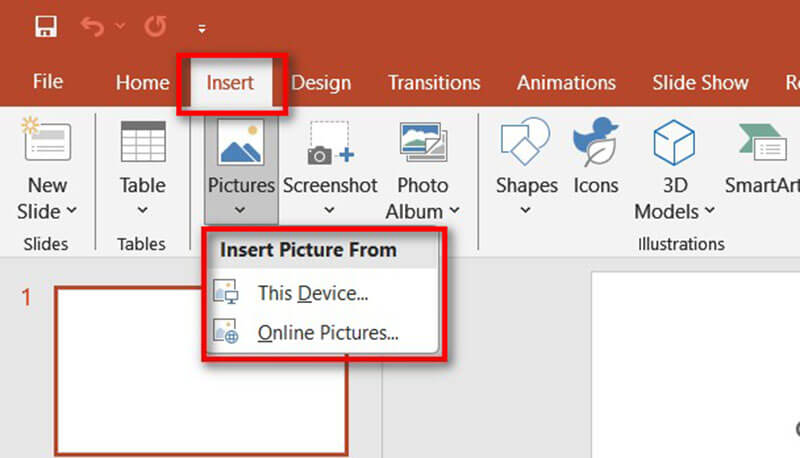
Select an Image
First things first, open up your PowerPoint. Then head over to the Insert tab at the top (you’ll see it in the ribbon). Click on Pictures to import the image you want to reduce the file size from your device or online picture.
Note: If you want to handle the images of the PowerPoint, just click on any image in your slide. You’ll see the Picture Format tab pop up in the ribbon.
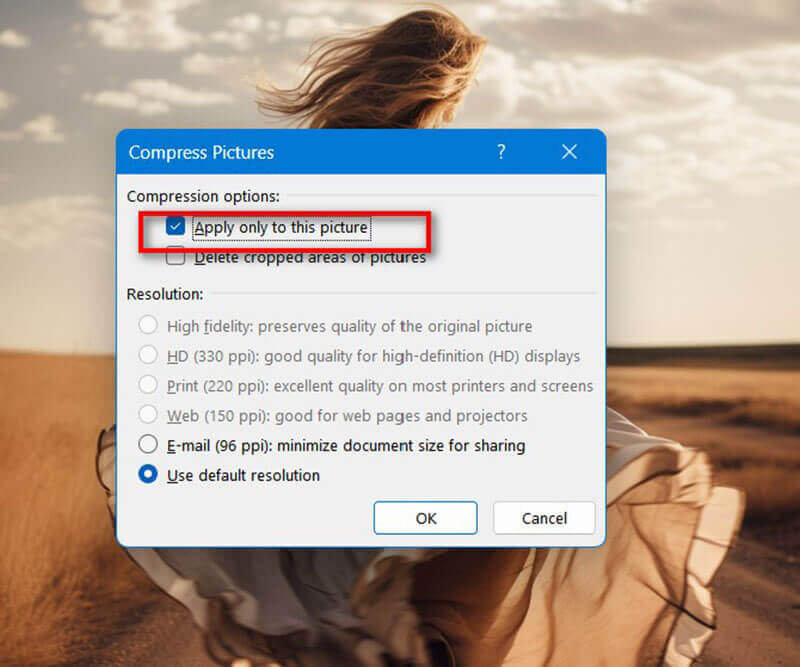
Open Compression Settings
In the Adjust group, click on Compress Pictures.

Then you need to choose your options:
Uncheck Apply only to this picture if you want to compress all images in the presentation.
Besides, you can select Delete cropped areas of pictures to remove unused data.
For the image resolution, you can choose:
• Email (96 ppi): Great for sharing via email.
• Web (150 ppi): Ideal for online viewing.
• Print (220 ppi): Good for printed handouts.
• HD (330 ppi): Best for high-quality visuals.
Besides, you may notice that there is one option of Delete Cropped Areas of Pictures. When you crop an image in PowerPoint, the software doesn’t actually throw away the cropped-out parts. Instead, it just hides them. This means the entire original image (even the invisible parts) is still stored inside your presentation file. That’s why sometimes your PPT is way bigger than you expect, even though you’ve cut down images.
If you enable Delete cropped areas of pictures, PowerPoint permanently removes those hidden parts and only keeps what’s visible. As a result, your PowerPoint presentation file will be thinner than before. Like this, PowerPoint also have the video resizer feature, which lets you crop a video on PowerPoint easily.
Save Compressed images on PowerPoint
That’s it! Your images are now compressed, and your file size should be noticeably smaller. Now, when you send the PowerPoint presentations to others, the total file size will be smaller than before.
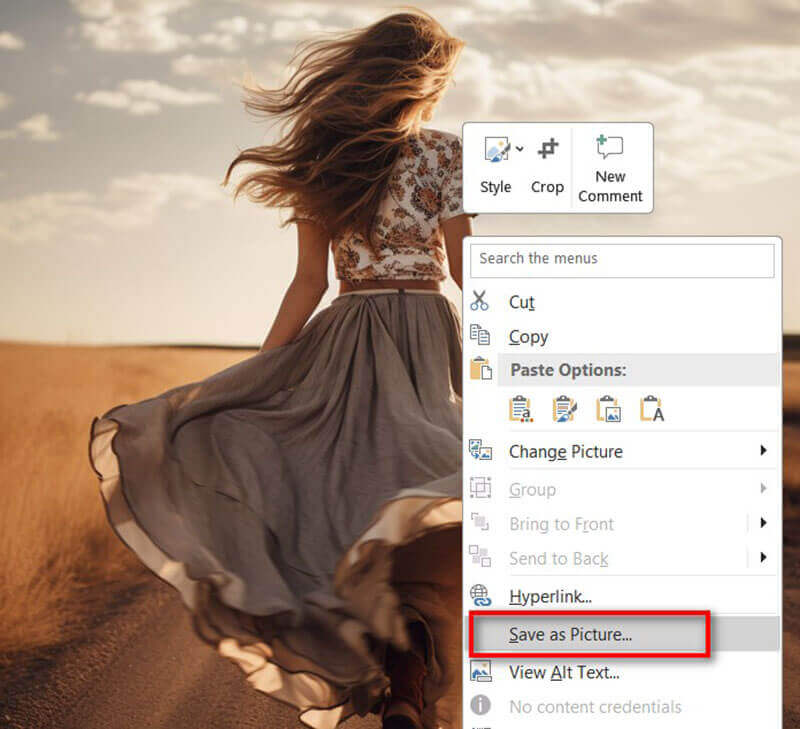
If you only want to keep these compressed images on your device, instead of PowerPoint presentations, you need to select the picture, and right-click your mouse to select Save as Picture. Save all the pictures one by one.
Tip: If you’re working on a group project, make sure everyone compresses their images before adding them to the shared deck. It saves time and avoids last-minute panic.
Part 2: Best PowerPoint Image Compressor Alternative
While PowerPoint’s tool works fine, sometimes you want a bit more control, or you’re dealing with multiple images before inserting them into slides. That’s where ArkThinker Image Compressor Online comes in.
It’s a free online tool that compresses images (JPEG, PNG, and more) while keeping quality high. You don’t need to install anything, and just drag, drop, and download.
Key Features
•Batch Compression: Upload multiple images at once.
•Custom Quality Options: Balance file size and clarity.
•Fast and Free: No sign-up required.
•Supports Multiple Formats: Works with common image types.
How are the steps of using it:
Then you need to choose your options:
Open ArkThinker in your browser
ArkThinker Image Compressor Online. No downloads, no fuss, and it works right from the web.
Upload your images
Click the Add Files to Start button, or if you're feeling fancy, just drag and drop your JPG or PNG files into the upload box.
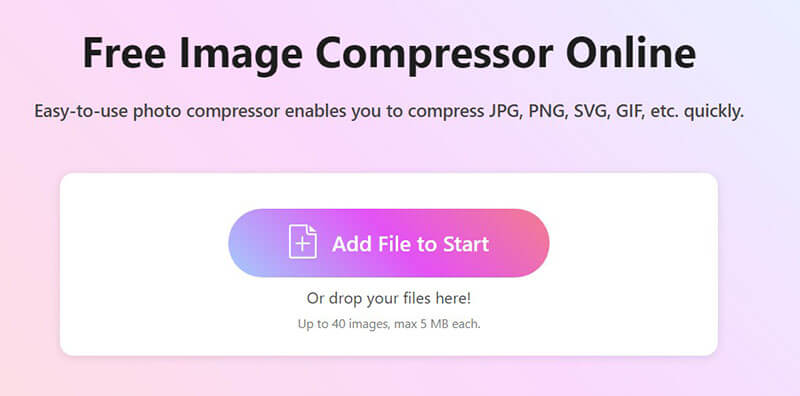
You can toss in up to 40 images at once, as long as each one is under 5MB. Super convenient for batch jobs!
Compress and download images
No need to click anything else, and the compression starts automatically.
Once it’s done, you’ve got options:
• Download each image one by one
• Or hit Download All to grab everything in a neat ZIP file
Tip: I recommend compressing large batches of images here before adding them to PowerPoint. It keeps the presentation small right from the start.
Part 3: Which Method Is Better
I actually tested both methods on the same presentation with 10 high-resolution product photos (each around 5 MB, and PNG). Here’s how they stacked up:
From my test, ArkThinker Image Compressor Online saved more space and was quicker since I could process images all at once. But if you’re already in PowerPoint, the built-in tool is a convenient one-click fix.
| PowerPoint Built-In | VS | ArkThinker Online Tool |
|---|---|---|
| 5MB PNG (landscape) | Test Image | 5MB PNG (landscape) |
| 2.8MB | Output File Size | 1.2MB |
| ~30 seconds | Time to Compress | ~15 seconds |
| No | Batch Compression | Yes (up to 40 images) |
| Minimal | Quality Loss | Minimal |
| Moderate | Ease of Use | Very Easy |
| No | Works on Mobile | Yes |
| One by one | Save Compressed Image | download all by zip |
Part 4: Tips to Keep Your PowerPoint Lightweight
Beyond compressing, here are some tricks I’ve picked up to prevent file size overload:
Use Proper Image Formats
• JPEG is best for photos - it keeps size small with decent quality.
• PNG is great for logos or images needing transparency, but avoid using it everywhere since it’s usually larger.
• Skip formats like BMP or TIFF - they make your file unnecessarily huge. If you want to compress BMP, you can convert BMP to JPG first, and then make the image compression.
Resize Before Uploading
If your image is 4000 × 3000 pixels but you’re only showing it in a small box, resize it with an image editor first. No need to store extra pixels you’ll never see.
Avoid Copy-Pasting from Web
When you copy images directly from a browser, they sometimes carry hidden formatting that bloats your presentation. Always save the file to your computer and insert it instead.
Stick to Standard Fonts and Elements
Using lots of custom fonts, shapes, or embedded objects can add bulk.
Don’t Overload with Animations
Fancy animations and transitions don’t add much value but can increase file size.
Keep it simple, and your audience will thank you.
Tip: Check your final file size before sharing. Under 20 MB is usually safe for email; anything larger may trigger errors or rejections.
Part 5: FAQs
Q: How do I compress images in PowerPoint without losing quality?
A: Choose the Web resolution option - it balances clarity and size well for most screens.
Q: Can I compress pictures in PPT on Mac too?
A: Yes! The steps are almost identical, just look for the Picture Format toolbar, and complete the following steps like that on Windows.
Q: How do I compress multiple images at once in PowerPoint?
A: In the Compress Pictures dialog, uncheck Apply only to this picture to compress all images in your file.
Q: Is ArkThinker free to use?
A: Yes, you can compress images online without paying or even signing up.
Q: What size should images be for PowerPoint presentation?
A: Most modern PowerPoint templates use 16:9 widescreen slides with a resolution of 1920 x 1080 pixels (Full HD). A smaller image (like one covering half a slide) can be closer to 1000 x 800 px.
Conclusion
Large PowerPoint files can be a real headache, but thankfully there are easy fixes. You can compress pictures in PowerPoint directly - it’s quick, built-in, and works fine for most cases. But if you want the best results with batch compression and smaller output sizes, ArkThinker Image Compressor Online is my go-to tool. Next time you find yourself asking, How do I compress images in PowerPoint? and remember, you’ve got two solid options. Keep your slides lean, share them with ease, and let your visuals shine without weighing down your presentation. Try ArkThinker today and keep your PowerPoints lightweight and professional.
What do you think of this post? Click to rate this post.
Excellent
Rating: 4.9 / 5 (based on 502 votes)