


Record Video & Audio in PowerPoint when Giving a Presentation
Microsoft PowerPoint, fueled by a batch of editing and collaborating features, is the most recognized tool for slideshow making in work and study life. But in addition to creating PPT slideshows, recording a PowerPoint presentation is also a powerful yet hardly noticed section. To help you record a PowerPoint presentation with audio, this post can help you with a step-by-step instruction.

- GUIDE LIST
- Part 1. How to Record a Presentation with PowerPoint
- Part 2. How to Record PowerPoint Presentation with Desktop App
- Part 3. How to Record Audio on PowerPoint
- Part 4. How to Stop Screen Recording on PPT
- Part 5. FAQs of Recording on PowerPoint
Part 1. How to Record a Presentation with PowerPoint
Recording a PPT presentation is not as complicated as most people think. Fortunately, once you grasp each feature within the Record section, it will take little pain to record PPT slideshows. Here are all basic functions you need to know before you jump to recording.
Make All Settings Fit Before Recording
A. Enable the Recording Feature in PowerPoint
The Recording feature may vary on different PowerPoint versions. To ensure you can enjoy the full functions, you can access the latest version with instructions below.
To update Microsoft PowerPoint or other products, you can visit Start Menu > Settings and then enter the Update & Security column.
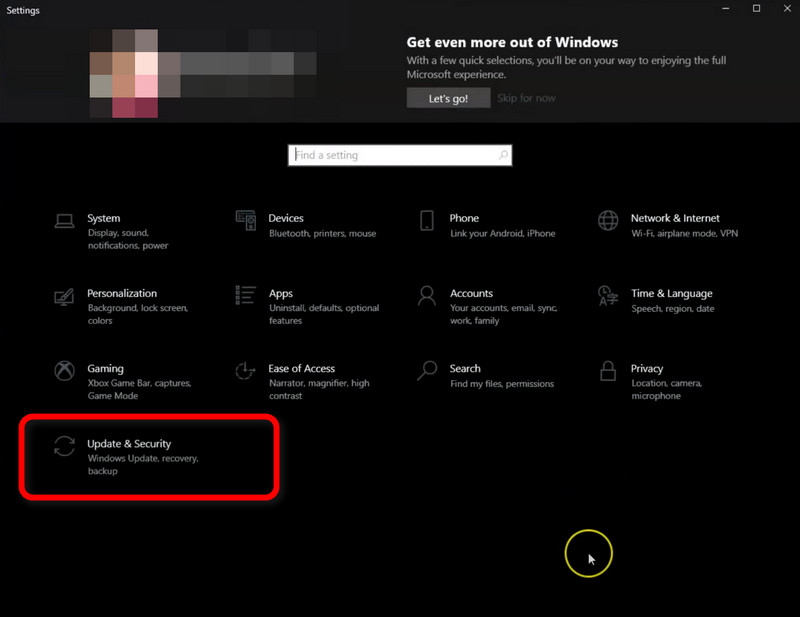
Locate yourself at Windows Update. Enter Advanced Options. Here you can turn the first toggle on to receive updates for Microsoft products upon updating Windows. update-option.jpg
B. Understand All Basic Functions for Recording
For PowerPoint 2019/2016/2013:
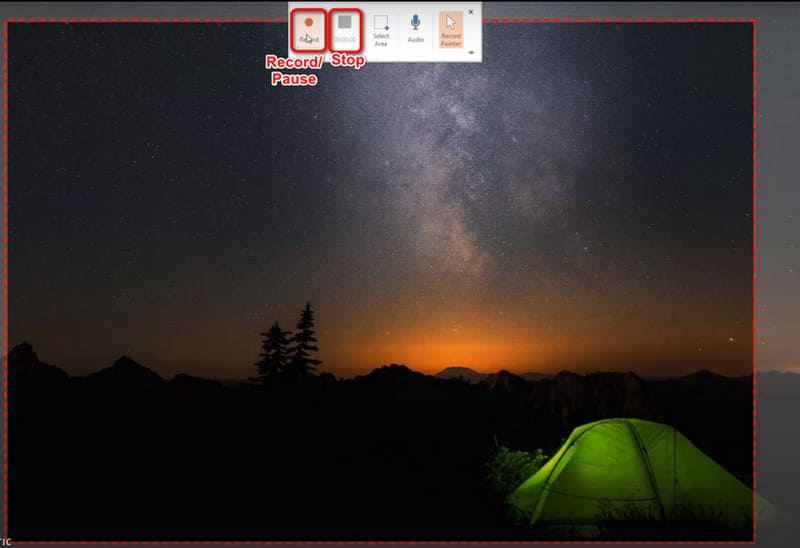
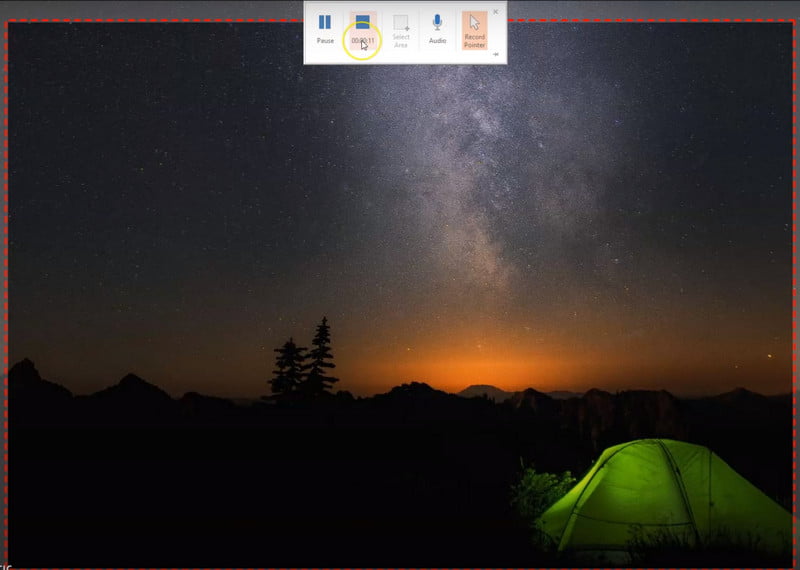
After you start screen recording, you will see five main buttons on the menu bar:
Record /Pause: Click to begin recording a PPT or make a pause (or Windows Logo Key + Shift + R).
Stop: Tap to finish recording (or Windows Logo Key + Shift + Q).
Select Area: Customize the recording window for slideshows.
Audio: Enable you to record voice on a PPT (or Windows Logo Key + Shift + U).
Record Pointer: Show your cursor on the screen recording.
For PowerPoint 2021:
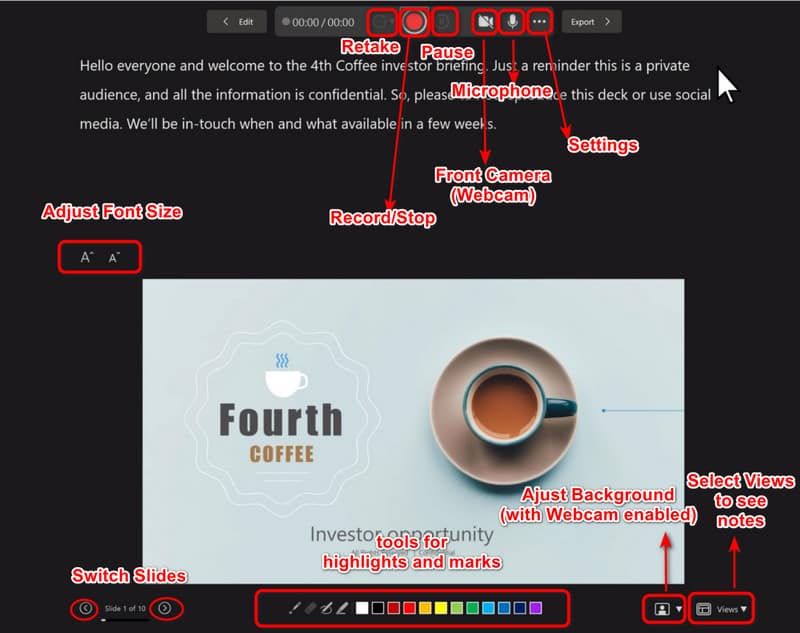
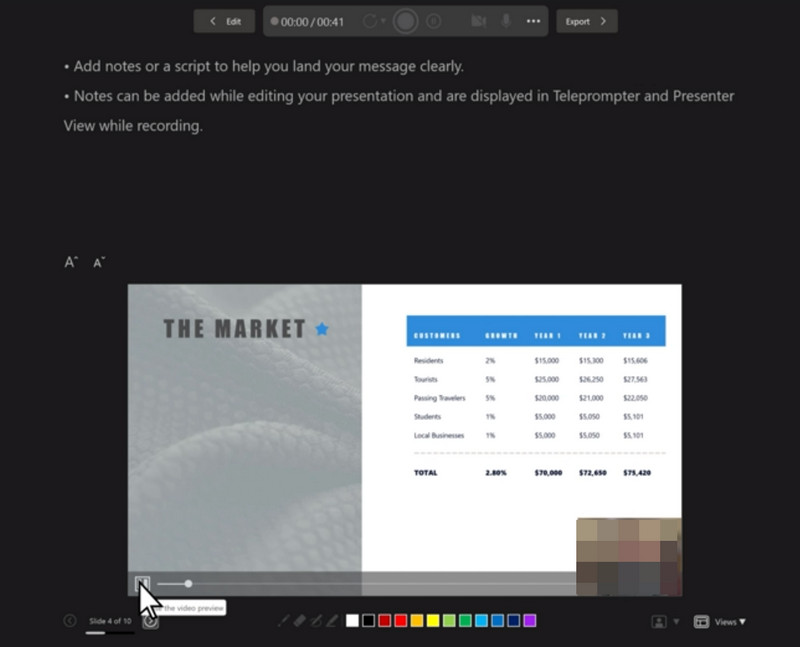
Once you click the Record button, you can get a multifunctional interface with following functions:
Retake:Start a presentation video again for the current or all slideshows.
Record/Stop: Start or stop screen recording on PPT.
Pause: Stop recording for a little while.
Font Camera: Turn it on to video record yourself presenting a PowerPoint.
Microphone: Capture the speaker’s voice.
Settings: Change the microphone/ camera as well as clear recordings.
Font Size: Change the font size for better visual effects.
Switch Slides: Move to the next/last slideshow.
Drawing Tools: Highlight or make the things you want to emphasize.
Background: show or blur your background after you tap the Font Camera.
Views: Give a presentation from the views of teleprompter, presenter or slide.
Start Your Recording
For PowerPoint 2019/2016/2013:
Open your PPT and visit Insert > Screen Recording.
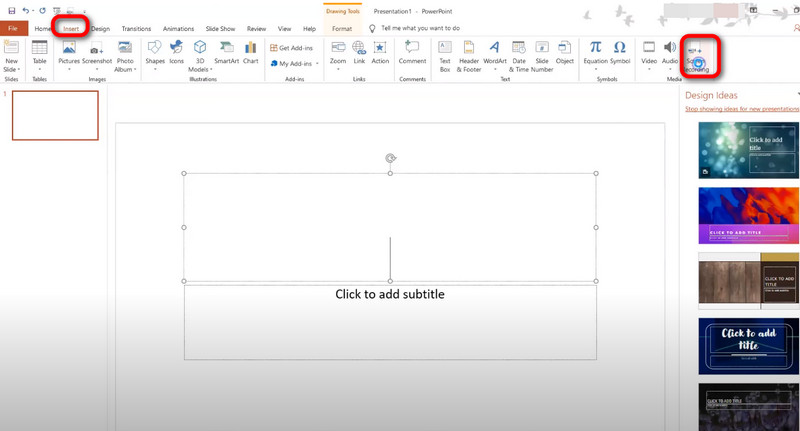
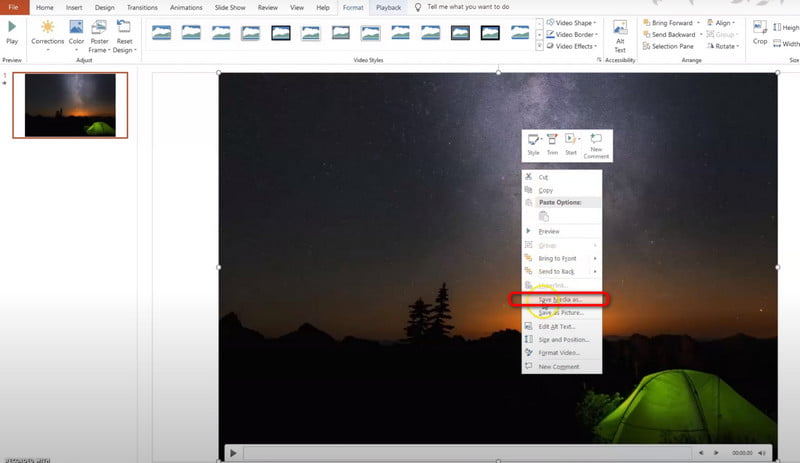
Click the Select Area button to choose your slideshow and enable the audio recording with Audio buttons or Windows Logo Key + Shift + U. Tap Record to start.
With all done, click the Stop button or press Windows Logo Key + Shift + Q. Then right click the recording and enter Save Media as and find an ideal path to save your video.
For PowerPoint 2021:
Launch your PPT and enter the Record section on the top right corner.

Change settings on the Font Camera, Microphone, Font Size and more based on your needs. With all set, click the Record button.
Tips: The speaker’s voice can be captured except the transition between two slides. So get ready to speaker after you arrive at the new slide.
After that, click the same button again and enter the Export section to generate your recording.
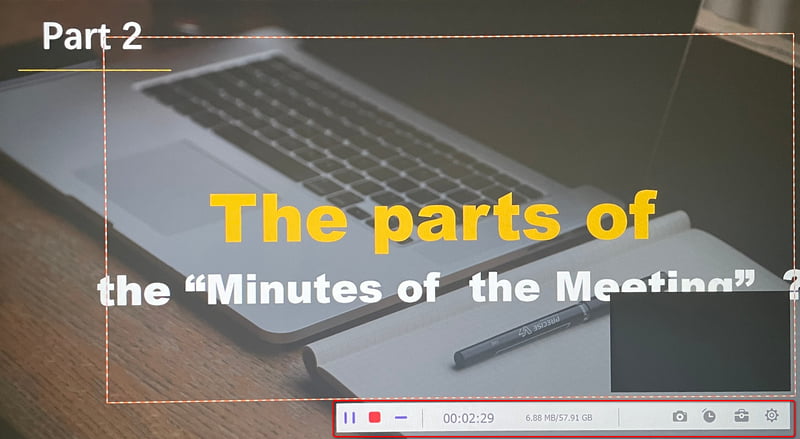
Part 2. How to Record PowerPoint Presentation with Desktop App
ArkThinker Screen Recorder - Cherry Pick to Record Videos & Audio on PowerPoint
What if you want to enrich your PPT presentation with fancy videos and more details? Is there any way to record a PPT presentation video while sharing your screen? Want to get an HD recording and take screenshots easily and quickly?
ArkThinker Screen Recorder can have all the mentioned goals met. In contrast to the built-in recorder, you can select the recording window and make changes freely, which enables you to capture all necessary information for the final recorded video. What’s more, you can select the audio source based on different occasions here.
- Record a PPT presentation video with 4K/1080p quality.
- Capture microphone and system sound based on your needs.
- Emphasize and mark your slideshows freely with editing tools.
- Change the output to all famous formats like MP4, MOV, FLV, MP3, AAC, etc.
- Take snapshots with hotkeys whenever and wherever you want.
- Record Zoom meeting, gameplay, phone screens, audio without any limit.
Reach Video Recorder within ArkThinker Screen Recorder
Download and install this recording tool based on your devices. Then launch it to enter the Video Recorder.
(If you want to record audio only on PowerPoint, then choose the Audio Recorder to continue)

Change the Settings for Recording
In the following window, select the PowerPoint window in Full or Custom and change it as you like. Turn on the System Sound and Microphone and move the bar to adjust the volume.
To record yourself in the presentation video, you can change the Webcam toggle to turn it on.
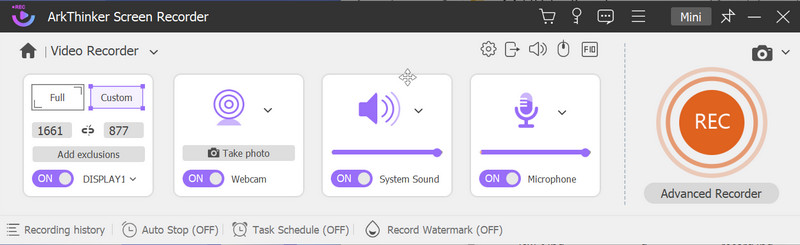
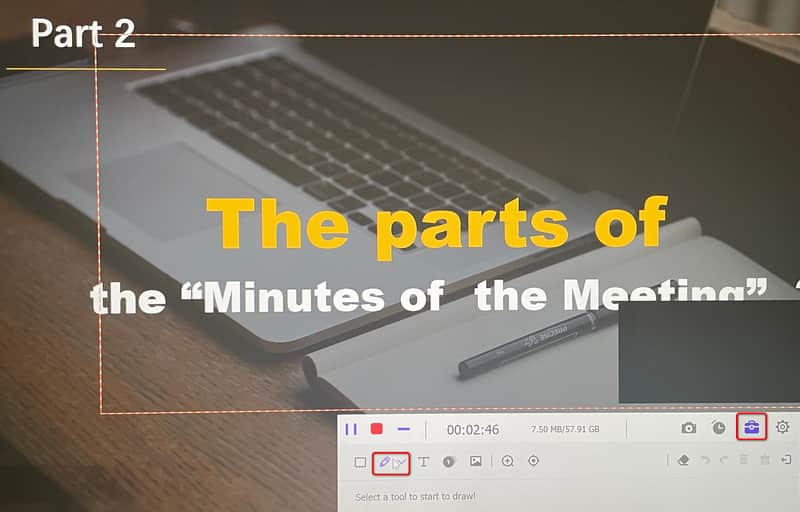
Record and Edit Your Recording
When you are ready, click the REC button to start recording. During the recording, click the menu buttons to make a pause, hide the menu, take snapshots, set the timing and change other settings freely.
To add captions or marks, click the Toolbox button and you can input text or make drawings.
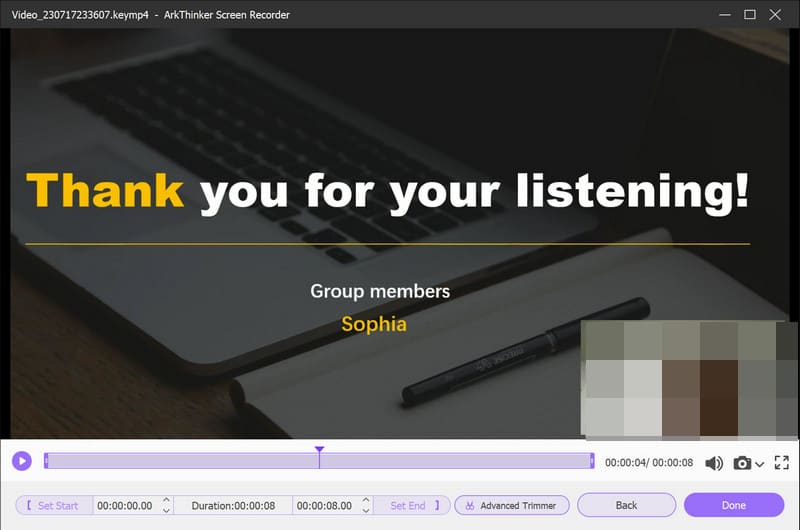
Preview and Finish Recording
Tap the End button and you can preview your video in the next window. Reach the Done button to continue.
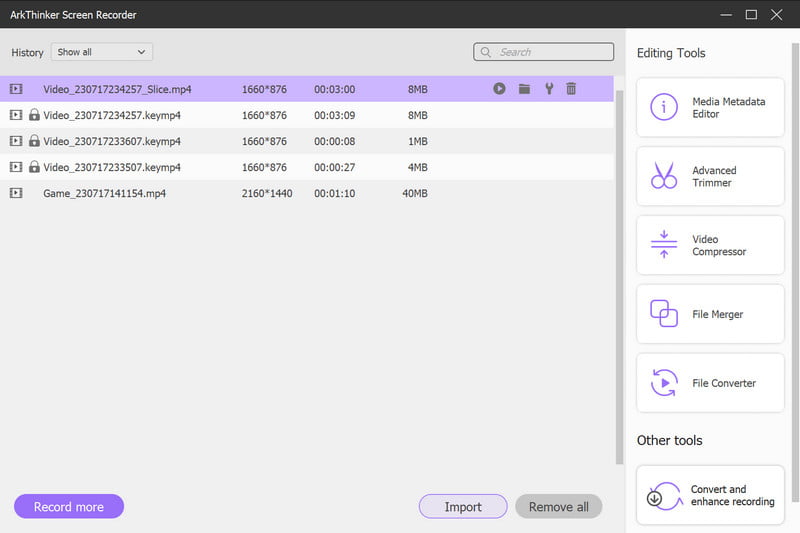
Then you can view all recordings in the History list. Here you can play, rename, delete, edit and share your recording to any platform you want.
Part 3. How to Record Audio on PowerPoint
For PowerPoint 2019/2016/2013:
Click the Audio button on the top menu bar or use the hotkeys match (Windows Logo Key + Shift + U) to activate audio recording on PPT.
For PowerPoint 2021:
Click the Microphone button on the top of the recording interface to start audio recording. Change the microphone device via Settings > Microphone.
Tips: To get high-quality audio recordings, you can also turn to other voiceover tools.
Part 4. How to Stop Screen Recording on PPT
For PowerPoint 2019/2016/2013:
Click the Stop button or press Windows Logo Key + Shift + Q together to complete your PPT recording.
Your recorded media will be presented in the PPT then. And remember to save the media before you close the PPT.
For PowerPoint 2021:
Click the Stop and Export button. Here you can rename the file and choose to Export Video. After that, you are free to View and Share Video as you like.
Part 5. FAQs of Recording on PowerPoint
How do I record a PowerPoint presentation with my Webcam?
You can enable the Webcam/Font Camera in the menu bar and change the Camera via Settings and record the video with your Webcam device.
How do I record a presentation while sharing my screen?
You can select Video Recorder within ArkThinker Video Recorder and customize your recording window for the presentation. All the settings are flexible during the recording.
Does Windows 11 have screen recorder?
Yes, just like Windows 10, Windows 11 is also designated with a native screen recorder called Xbox Game Bar. You can activate this feature via Windows Logo Key + G from your keyboard.
Conclusion
This article introduces all necessary steps and tips for a PowerPoint video recording based on different versions. You are always welcomed to share your ideas and comments below.
What do you think of this post? Click to rate this post.
Excellent
Rating: 4.9 / 5 (based on 421 votes)
Find More Solutions
How to Record Gameplay Videos on PS4: Quick Fix [2023] How to Record Gameplay on Xbox One, Series S, and Series X How to Record Steam Gameplay on Windows 11/10/8/7 PC and Mac 3 Easiest Ways to Record Minecraft Gameplay on Windows and macOS 4 Easy Methods to Record Roblox with Voice on PC, Mac, and Phone Best Game Recorder to Capture Gameplay [Reliable Tools + Reviews]Relative Articles
- Record Video
- Detailed Guide on How to Record Gameplay on Nintendo Switch
- Screencast-O-Matic Review, Features, and Best Alternative
- Ultimate Review of FlashBack Express & Best Alternative
- Full oCam Screen Recorder Review and Best oCam Alternative
- Exploring the Benefits and Usage of Webex Recording
- CamStudio Screen Recorder: Key Functions, Pros, and Cons
- [Solved] How to Screen Record A Video on Instagram Smoothly
- Top 4 Mouse Movements Recorders for Windows and Mac
- How to Use Adobe Screen Recorder to Record Your Contents
- Top 7 Ubuntu Screen Recorders Online and Offline for Ubuntu Users