


4 Ways to Slow Down Audio: Using User-Friendly Tools
There are times when watching a video or listening to an audio, for some reason, we can not understand or fully grasp the context of the media, maybe due to an inaudible way of delivering it or the speed of it. Regardless, this just makes us not only want to fully digest the context but also makes us want to repeat the parts. Luckily, on digital platforms, there are now ways for users to fully enjoy content at their own pace and preference speed through the usage of an audio slower feature that allows users to change the content audio speed without changing its pitch or quality.
In this article, we will delve into various methods how one can slow down songs or video audio using trusted online tools, software, and mobile applications. Not only that, but in the following methods, this article also includes simplified steps one can use as a basis to effectively slow down their media content, audio or music.

- GUIDE LIST
- Part 1. Method 1: Change Speed with ArkThinker Video Converter Ultimate (Best Overall)
- Part 2. Method 2: Slowing Down Audio Using Audacity’s Change Tempo Effect
- Part 3. Method 3: Using YouTube’s Native Playback Speed Settings
- Part 4. Method 4: Mobile App Solutions (Amazing Slow Downer)
- Part 5. FAQs about How to Slow Down Music
Part 1. Method 1: Change Speed with ArkThinker Video Converter Ultimate (Best Overall)
When it comes to handling a video or audio change of speed, a third-party tool called ArkThinker Video Converter Ultimate is the go-to tool for such matters. Arkthinker, as a tool to slow down songs and videos, is a type of tool that gives its users the freedom to access other tools for enhancing and refining their media files. In this way, users are ensured not only to help them with their audio speed changing needs, but also guaranteed to export their files in their pristine condition. In addition, ArkThinker, as a music slow-downer tool, is easy to use as it has a very straightforward, user-friendly user interface that allows even novices to easily utilize the tool without a problem. Moreover, it is a fast processing tool and lightweight on devices to ensure all desktop devices can run the program.
From your Desktop device (macOS or Windows), open the ArkThinker Video Converter Ultimate software tool. If you have not yet installed the software, simply go to their website or access the direct download link below and install the software tool.
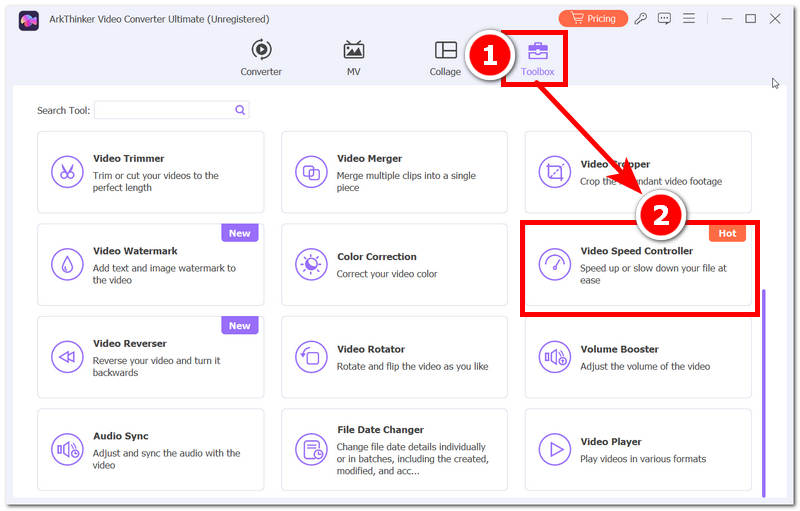
Once you open the ArkThinker software from your desktop device, navigate your way to the tool’s Toolbox menu section to access all the various video and audio tools offered by the software.
From Toolbox, locate and select the Video Speed Controller feature to access the features that will allow you to change your video or audio file speed. After that, simply choose your file to load into the software.
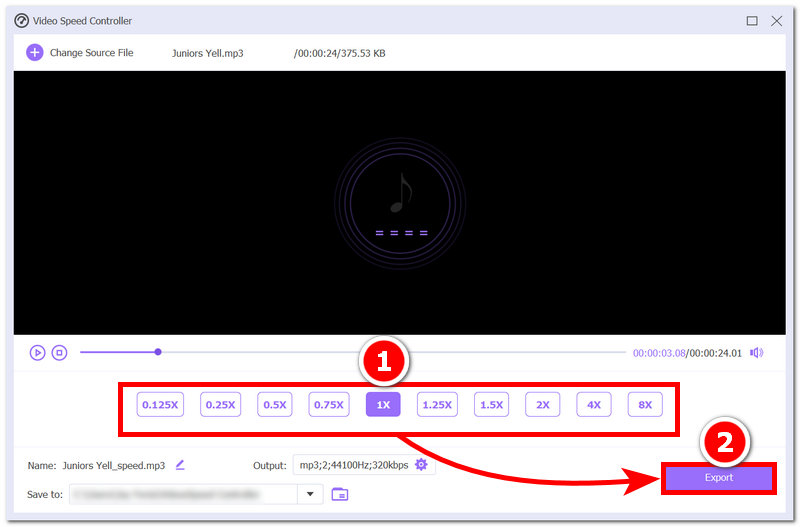
Once your video or audio file is loaded into the software tool, the Video Speed Controller feature, you will immediately see the media speed control right beneath the play button of your file. From there, choose your preferred speed, and after that, click on the Export button to have it be saved to your desktop device.
Part 2. Method 2: Slowing Down Audio Using Audacity’s Change Tempo Effect
If you are more adept at using an audio or sound engineering tool like Audacity, you may also use it to change the audio speed without affecting your audio pitch or its quality. As Audacity is jam-packed with features to perfect audio quality, users can only use this software to slow down music files; otherwise, users will have to convert video file formats into audio file formats compatible with Audacity.
From your Desktop device, open your Audacity software and begin by importing your audio file into the software with which you wish to change the speed.
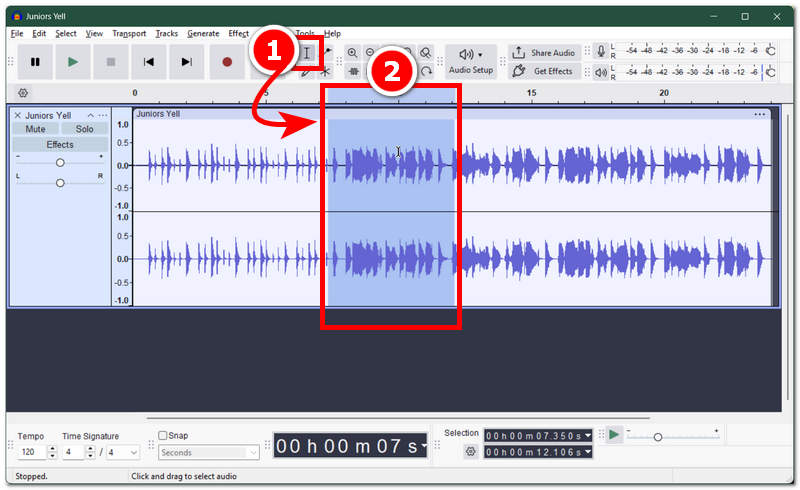
After importing your audio file, click on the Selection tool located in the upper part section of Audacity and simply highlight or select the area in your audio file that you wish to change the speed of.
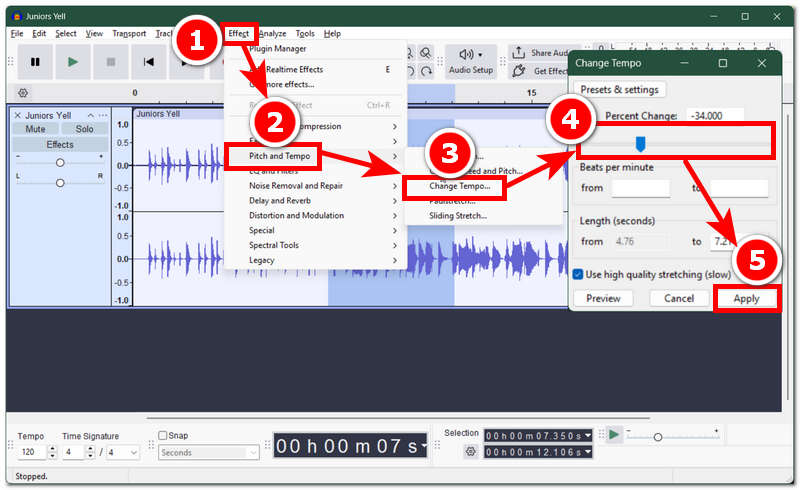
After highlighting the area, simply navigate your way to the Effects tab and from there click on the Pitch and Tempo. To change your audio file speed, choose the Change Tempo option from the selection.
After selecting the Change Tempo option, a new window will appear on your screen, and from there you will see the file speed slider. To slow down the highlighted parts of your audio file, simply move the slider to the left.
Once you are satisfied with the change of speed you’ve made in your audio file, click on Apply to apply the changes effectively in your audio file, and from there, you feel free to export your audio file to your desktop device to have the playable file be saved from the designated folder.
Part 3. Method 3: Using YouTube’s Native Playback Speed Settings
If you happen to be watching a YouTube video or listening to a podcast or music on the platform and you wish to adjust its speed, you may do so easily by using the built-in speed changer feature located in the quick playback settings. This method will only work on the content that is available on the YouTube platform; an external video or audio file will need to be uploaded onto the platform before users can change its speed in real-time, but on the brighter side, you may perform this method on your mobile and desktop devices as long as you have the YouTube app.
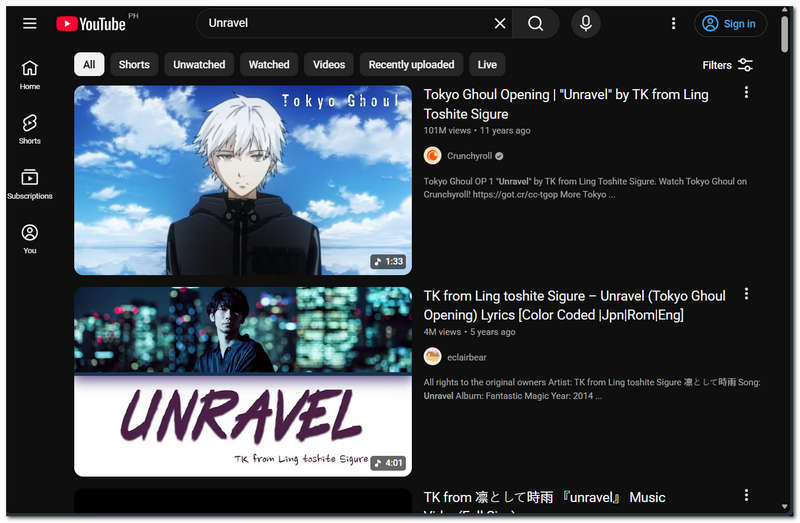
Using your mobile device YouTube app or desktop device web browser, go to YouTube and search for the content you want to change its playback speed.
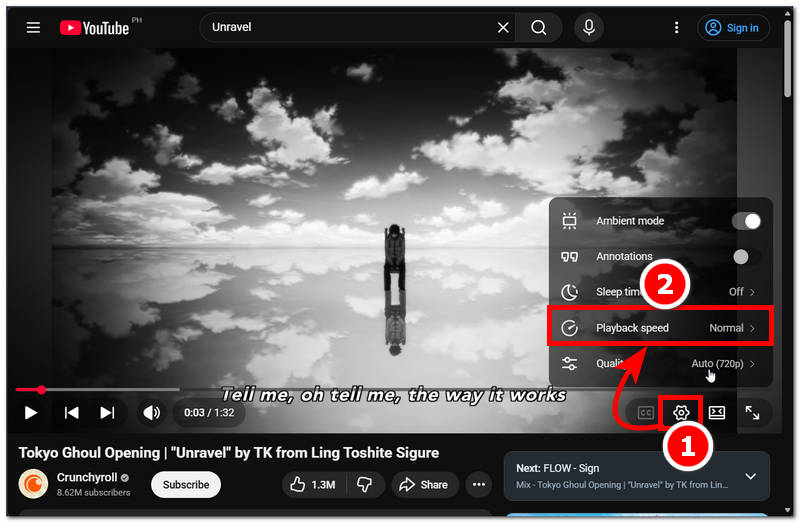
Once you have your YouTube content playing on your screen, to access the playback speed setting, navigate your way to the lower right corner of your screen and click on the Settings icon from there to locate the Playback Speed setting.
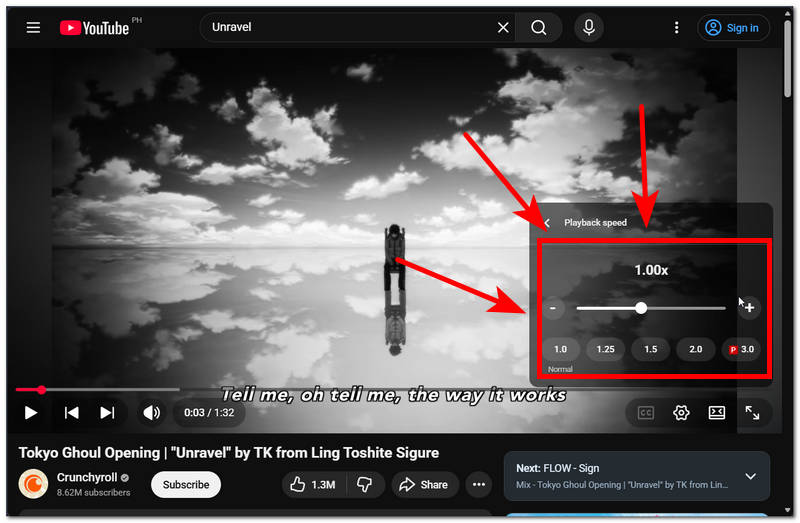
After clicking on the Playback Speed setting, you will gain access to the video speed slider. To make the YouTube content slower, simply adjust the slider to the left. This will change the playback speed of YouTube content in real-time.
Part 4. Method 4: Mobile App Solutions (Amazing Slow Downer)
If you happen to have a mobile device and are using it to play your favorite audio file, and for some reason you wish it to be played a tad bit slower but don’t know how, then this fourth method will introduce you to a mobile app to slow down music. This app is very handy as it can be used to slow down audio and video file making it accessible to mobile users.
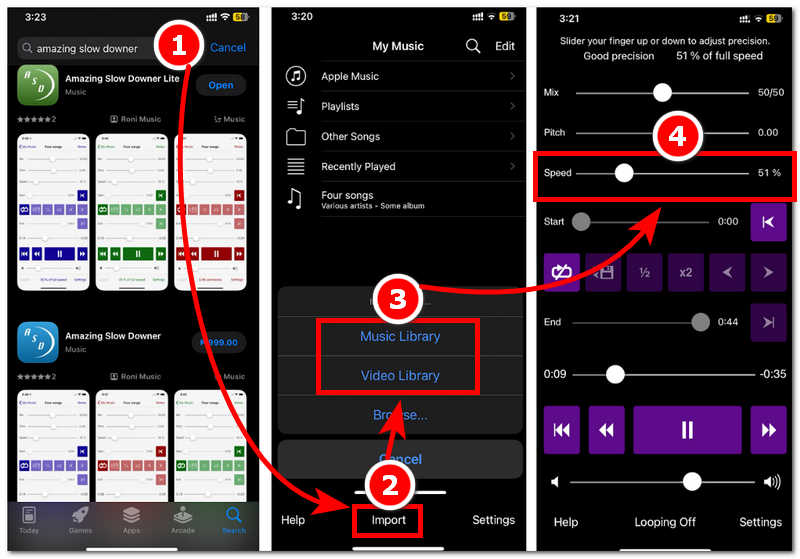
Using your mobile device, open the Amazing Slow Downer application from your device. If you have not yet installed the app, check it on your app store for availability.
Once you are in the Amazing Slow Downer app's main interface, proceed to import the music or video file you wish to slow down using the app’s Import button in the lower part of the app.
After importing your media of choice, you can make adjustments to it, such as its pitch, looping, and more. But for this instance, navigate your way to the Speed slider and proceed to adjust the slider to the left to make your media file slower.
Part 5. FAQs about How to Slow Down Music
Does slowing down music reduce audio quality?
Yes slowing down music can reduce audio quality especially if its done excessively. That’s why it is important for users to check their audio after every adjustment so that they can check the quality while also slowing down their audio file to their preferred setting.
What audio formats can be slowed down?
The file formats that can be slowed down or supported by tools and software to tone it speed down are the file format such as MP3, WAV, AAC, FLAC, and OGG.
Conclusion
This article have shown users that it is to slow down the speed of a music or audio is possible regardless of what device, platforms you are using. This article listed four methods how users can slow down music speed in various platforms and devices which includes the use of a free to use and fast processing video and audio speed adjustment tool ArkThinker up to using a mobile app for convenient.
What do you think of this post? Click to rate this post.
Excellent
Rating: 4.8 / 5 (based on 458 votes)


