


How to Record with a Webcam on a Mac: A Friendly Guide for Beginners
Recording with your Mac’s built-in webcam is an easy and efficient way to create videos for personal, academic, or professional purposes. When you're making video calls, creating tutorials, or even recording content for social media, you might find yourself wondering: How do I record with my webcam on Mac? Fortunately, your Mac has some excellent built-in tools that can help you do just that.
In this guide, we will share 4 easy ways to capture videos with your Mac webcam, from the simplest built-in tools to pro-level apps that make your projects shine. Now, let’s get started.

- GUIDE LIST
- Part 1: Is It Possible to Record High-Quality Videos with a Mac Webcam
- Part 2: How to Record with a Webcam on a Mac in 4 Ways
- Part 3: Bonus Tip: Combine iPhone or iPad Camera (Continuity Camera)
- Part 4: Tips for Improving Your Recordings on Mac
- Part 5: FAQs
Part 1: Is It Possible to Record High-Quality Videos with a Mac Webcam
The short answer is yes, absolutely!
Mac webcams, especially in newer models, offer pretty good video quality, often up to 720p or even 1080p on some MacBook Pro models. If you’re planning to record videos for casual use, such as video calls, tutorials, or vlogs, your Mac's built-in webcam should be more than enough.
However, there are a few things you may want to consider to get the best video quality. Watch out! A few simple things, like sketchy Wi-Fi, a background piled high with laundry, or dim light, can seriously sabotage how good your final video looks. If you’re noticing issues like grainy video or poor resolution, these could be due to factors other than your webcam.
Why can’t I record a video on my Mac?
If you’re having trouble recording video on your Mac, it may be due to one of several common issues.
First, ensure that your webcam is functioning properly. If your Mac is not recognizing the webcam, you might need to check the privacy settings or restart your Mac.
Also, if you’ve never used your webcam before, you may need to grant permission for apps to access it.
If you’re still having trouble, check if the software you’re using to record has the correct input device selected (in this case, your webcam). The issue could also be related to the app's settings, so it’s worth reviewing those as well.
Part 2: How to Record with a Webcam on a Mac in 4 Ways
Now that you know it’s possible to record high-quality videos on a Mac, let’s look at four methods for recording with your Mac’s webcam. Each method is straightforward to use, and I’ll break them down step-by-step, providing tips and tricks I’ve learned from personal experience.
1. QuickTime Player
QuickTime Player is one of the most straightforward ways to record videos on your Mac. It’s built right into macOS, so there’s no need to download or install anything. QuickTime is ideal for those who want a straightforward solution for recording videos without any unnecessary extras.
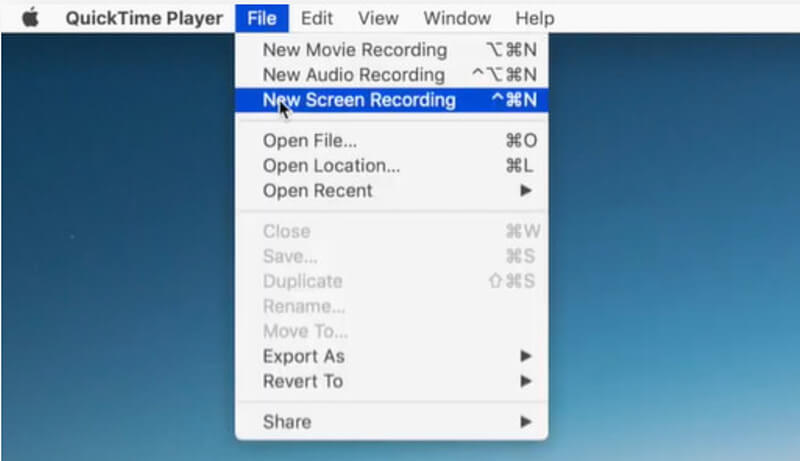
Open QuickTime Player
Please find it in your Applications folder or use Spotlight (Command + Spacebar) to search for it.
Start a new movie recording
Go up to the menu bar, click File, and then select New Movie Recording. A window should appear, displaying your webcam feed.
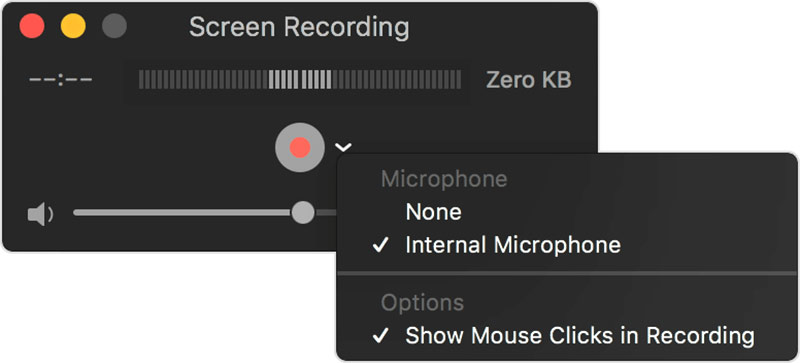
Check settings
Before you hit record, look for the small down arrow next to the red record button. Click it to choose your camera (if you have an external one plugged in), the microphone source, and the quality setting (High/Maximum).
Pro tip: Always choose the highest quality you can, as you can always compress it later.
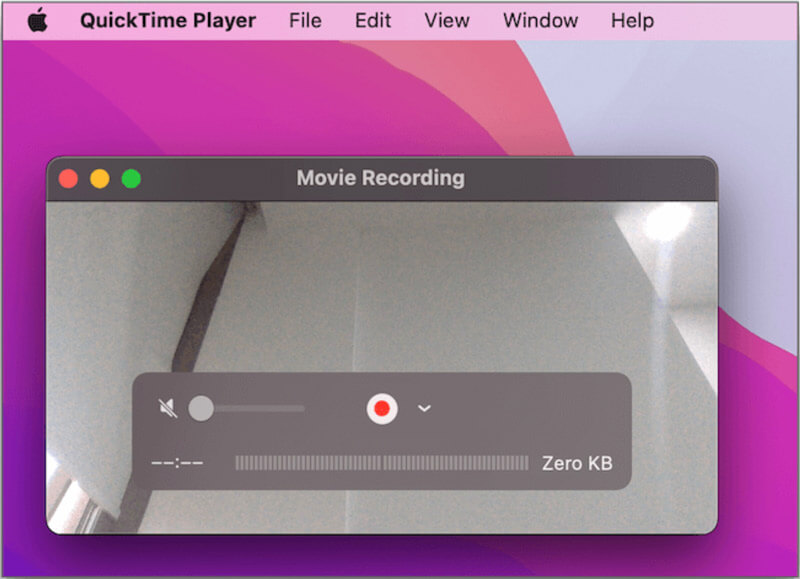
Start recording
Click the red circle, and the countdown begins! To stop, click the square inside the red button.
Save your file
As soon as you close the recording window, QuickTime pops up a little box asking exactly where you want to save your QuickTime screen recording. Name it something logical (like HistoryProjectIntro_Final.mov) so you can find it easily!
Summary:
QuickTime is my go-to for quick webcam recordings. I’ve used it to record everything from casual vlogs to presentations. The simplicity of it is what I love most. The quality is decent, and the app lets me save the recording immediately. However, you won’t get advanced editing features like you would with other tools, so it’s perfect for basic recording needs.
QuickTime Player is a solid, no-frills option that’s perfect for those who need to record webcam videos quickly and easily. If you're looking for a simple solution with minimal setup, this is your best option.
2. ArkThinker Screen Recorder
If you need a bit more flexibility or want to add extra features to your recordings, ArkThinker Screen Recorder might be a better choice.
This tool enables you to annotate something on the screen while you talk, schedule a recording for later, or record separate audio tracks. When your project requires numerous features, this webcam recorder for Mac is the ideal solution.
Additionally, this Mac webcam recorder provides you with incredible control over your output, including custom frame rates, advanced audio noise reduction, and the ability to record just a portion of your screen alongside your webcam feed. While the built-in apps are great, an advanced tool takes the lead when you need professional-looking results for larger projects or remote internships.
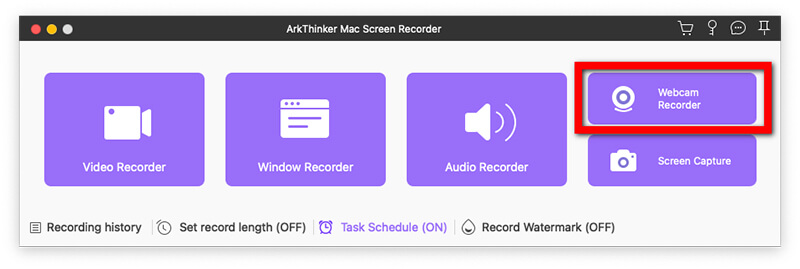
Select Webcam Recorder
After installing the software, please open it and select the Webcam Recorder mode, and adjust the window to fit your preferences. Also, don't forget to toggle on system and microphone sound as needed.
Advanced setup (optionally)
This is where it shines. You can always check the settings to enable the built-in noise reduction and set my output format to MP4 (it’s easier to upload everywhere). You can also often click the Task Scheduler feature if you need to record a talk or a remote session happening at a specific time.
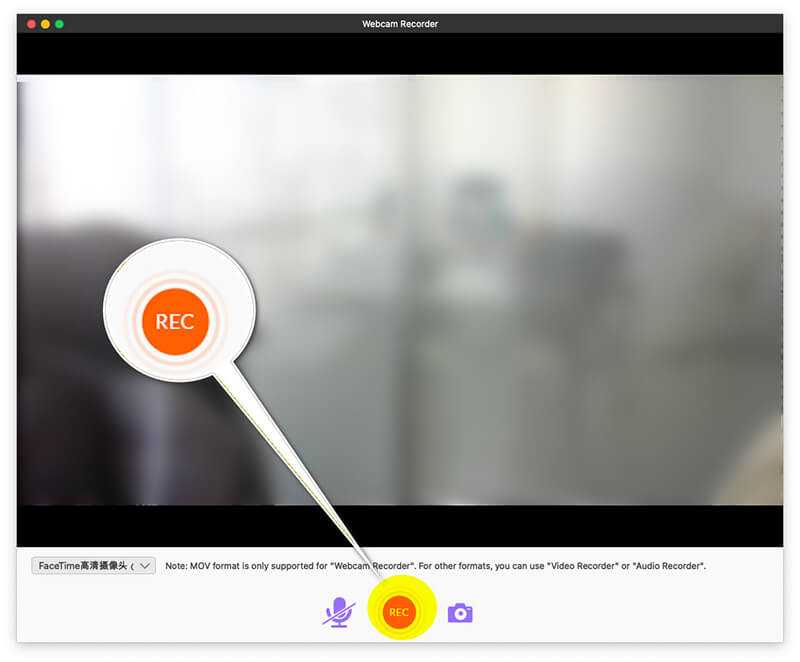
Record webcam on Mac
Once you are ready, just click REC to start recording webcam on your Mac.
While recording, you can use the floating editing bar tool.
For example, in a recent math tutorial you will make, you can use the software's screen drawing tool. Once you place your face cam right where you want it. Then you can grab the pen tool and actually circle or highlight key equations while walking through the problem—it makes a math tutorial so much easier to follow! This feature makes tutorials so much more engaging!
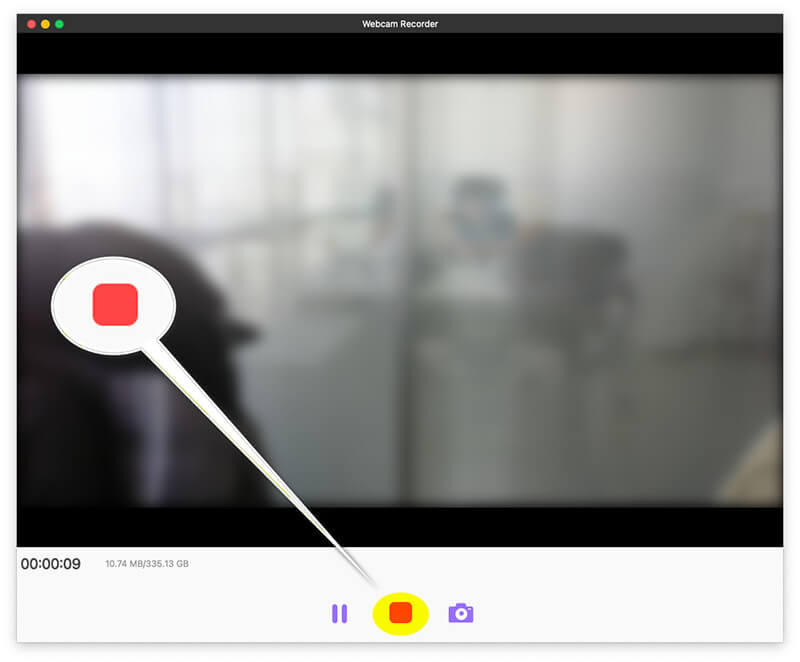
Export webcam recording
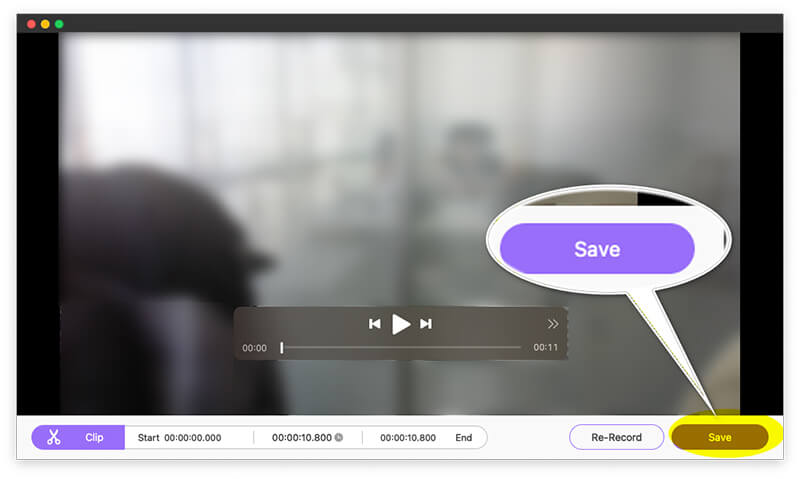
Once finished, click Stop and save your video.
The best part is the export options. You can often choose to export just the video, just the audio, or the whole thing with custom settings, ensuring the final file size is perfect for uploading to your school's server or YouTube.
Summary:
I tried ArkThinker Screen Recorder when I needed to record my screen along with my webcam for a project. The process was smooth, and I loved that I could adjust the webcam size and position during the recording. I had no issues with performance, and the video output quality was good. I also appreciated the extra editing features, which allowed me to trim the video afterward. It’s easy to use and provides more features than QuickTime, making it ideal for more advanced recording projects.
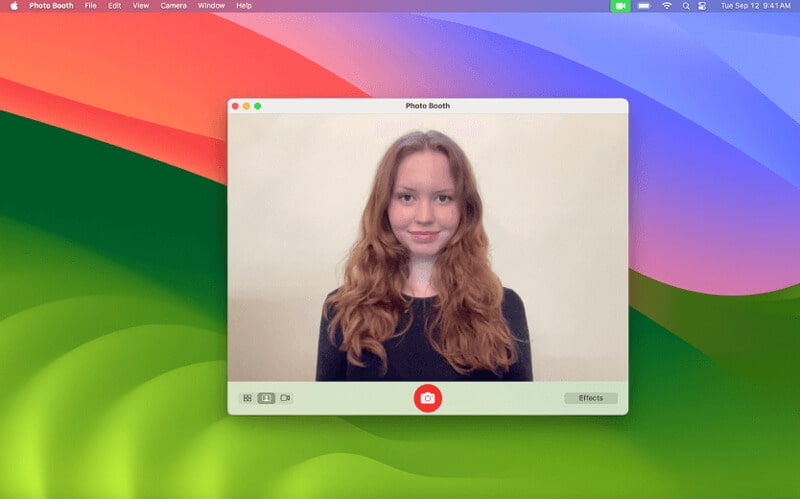
3. Photo Booth
If you want something even simpler, Photo Booth is another built-in webcam recorder software on Mac that enables you to record videos using your webcam. It’s more known for taking photos, but it also has a video recording option that’s super easy to use.
Launch Photo Booth
It’s in your Applications folder, usually near the bottom.
Switch to Video Mode
Look for the small button in the bottom left corner. It usually has three icons: one for a photo, one for a four-up photo strip, and one for a video camera. Click the video camera icon.
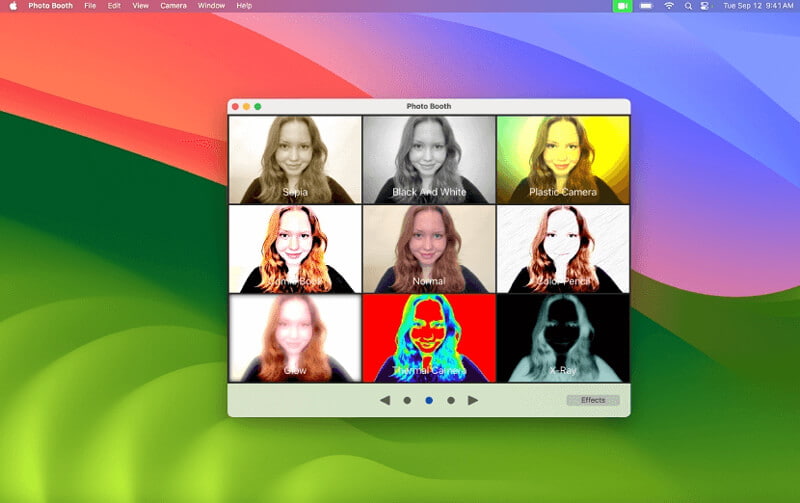
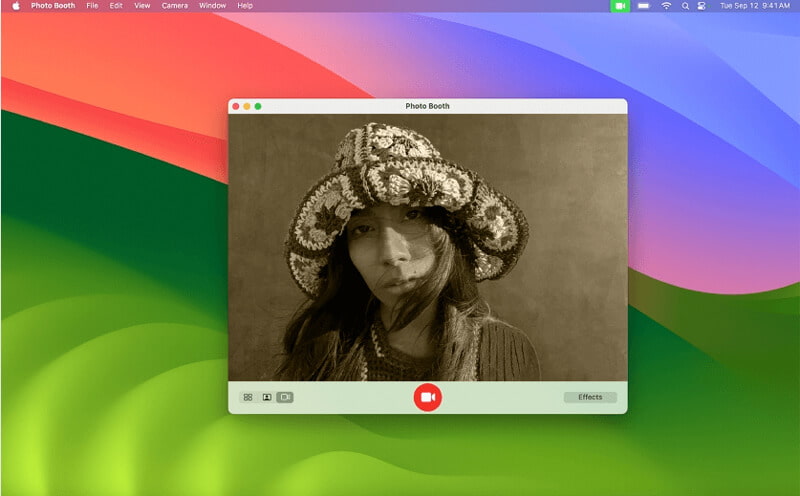
Check out the Effects
Go to Effects in the bottom-right corner (the small grid icon). This is where the magic is! Try out the kaleidoscope or the light tunnel effect. You can use the space background for a ridiculously quick sci-fi short film project.
Record and review
Click the big video camera icon in the center. It will count down (3, 2, 1...), and then you're ready to record! To stop, click the same button. Your video automatically appears on the film strip along the bottom.
Share webcam recording file
Simply drag the video from the bottom filmstrip right onto your desktop or into an email, and it’s that easy!
Summary:
I’ve used Photo Booth when I needed a quick recording for fun or a lighthearted project. It’s super easy to use, and I love the silly effects I can apply to the video. It’s not the most professional option if you need advanced features, but for casual use, it does the job.
Photo Booth is perfect for those who want a quick and simple way to record a video without worrying about settings or complicated software. If you just need to capture a quick clip, this is a solid choice.
4. iMovie
If you want to get creative and edit your videos after recording, iMovie is a fantastic option. While iMovie is primarily a video editing app, you can use it to record directly from your Mac’s webcam.
Open iMovie and Start a New Project
Create a new Movie project first.
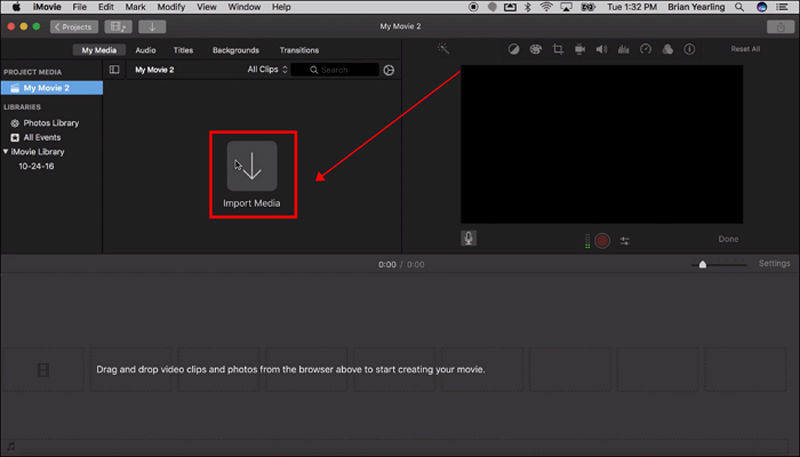
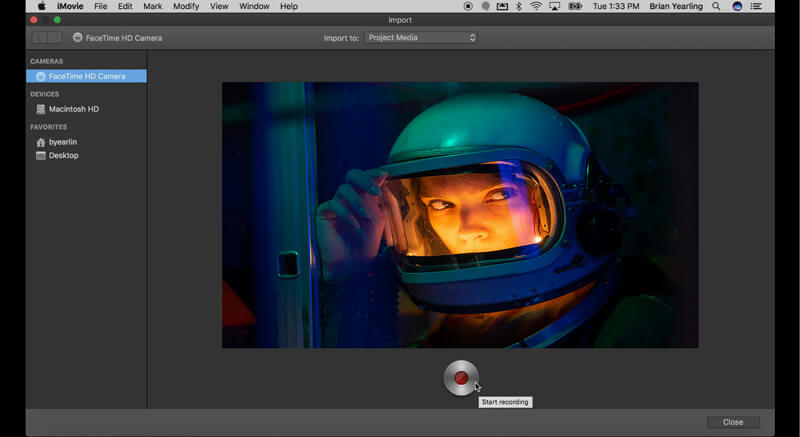
Select Cameras
Click the Import media button (represented by a downward arrow icon). This window lets you select clips you've already made (like those from QuickTime) or, more importantly, use the Cameras sidebar to select your MacBook's camera and record directly into the project.
Record segments
Instead of one long recording, you can record short, polished segments right into the timeline. For instance, when you record my introduction, stop, edit it, and then record the next segment, ensuring each part is perfect before moving on.
Export webcam recording
Once all the recorded webcam clips are on the timeline, you can drag and drop your royalty-free music, add titles (iMovie has some great built-in styles!), and then share the final project directly to YouTube or export it as a single file.
Summary:
I love iMovie for recording when I want to add some edits right after filming. The video quality is great, and I can easily trim, cut, or add effects. However, it’s a bit more involved than the other options, so I only recommend it if you plan to edit your video afterward. Besides, iMovie only is built-in on Mac computer, and if your computer is Windows, then you need to check iMovie for Windows.
iMovie is an excellent option for recording webcam footage and editing it afterward. It’s more feature-rich than the simpler tools, but it’s also more time-consuming.
Part 3: Bonus Tip: Combine iPhone or iPad Camera (Continuity Camera)
If you have a recent Mac and an iPhone or iPad (both on the same Wi-Fi network and signed into the same Apple ID), you can use a feature called Continuity Camera. This is a game-changer! It lets you use your iPhone’s vastly superior rear camera as your Mac’s webcam.
It works automatically in apps like QuickTime or FaceTime. Simply open QuickTime's New Movie Recording, click the camera selector, and your iPhone will appear as an option. You get much higher resolution, better low-light performance, and cool features like Center Stage (on supported devices), which keeps you framed perfectly.
Part 4: Tips for Improving Your Recordings on Mac
To make sure your webcam recordings look as good as possible, here are a few tips I’ve picked up over time:
Good Lighting is Key
Natural light works best, but if that’s not available, try using a ring light to evenly light your face and avoid shadows.
Stabilize Your Mac
Ensure your Mac is placed on a stable surface. Using a tripod or stand can help keep it steady.
Clean Your Webcam
It’s easy to forget, but dust or smudges on the webcam lens can reduce the quality of your video.
Test Audio
If you're recording with audio, check your microphone levels to avoid clipping or distortion.
Background
Make sure your background isn’t distracting. If possible, choose a clean or neutral backdrop for a professional look.
Part 5: FAQs
Q: Can I record with my Mac webcam without installing any software?
A: Yes, you can use QuickTime Player, Photo Booth, or iMovie without needing to install additional software.
Q: How do I improve my webcam video quality on a Mac?
A: To improve webcam video quality on your Mac, make sure you have proper lighting, avoid cluttered backgrounds, and clean your webcam lens. You can also use apps like ArkThinker or iMovie that offer additional settings and features to enhance video quality.
Q: Can I record my screen and webcam at the same time on a Mac?
A: Yes! Apps like ArkThinker Screen Recorder and iMovie allow you to record both your screen and webcam simultaneously, which is perfect for tutorials or presentations.
Q: Does my MacBook’s built-in webcam support HD recording?
A: Most newer MacBooks have built-in webcams that support at least 720p or 1080p resolution. While the quality is good for casual recordings, it’s always best to ensure you’re recording in a well-lit environment for the clearest video.
Conclusion
Recording with your Mac’s webcam is easier than ever, thanks to the variety of tools available. Whether you’re using QuickTime Player for a quick recording, ArkThinker for more advanced features, Photo Booth for fun and casual clips, or iMovie for professional-level editing, there’s an option for every type of user.
What do you think of this post? Click to rate this post.
Excellent
Rating: 4.8 / 5 (based on 487 votes)