


Record Screen With Quicktime on Mac, iPhone, and iPad
The QuickTime application is familiar to your eyes if you are an Apple user. It is a program that allows you to play video files using your desktop computer. In fact, it is the default multimedia player for Mac devices. QuickTime can edit movies, such as trimming, rotating, and rearranging. It is also possible to record your screen activities. Do you want to know how? If yes, proceed to the following parts that will help you to record screen with QuickTime.

- GUIDE LIST
- Part 1. How to Screen Record with QuickTime on Mac
- Part 2. How to Screen Record with QuickTime on iPhone/iPad
- Part 3. How to Stop QuickTime Screen Recording
- Part 4. Best Alternative to QuickTime Screen Recorder
- Part 5. FAQs about QuickTime
Part 1. How to Screen Record with QuickTime on Mac
This part will present detailed information on enabling screen record on your Mac device. To learn about this, proceed to the steps provided.
On your Mac device, open the QuickTime application. From the top menu bar of the program, click the File tab, and select New Screen Recording from the applied list. After that, a recording tool will appear on your screen. Click the Down arrow to choose whether to enable QuickTime screen recording with audio. In addition, you can apply Show Mouse Clicks in Recording if you want to.
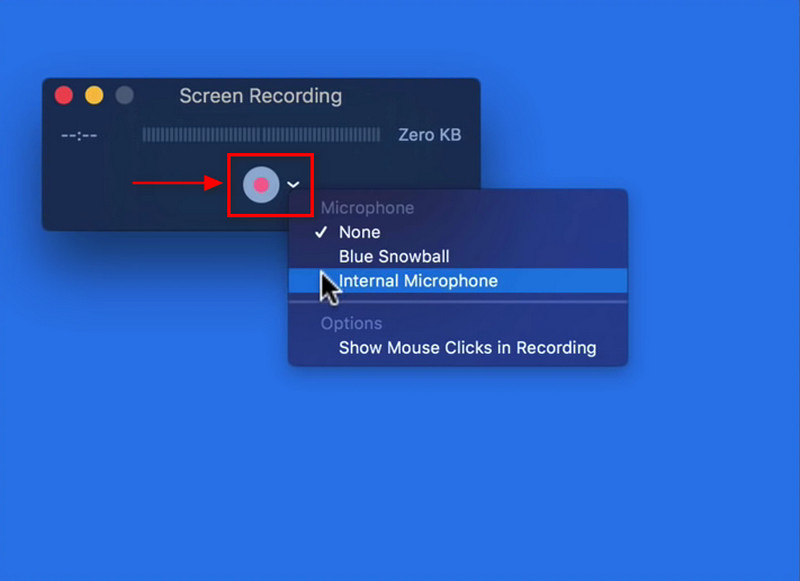
Once ready, hit the Recording button to start the recording process. In this part, you can choose whether to record the entire screen or select a portion of the screen. If you only need to record part of the display, click and drag over that section. After that, click the Start Recording button on your screen.

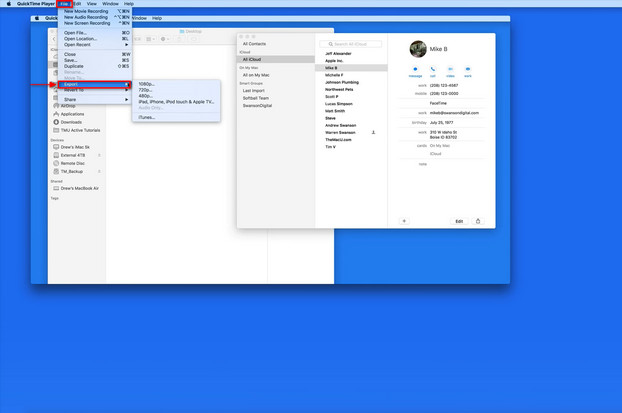
Once you are done recording your screen, navigate to the application, right-click, and select Stop Screen Recording. After that, your untitled recorded video will appear on your screen. To save your recorded video, click the File tab, proceed to the Export button, and select your preferred size.
Part 2. How to Screen Record with QuickTime on iPhone/iPad
This part will provide knowledge on enabling screen record on your iPhone device using the QuickTime application. Read the following steps to learn how to record screen with QuickTime.
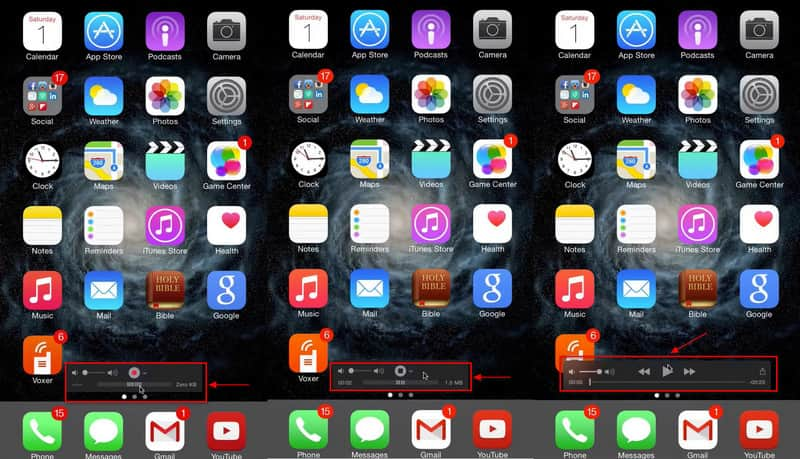
First and foremost, connect your iPhone to your desktop computer. Go to your iTunes application to ensure that your device is connected.
Open your QuickTime application, proceed to the File tab, and select New Movie Recording. Once the recording option appears on your screen, click the Down arrow icon, and select iPhone. After that, click the Record button to start recording your screen.
When you are done recording your screen, click the Stop button, and your video will show up on your desktop computer. The phone screen is recorded with the help of your desktop computer.
Part 3. How to Stop QuickTime Screen Recording
There are cases in that QuickTime’s stop button is not responding or functioning. With that said, this part will present alternative ways how to stop QuickTime screen recording.
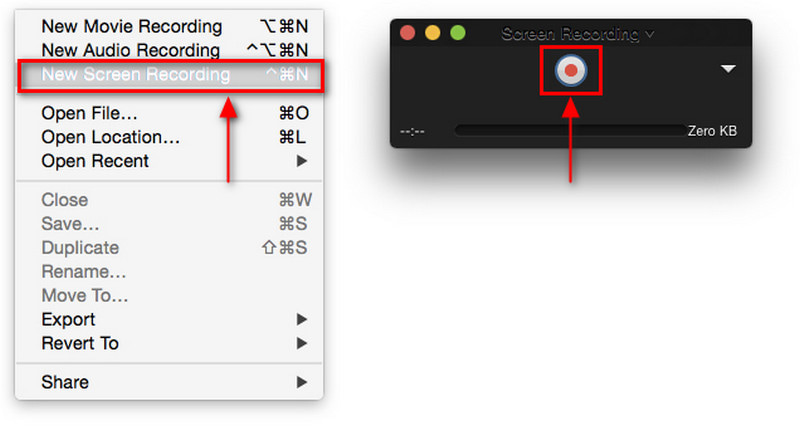
Using your Mac, launch the QuickTime application. Go to the File tab from the main interface and the top menu bar. From the applied list, click the New Screen Recording. Alternatively, press CTRL + Command + N keys together on your keyboard.
The recording option will appear on your screen. Click the Arrow down button if you want your audio to be recorded. After that, hit the Red button to start recording.
Suppose you cannot find the Stop button but want to stop the recording; press ESC on your keyboard. After that, the recording bar will appear on your screen, where you can find the Stop button. Alternatively, you can press CTRL + Command + Esc keys on your keyboard to stop the recording immediately.
Part 4. Best Alternative to QuickTime Screen Recorder
If you are looking for another screen recorder application to record your screen, you can rely on ArkThinker Screen Recorder. This program is accessible and downloadable using your Mac or Windows device. This program has a straightforward interface that is easy to control and master. You do not need to know about screen recording, as this recording tool is easy to use. It has a built-in feature that can record your screen activities. It can record your video, audio, game, window, webcam, and phone. Before you record your screen, it permits you to choose your preferred screen size. You can record the full screen or just your desired portion on your screen. Moreover, you can overlay your face and voice by enabling the Webcam and Microphone. This program is the best alternative recording tool you can use. To learn how to record your screen using this program, proceed to the following steps.
Download and Install
First and foremost, download and Install the program on your desktop computer. After the installation procedure, open the program to get started.
Open Video Recorder
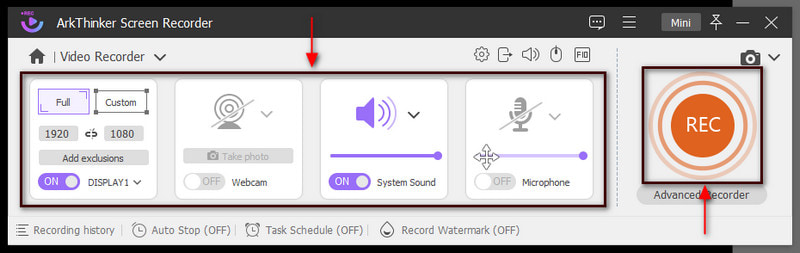
Once you open the program, the built-in features will are presented on the screen. Click the Video Recorder, which will bring you to the recording options. To enable recording, the first thing that you need to do is to turn on the Display. From there, you can choose whether to record in full screen or select a window or region on your screen. Also, turn on the Webcam if you want to overlay your face. Next, turn on the System Sound, and adjust the volume. In addition, if you want to add your voice to the recording, turn on the Microphone. Once done, hit the REC button to start recording your screen.
Stop Screen Recording
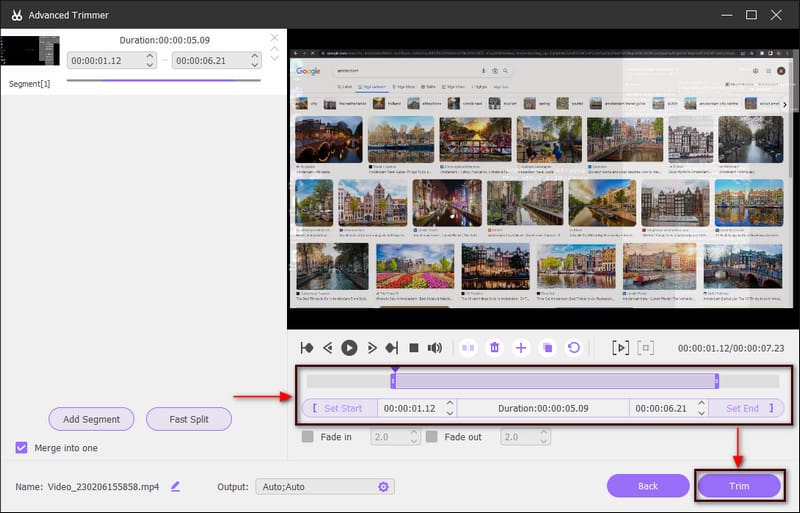
Once you are done, click the red box that indicates Stop. After that, the preview window will appear on your screen, presenting the screen-recorded video. If you want to remove unnecessary parts from your recorded video, click the Advanced Trimmer. Drag the sliders from the parts you need, and the unhighlighted parts will leave them out. Once done, click the Trim button, and the highlighted parts will retain.
Save Recorded Video
Once you are done recording your screen, hit the Done button to save your recorded video. After that, it will lead you to the recorded history, where your screen video is on the top list. You can play your recorded video on your media player and can locate it in your folder.
Find More Solutions
Tutorial to Crop and Resize a Video in QuickTime Player Compress MOV File – How to Compress a QuickTime MOV FilePart 5. FAQs about QuickTime
What is the best video format for QuickTime Player?
The best video format for QuickTime player is MOV, which holds high-quality audio, video, and effects. MOV file format uses MPEG-4 encoding to play it smoothly.
What is QuickTime used for?
QuickTime is used to carry out graphics, music, text, sound, and video. In addition, QuickTime is used as an audio player, image viewer, movie player, and virtual reality tool.
Why is my MOV file not compatible with QuickTime?
The reasons might be outdated QuickTime, wrong media encoding, corrupted files, or missing required codec. The wrong codec or incompatibility might be why QuickTime can't play MOV.
Conclusion
By this post, you already know how to record with QuickTime. In addition, it supplies methods on how to stop QuickTime screen recording that you can use. You can now record the screen of your Mac, iPhone, or iPad using the program and relying on the steps. In addition, it presents ArkThinker Screen Recorder as an alternative to record your screen. It is the best alternative recording tool you can count on to record your audio and video excellently.
What do you think of this post? Click to rate this post.
Excellent
Rating: 4.9 / 5 (based on 112 votes)
Relative Articles
- Record Video
- OBS Screen Recorder: Powerful Screen and Broadcasting Tool
- How to Fix Audacity Won’t Record Issues in 5 Basic Methods
- How to Enable Google Meet Recording on Your Desktop
- Guidelines on How to Trim a Video on Facebook Effectively
- How to Zoom in on a Video with Most Helpful Methods
- Top 7 Video Cropper that Excellently Crop and Resize a Video
- Top-Notch Video Trimmer Available on Windows, Mac, Android, and iOS
- How to Create an Instagram Filter Using Excellent Tools
- Easy Guidelines on How to Trim a Video on Snapchat
- Easiest Ways to Shorten a Video on Different Devices