


How to Make an Image to GIF: A Simple Guide for Beginners
GIFs have become a central part of our online culture. From expressing reactions to conveying emotions, GIFs allow us to share a moment in a fun and lively way. If you’ve ever wanted to turn a single image or a series of photos into a GIF, you’re not alone!
We will share 3 easy pic to GIF maker here, and with a detailed beginner guide to convert an image to GIF. Whether you're trying to create a series of reaction GIFs for your group chat, a neat little animation for a school project, or a professional-looking loop for a blog, you can find the steps easily.
Part 1: Why Convert Image to GIF
Before we get to the how-to, let’s spend a quick minute on the why. Why are GIFs so popular, and what are the best ways to use them?
A Graphics Interchange Format (GIF) file is essentially a collection of images displayed in rapid sequence, creating a loop. Because they are universally supported and don't require you to press play like a video, they are incredibly versatile.
Expressing Emotion (The Classic Use)
The most common reason! You can take a series of your own photos, and maybe a silly face progression or a reaction shot, and transform them into a hilarious pic-to-gif reaction that you can deploy in any conversation. It’s a step up from an emoji and far more personal.
Creating Mini-Tutorials or Demos
For a school presentation or a quick help guide for a friend, a GIF is brilliant. Instead of recording a long video showing how to, say, open a specific menu, you can quickly capture the steps as stills and convert those images to GIF format. It’s silent, auto-playing, and loops perfectly.
Showcasing Photography or Art
If you’re a budding artist or photographer, you can use the image to GIF format to show the process of creating a piece of work, from the first sketch to the final result. It's a visually stunning way to show off your talent quickly.
Sprucing Up a Website or Email
A subtle, looping GIF can make a static webpage feel more dynamic without bogging it down with a heavy video file. It’s an effective way to make a GIF from stills that draws attention to a specific part of your page.
Part 2: How to Convert Image to GIF
Ready to transform your static images into moving magic? I’ve personally experimented with various tools, from heavy-duty software to super-fast online options. Here are my favorites, broken down by what they do best.
Method 1: ArkThinker Video Converter Ultimate
If you are looking for a powerful desktop tool that handles everything: video conversion, editing, and yes, creating a high-quality GIF maker from images, ArkThinker Video Converter Ultimate is one of my favorite tools for converting images to GIFs. I’ve personally found it easy to use, especially for beginners. It allows you to convert a single image, or a series of photos, to GIF format quickly. You can also adjust the speed and frame rate, which can give you more control over how your GIF looks. This is a paid tool, but its user-friendly interface and advanced features make it worth the investment.
Free download ArkThinker Video Converter Ultimate on your computer.
Install and run it. Navigate to the Toolbox tab, which is usually found on the top menu bar. From there, select the GIF Maker option.
Then click Photo to GIF to select the tool.
Click the Add Files button and select all the static images you want to use in your animation.
Tip: Make sure your files are already named in the order you want them to appear (e.g., photo-01, photo-02, etc.).

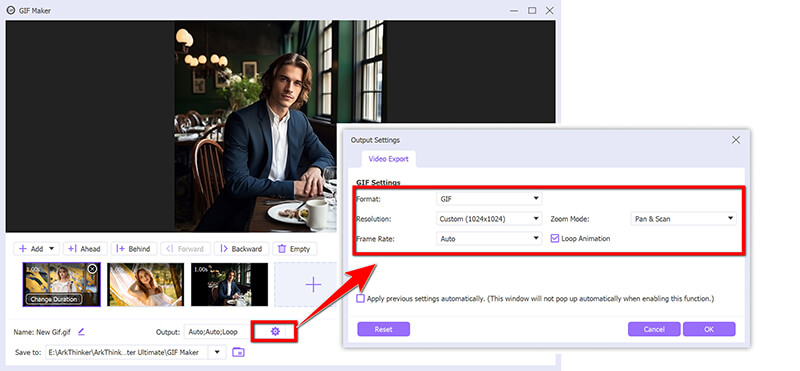
On the editing line, you can adjust each image duration.
Besides, you can make the output settings like Resolution, the Frame Rate (how fast the images flip, usually 10-15 FPS is a good starting point), and the Loop Animation setting (check this if you want it to play forever). This is where you really fine-tune your final animated loop.
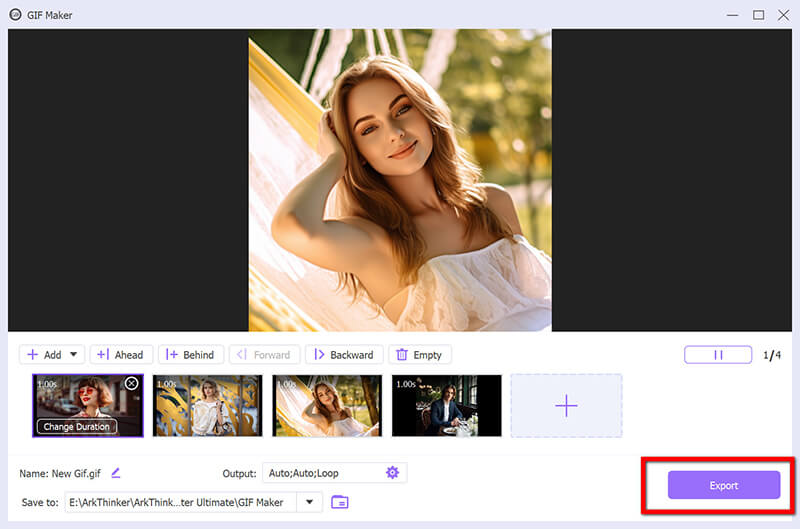
Once you’re happy with how the animation looks, choose your save location in the Save To field, and click the Export button. You’ve successfully used a professional image to GIF converter!
I started using ArkThinker when I needed to batch convert a large set of stills to GIF for a website project, and what I loved most was the sheer control. Being able to precisely set the frame rate and resolution without guesswork was a huge plus for ensuring high quality. It’s truly a premium experience for making a GIF from stills. The main limitation, however, is that it's paid software.
For a student or casual user who only needs an image to GIF a couple of times a year, the cost might be overkill. But if media conversion is a frequent task, it's worth the investment for its reliability and expertise.
Method 2: Photoshop
Photoshop is another excellent tool for converting images to GIFs, especially if you already use it for photo editing. If you’re familiar with Photoshop’s interface, this method is a great way to convert photos to GIFs while maintaining high-quality control. Plus, Photoshop allows you to animate images with precise frame timing and can handle multiple layers.
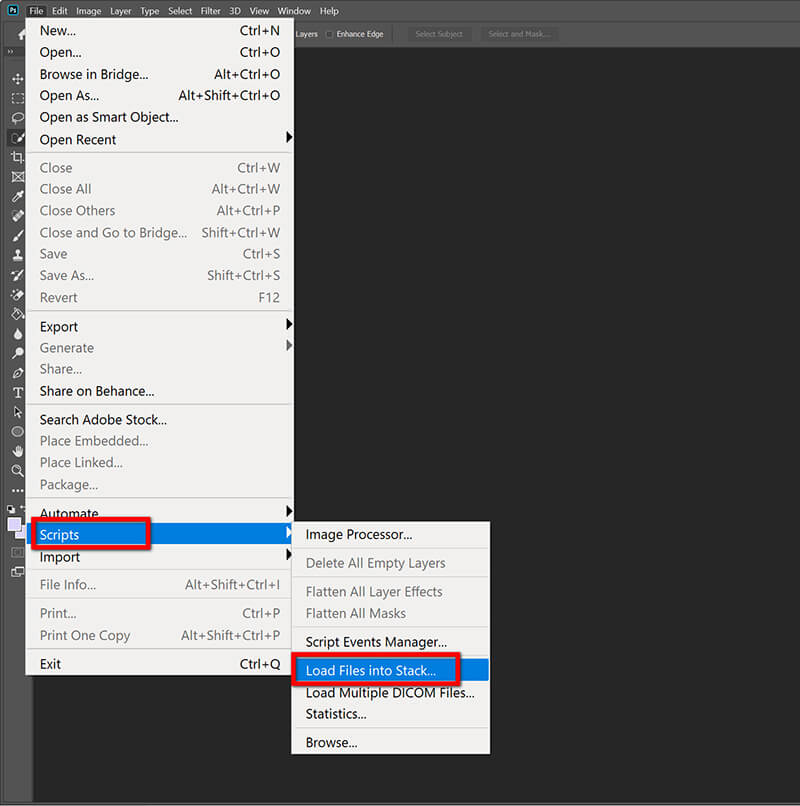
Open Photoshop. Go to File > Scripts > Load Files into Stack... and browse to select all the images to the GIF converter you want to use. Make sure the Create Smart Object after Loading Layers is unchecked. This places each image on its own layer.
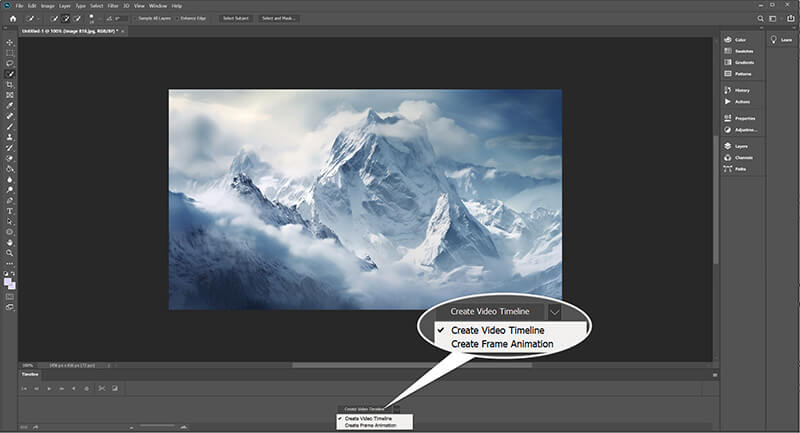
In the Timeline panel (Go to Window > Timeline), click the button that says Create Frame Animation (it might default to Create Video Timeline, so make sure to click the small icon on the right to switch).
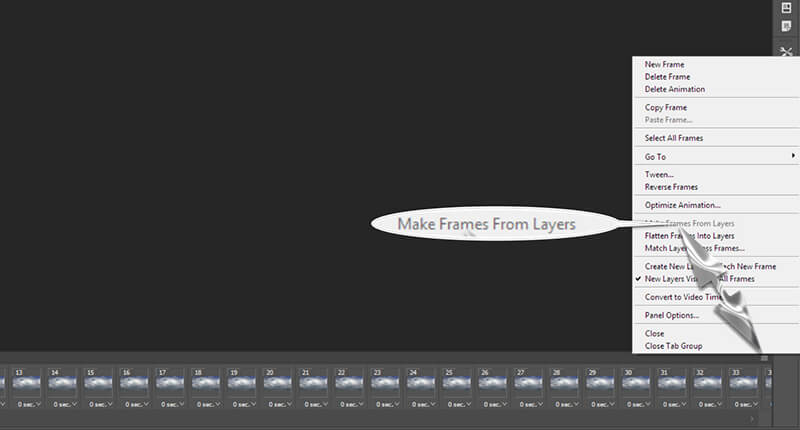
Click the hamburger menu (three horizontal lines) in the top right of the Timeline panel. Select Make Frames From Layers. This instantly turns each layer into a frame in your animation.
Select all frames (Shift + Click), click the time underneath a frame (e.g., 0 sec.), and set your desired delay (e.g., 0.1 or 0.2 seconds). Set the loop option to Forever.
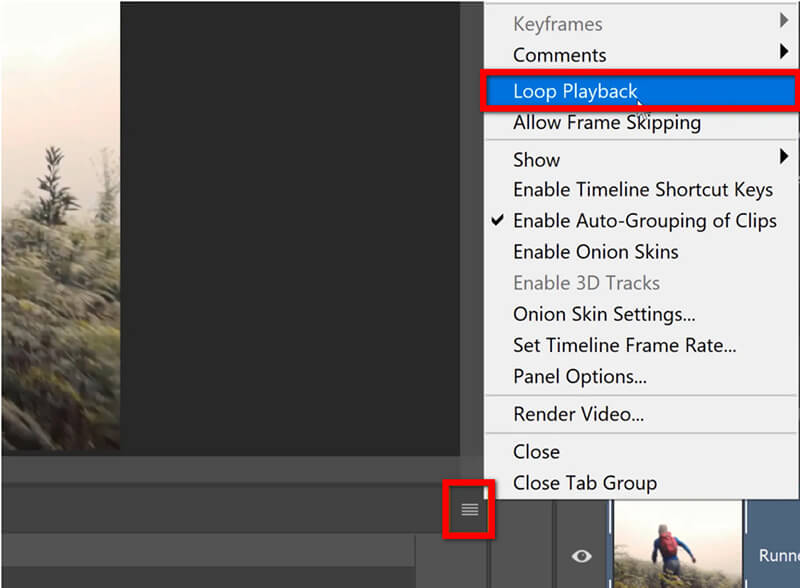
Go to File > Export > Save for Web (Legacy)... Under the Preset dropdown, choose GIF. Ensure the Looping Options at the bottom are set to Forever. Click Save. This process ensures the highest quality output for your pic to GIF.

I use Photoshop when I need maximum control, like perfectly aligning elements across frames or adding subtle fading effects. The granular control over timing, color palette, and dithering makes it the best image-to-GIF converter for professional or high-end results. However, let’s be real: it has a steep learning curve. If you’ve never touched Photoshop, setting up the timeline and navigating the export menu can feel overwhelming. It’s definitely not the quickest way to make a GIF from photos, and you need the paid subscription, which is a major drawback for quick, casual use.
Method 3: EZGIF
When you need an PNG/JPG image to GIF converter in less than a minute and don't want to download any software, online tools are your best friend. They are completely free, accessible from any EZGIF is one of the fantastic tools because it offers tons of editing features after you upload (like cropping, resizing, and optimizing). It is simple, efficient, and perfect for when you’re in a hurry to make a GIF from stills.
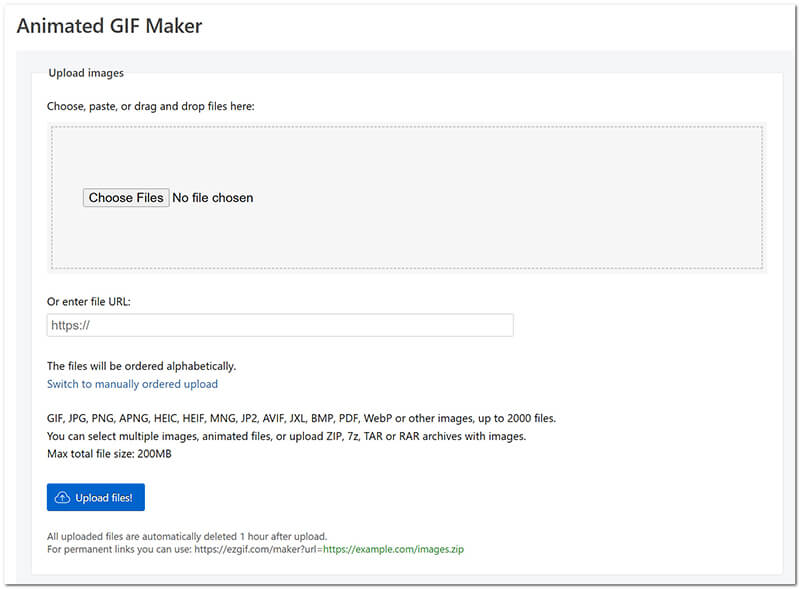
Open your browser and go to the EZGIF website. Look for the GIF Maker tool in the top navigation bar.

Click the Choose Files button and select all the images you want to include in your animation. You can select multiple files at once. Once chosen, click the Upload and make a GIF! button.
After uploading, your images will appear. You can easily drag and drop them to change the order. Below the images, you’ll find the Delay setting (in hundredths of a second, e.g., 20 = 0.2 seconds). Set your desired delay. You can also adjust the final size.
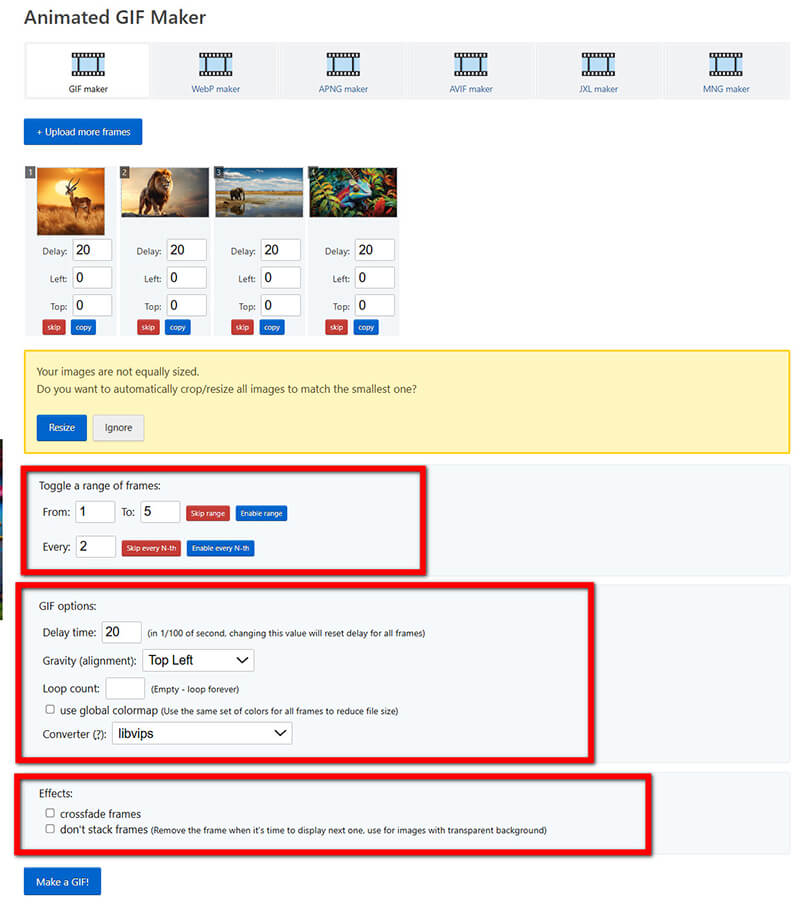
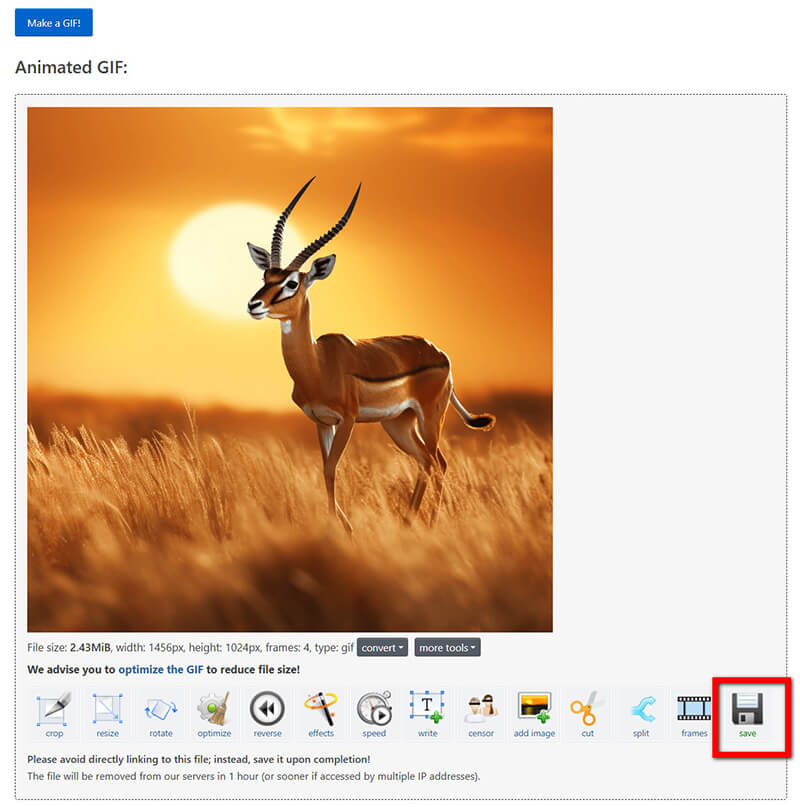
Click the Make a GIF! button at the bottom. The tool will process the animation. Once it's ready, right-click on the final GIF and select Save. Done! That's how easy it is to make a GIF from photos with an online image-to-GIF converter.
EZGIF is my go-to for speed. I love that I can get a decent-quality pic to GIF done in seconds, and the fact that it is free is unbeatable. EZGIF's editor, in particular, lets me crop or resize without needing another tool. However, the limitation is often the quality and the file size limits. If you upload very large, high-resolution images or many files, the site might struggle, or the quality of the final GIF might be noticeably reduced due to compression. Also, remember you are uploading personal files to a third-party server, so maybe skip the highly sensitive pictures for this method!
Part 3: FAQs
Q: What is the ideal image size for a GIF?
A: There’s no single ideal, but for social media or chat, 500-600 pixels wide is a great sweet spot. Remember, the larger the dimensions, the larger the file size, which can impact load times! If your platform has a strict rule of the GIF dimension, you can use a GIF resizer to change that.
Q: What is a good frame rate when I make a GIF from stills?
A: For smooth animation, aim for 10 to 15 frames per second (FPS). If you’re just flipping between two or three images for effect, a lower rate (like 5 FPS or 0.2-second delay per frame) works well too.
Q: My GIF looks blurry. How can I fix this?
A: GIFs use a limited color palette (a maximum of 256 colors). If your original images have millions of colors, the conversion will cause dithering (blurry colors). To fix this, use a dedicated image-to-GIF converter (like Photoshop or ArkThinker) to fine-tune the color settings and reduce the compression.
Conclusion
You now have three powerful methods to create your own custom animated loops! Whether you choose the feature-rich control of ArkThinker, the professional finesse of Photoshop, or the rapid simplicity of an online GIF maker from images, the power to turn your static pic to GIF creations is literally at your fingertips.
Remember that the best GIFs are often the simplest ones. So grab those favorite photos to GIF, start playing with the settings, and have fun. Happy animating!
What do you think of this post? Click to rate this post.
Excellent
Rating: 4.8 / 5 (based on 488 votes)