


How to Compress a Video For Email on Desktop, Mobile, Online
Are you looking for the most reliable solutions to learn how to compress a large video file for email attachments? This article will provide you with some of the most reliable programs and video compressor tools for desktop operating systems, mobile devices, and browser-based tools for installation-free multimedia editing. These programs are selected because they can efficiently compress videos to the 25MB limit for email services without significantly degrading video quality. To help our readers learn how to use each tool, we also provided detailed step-by-step guides for each featured program.

- GUIDE LIST
- Part 1. The Best Way: Send via Cloud Link (No Quality Loss)
- Part 2. Compress Video via Free Desktop Tools
- Part 3. Reduce Video File Size on Mac Using QuickTime / iMovie
- Part 4. Compress Video for Email Online (No Software Needed)
- Part 5. Compress Video on iPhone & Android Before Emailing
- Part 6. FAQs About Compressing Videos for Email
Part 1. The Best Way: Send via Cloud Link (No Quality Loss)
Although this option technically does not compress videos for email, using Google Drive or other cloud storage and sending videos via a link is the most reliable way to learn how to reduce a video’s size for email. Since email has a file size limit for attachments, videos that are way too large to be compressed to the usual 20-35 MB per file can only be shared via a cloud link.
To learn how to share cloud links via Google Drive, make sure to read our three-step guide below.
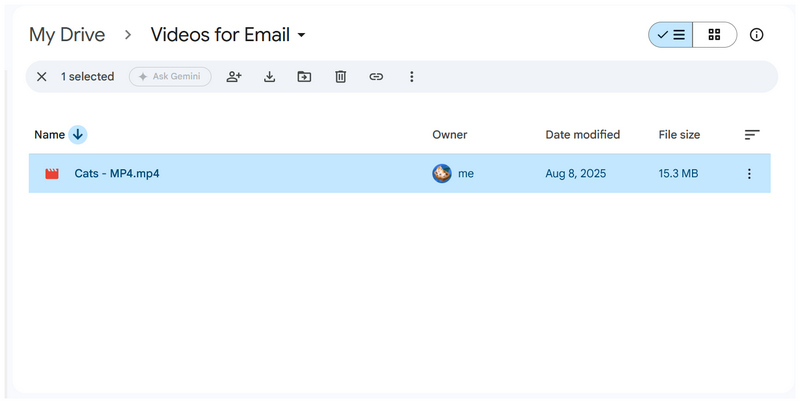
Go to Google Drive and locate the video file you want to share.
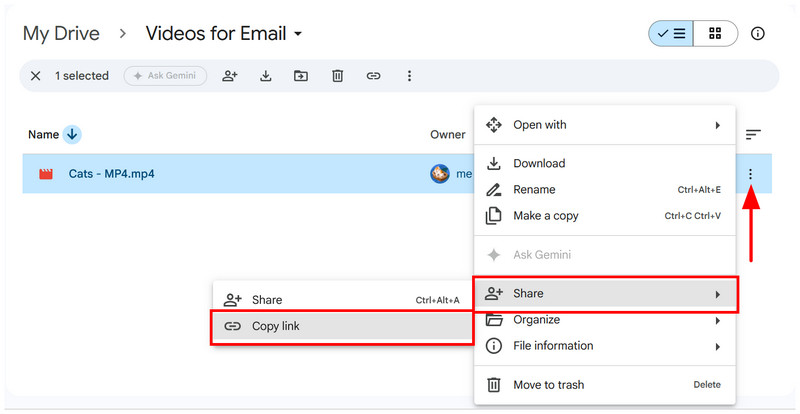
Select the video file, then click the three-dot menu. Hover your cursor over Share and select Copy Link.
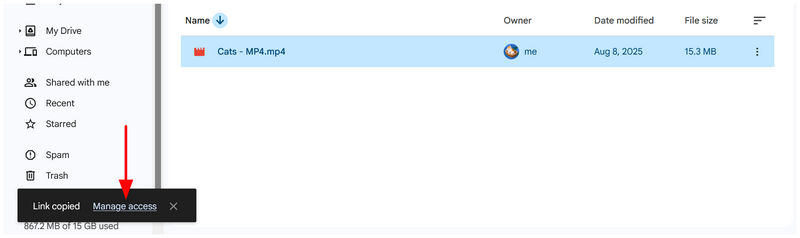
In the Link Copied notification, select Manage Access to open the file’s sharing settings.
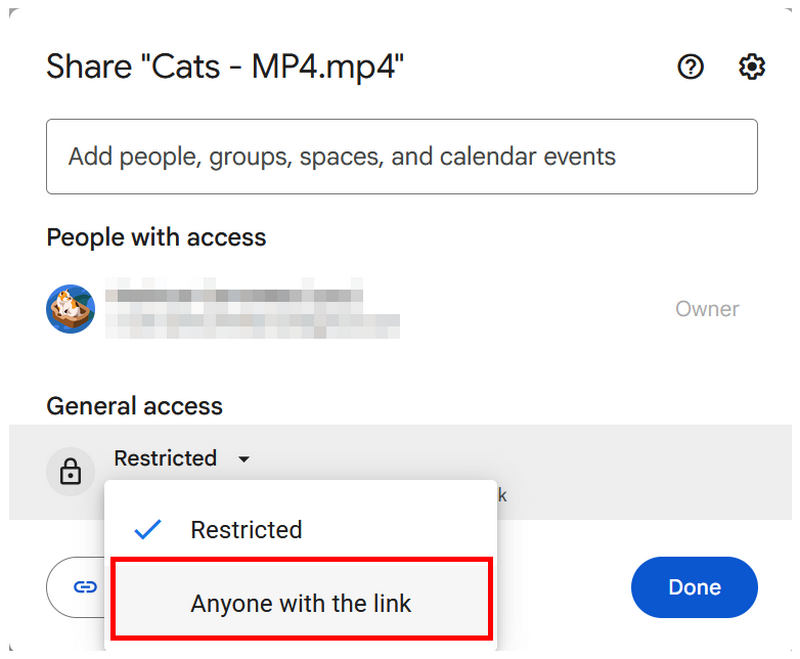
In the file access menu, select the General Access mode and choose Anyone with the Link. This will make your file accessible to those you will send the link to.
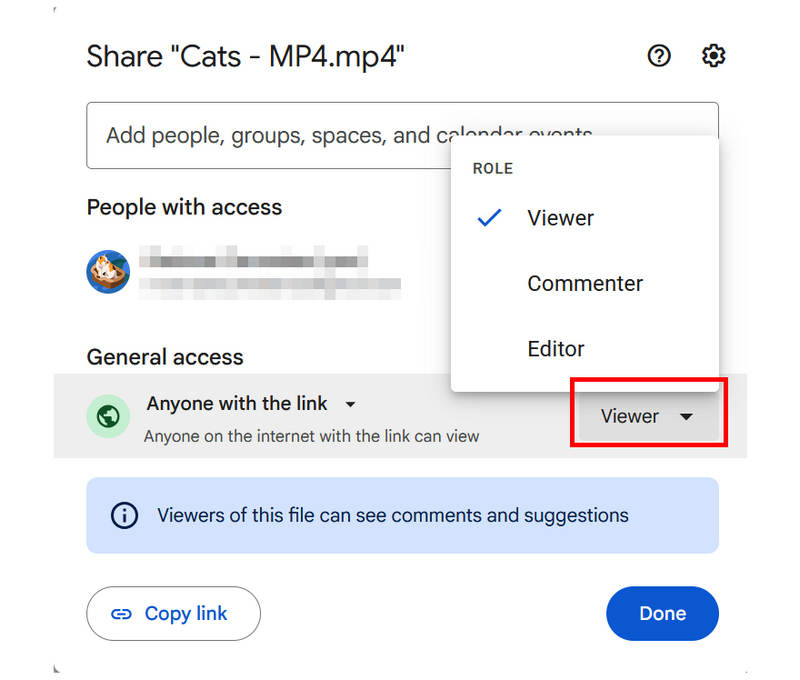
Then, select Role to set how you want people with access to the file to interact with it. If you only wish to make the video playable when sent via email, the Viewer role should be enough.
With the Viewer role now set, select Copy Link to copy the file link to your clipboard. This is the link you need to share via email.
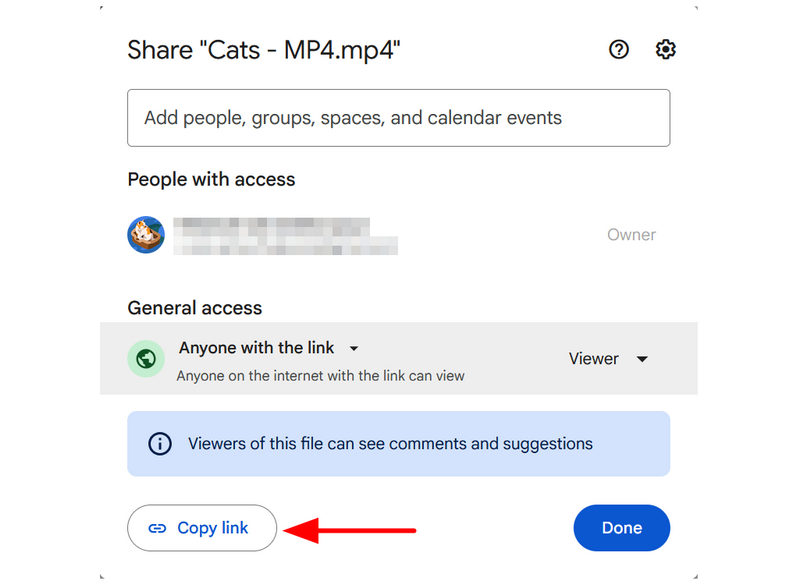
Although it does not technically compress your video or send it via email, this unconventional solution for shrinking a video for email will still get the job done of sending the video you want to share.
Part 2. Compress Video via Free Desktop Tools (Windows & Mac)
Option A (Windows & Mac): HandBrake
Moving on to the desktop-based solutions, we will now discuss the first option on this list to directly address inquiries about how to make video size smaller for email. We will start this guide by featuring the video encoder tool in HandBrake.
To use HandBrake to reduce video file size, the options in the program lie in video presets and quality adjustments. Although this is quite effective for controlling video file size, it is not recommended if your goal is to preserve video quality.
If you don’t mind sacrificing a little resolution to meet email size limits, read our guide below to learn how to compress an MP4 video for email using HandBrake.
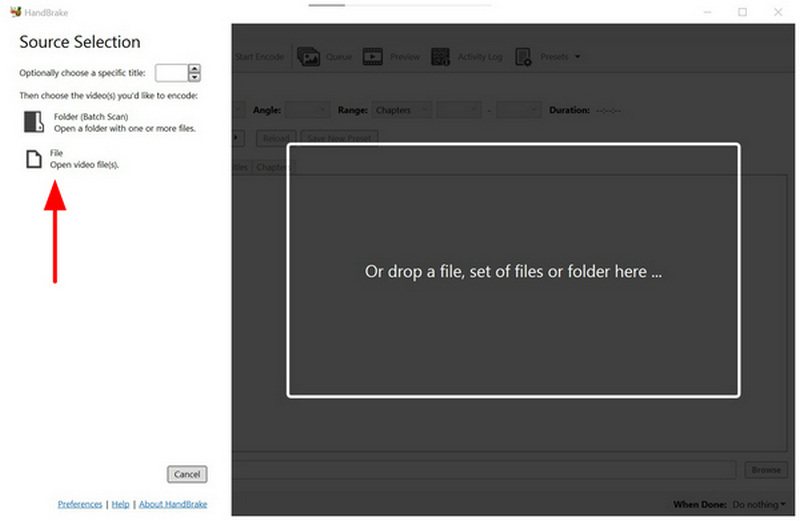
Open HandBrake and select File to import the video you want to compress.
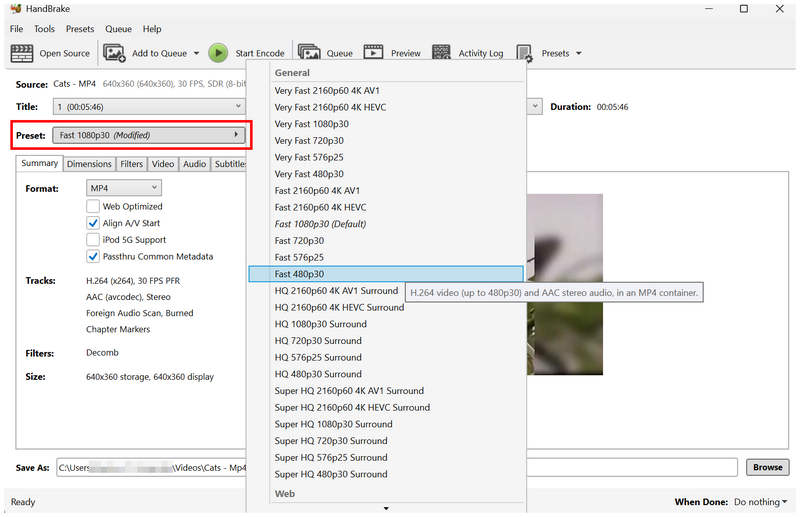
Once the video has been added, select Preset and choose an option that has lower quality than your current resolution.
Then, proceed to the Video tab and adjust the Quality slider to the left to reduce video quality.
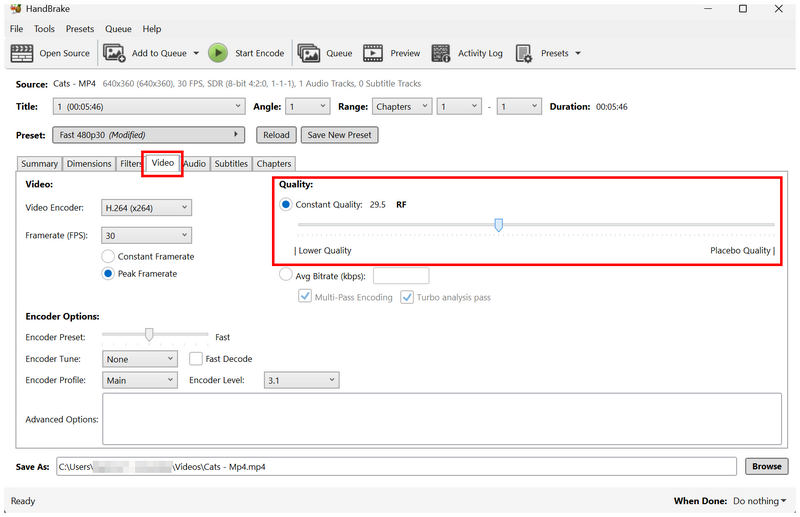
When you are done editing both the Preset and Quality settings, click on Start Encode to begin producing the video with a compressed file size.
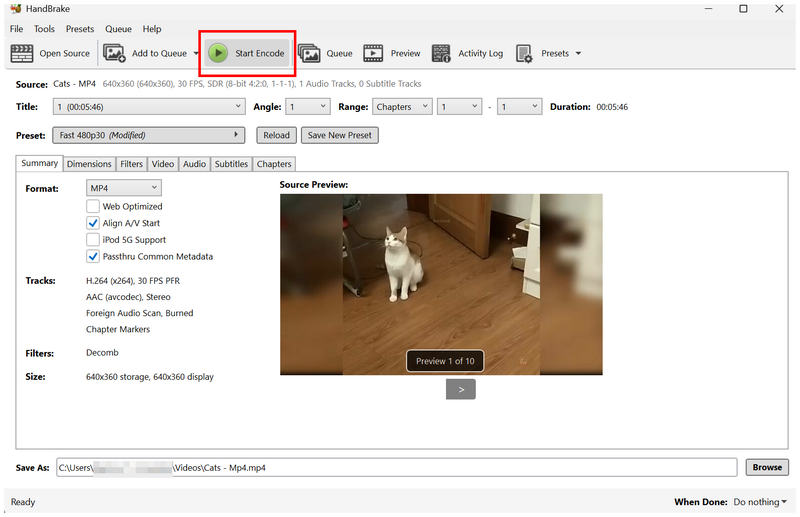
Before proceeding with the Start Encode step to create your compressed video, make sure to check the quality of your file in HandBrake’s Preview tab to avoid overreducing quality to reduce file size.
Option B (Windows 11): Clipchamp
Aside from direct compression and quality adjustments, you can also use video editors such as Microsoft Clipchamp to compress a movie file for email. When using video editors, you will have access to more drastic options to reduce file size, such as trimming the video duration and adjusting export settings.
To learn how to use export settings to compress videos in the Clipchamp video editor, please read our guide below.
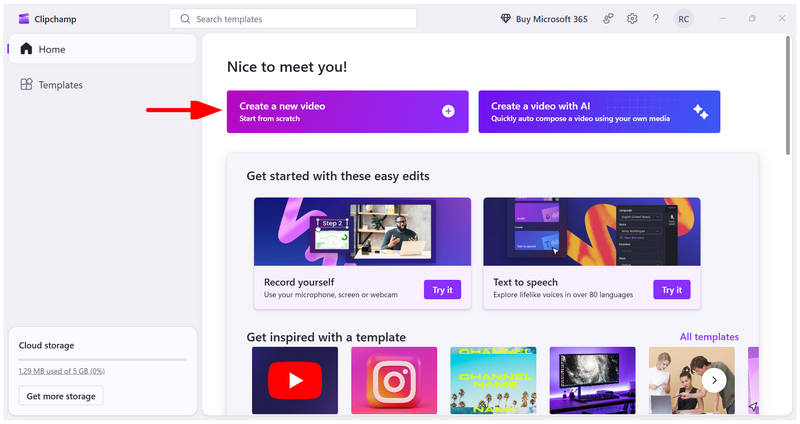
Open Clipchamp, then select the Create a New Video option to start a new video editing project.
In the program’s main interface, select Import Media, then select the video you want to compress. Once added, click and drag the file onto the editing timeline.
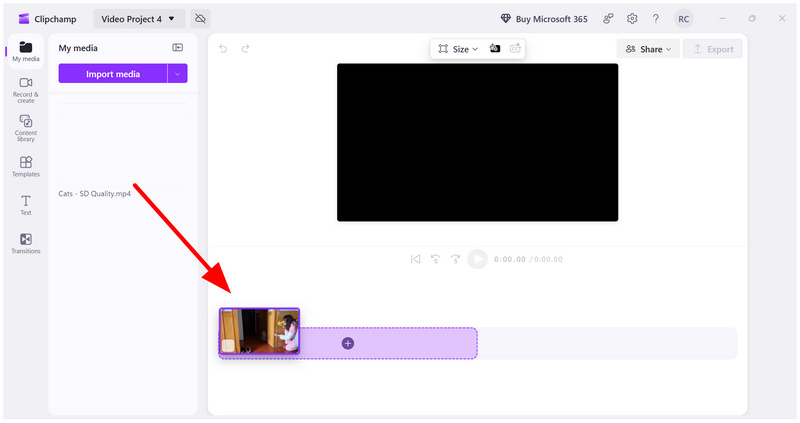
Once the video is added to the editing timeline, click on Export.
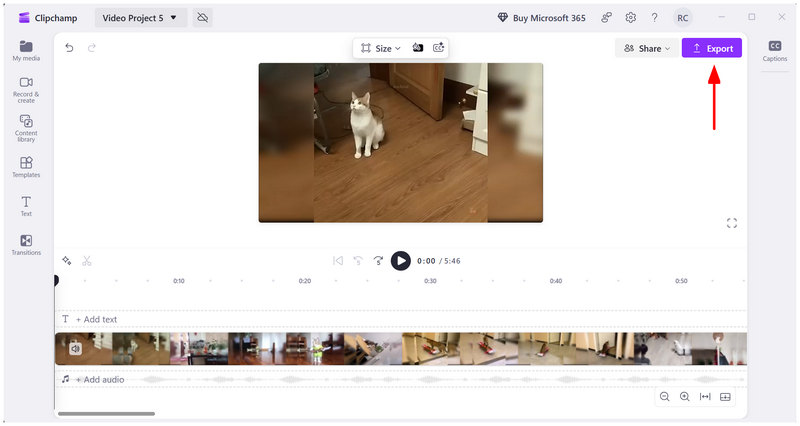
In the Export settings, select the 720p quality. This is advisable, as selecting a lower export resolution will significantly reduce quality. Click on the Export button to begin video production.
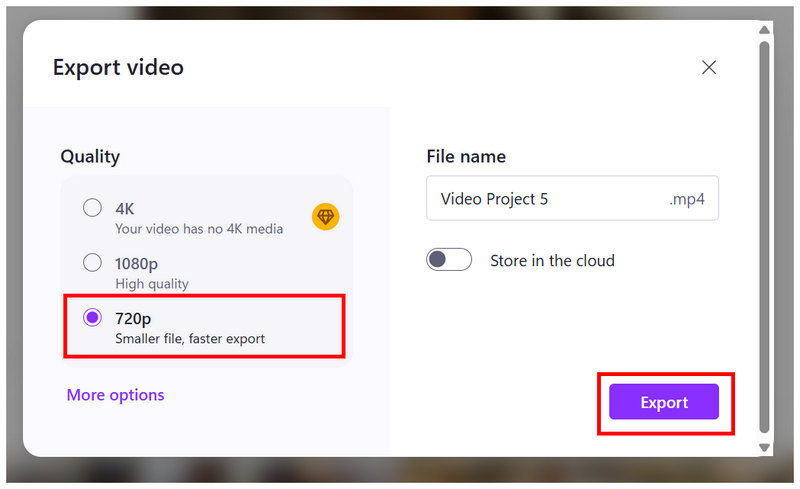
If your video will still exceed the email limit with the 720p option, you may select more options and use the more aggressive 480p export setting.
Part 3. Reduce Video File Size on Mac Using QuickTime / iMovie
QuickTime Player
Although QuickTime Player is primarily a video player, it can be used to learn how to compress a QuickTime video for email, as it includes basic controls to adjust video quality and file size by editing the export settings for videos played in the program.
Similar to the previous tools that applied video compression via export settings, QuickTime compresses videos on Mac by exporting them in 480p format.
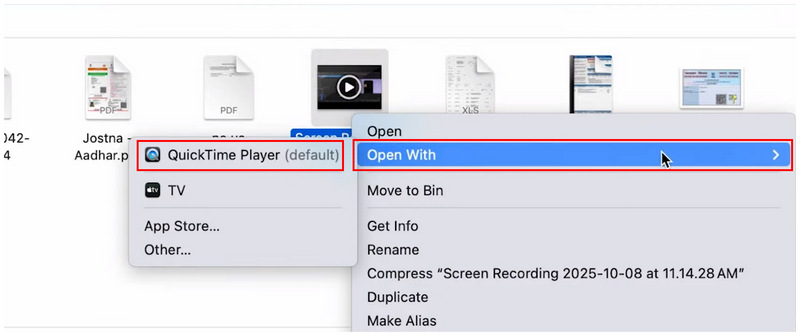
Open the video you want to compress by right-clicking on it, then select Open With > QuickTime Player.
In QuickTime Player, select File > Export As.
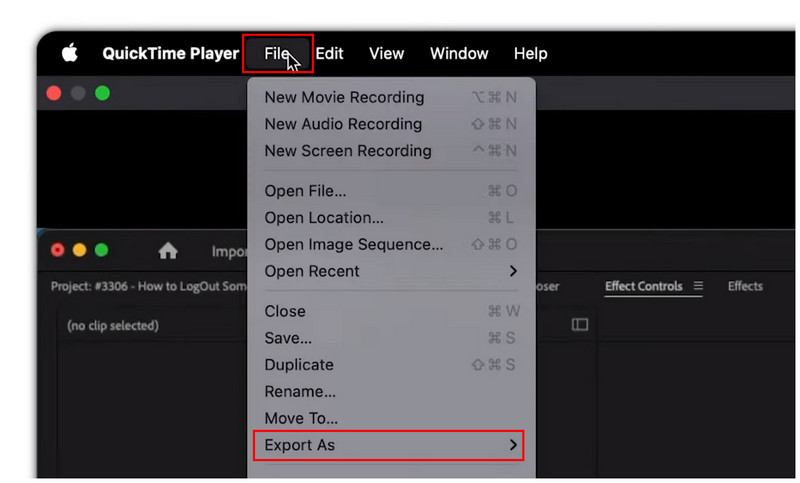
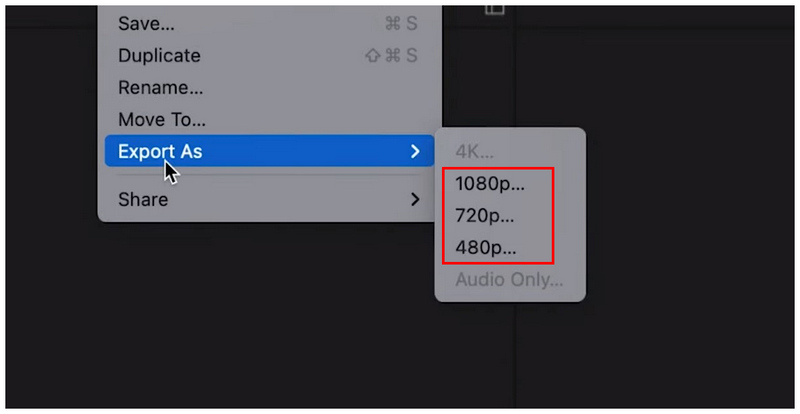
In the Export As options, select 1080p, 720p, or 480p. Select a quality lower than the current quality of your video. For aggressive compression at the cost of quality, select 480p.
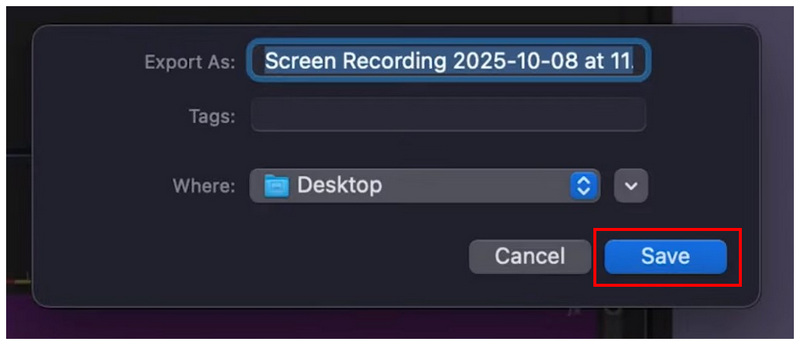
With the export quality now set, you may edit the Export As text box to rename the video file. Then set the video’s save destination by editing the Where option. Finally, click Save to create a new copy of the video with a compressed file size.
If you want the most accessible way to compress a video file for email on Mac, QuickTime Player is the most straightforward solution.
iMovie
Similar to Clipchamp, iMovie is the built-in video editor of macOS. As such, tinkering with the video export settings is the best way to compress video files in the program. With that in mind, our tutorial below provides a detailed guide to reducing video file size by editing the File menu settings.
Among the options on this list, iMovie has a slight edge over its video-editing competitors. The software's custom quality adjustment tool provides a file size estimate after editing the video quality.
Go to iMovie and open the video you want to compress.
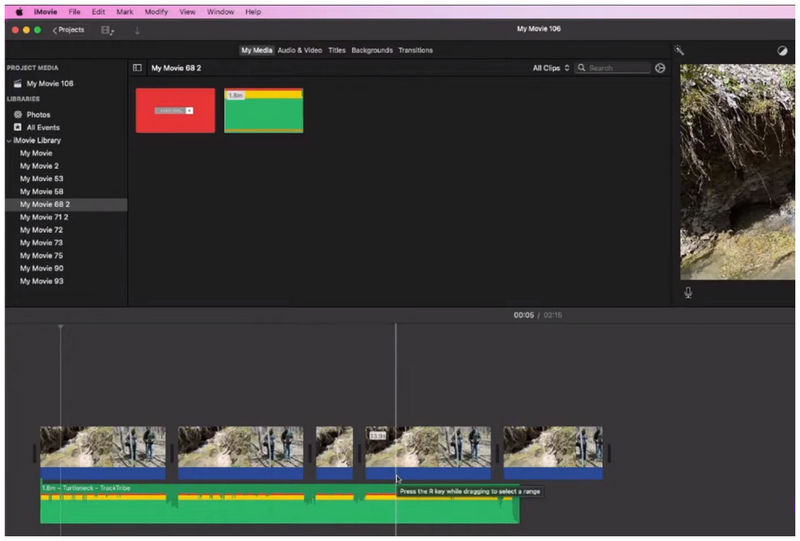
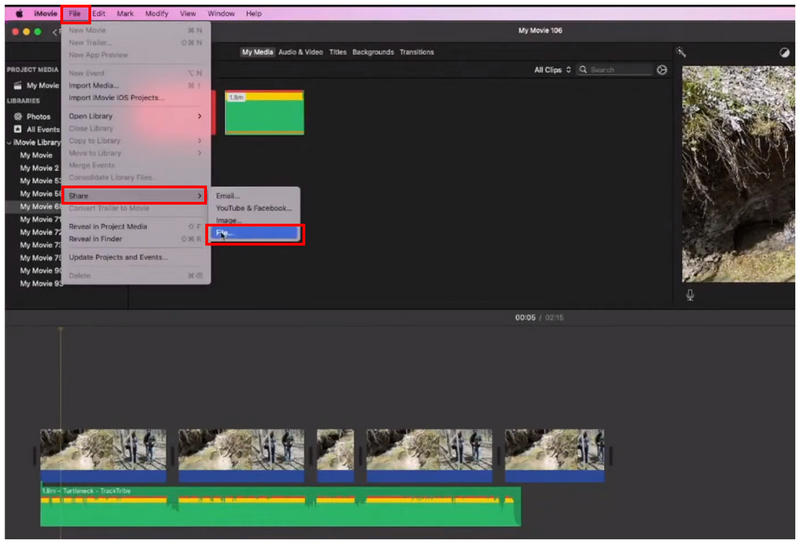
With the media file added to the video editor, select File > Share > File.
In the File editing menu, select Quality and choose Custom. Then edit the video’s custom quality using the slider tool. You will also have a preview of the software’s estimated file size. To confirm your settings, select Next to proceed to the next exporting step.
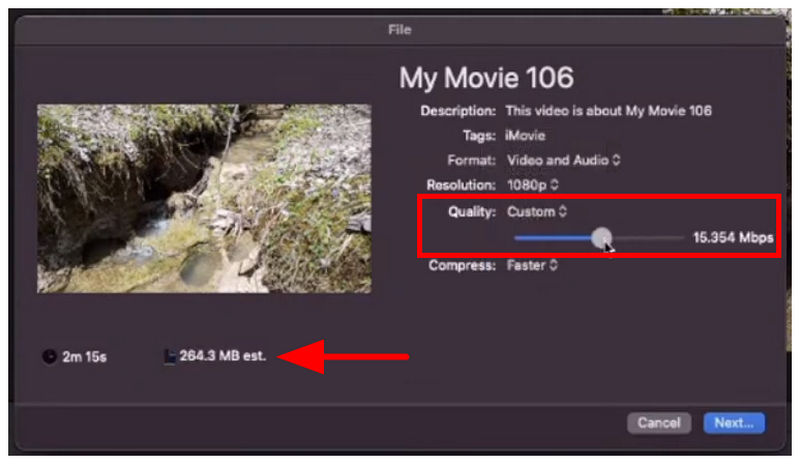
For more aggressive compression, you may also adjust the Resolution setting in the File editing menu. However, this comes at the cost of a noticeable decline in quality.
Part 4. Compress Video for Email Online (No Software Needed)
ArkThinker Free Video Compressor Online
Now that alternative tools to reduce video file size have been discussed, let us move on to dedicated media compressor programs designed to reduce video file size while preserving quality or applying minimal quality reduction. We will begin our options with ArkThinker Free Video Compressor Online.
The premier option for no-installation file-size compression, browser-based tools should be your number one choice to quickly reduce the file size of your videos intended as email attachments.
To learn how to use the most reliable online tool to compress videos for email, make sure to read our tutorial on using ArkThinker Free Video Compressor Online.
Go to ArkThinker Free Video Compressor Online and click on Start Compressing Video to import the file you want to compress.
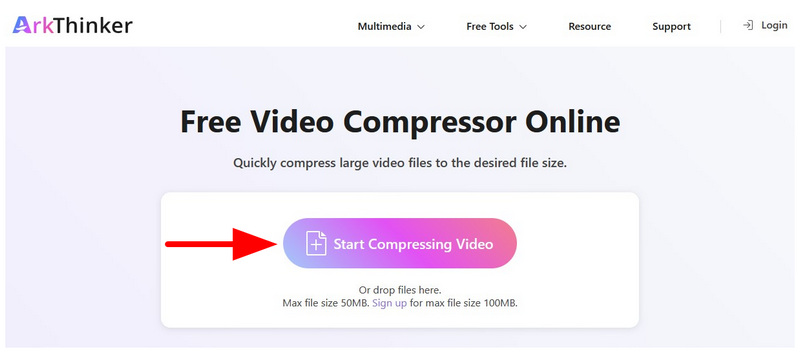
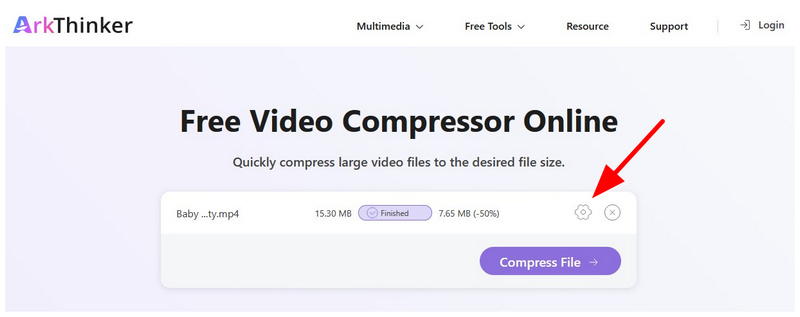
Once the file is uploaded, it will be automatically compressed to 50% of its original size. To customise the compression rate and file size, select the Settings button.
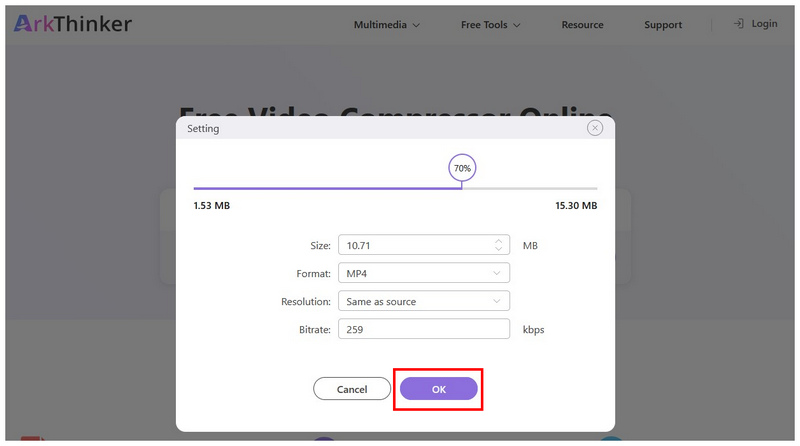
In the advanced Compression Settings, you can edit the media file’s Size, Format, Resolution, and Bitrate. Alternatively, you can adjust the Slider bar to edit the compression rate of your file. Click OK to confirm your custom adjustments.
With the video’s compression settings applied, select Compress File to produce your video, which can then be emailed as an attachment.
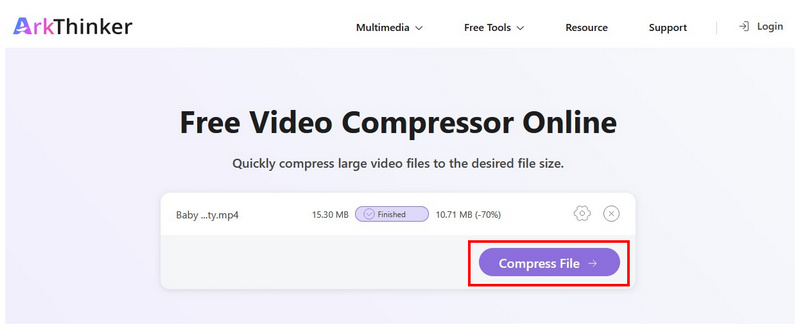
Unlike other web-based compressor tools, the ArkThinker offers advanced editing features for users who want full control over how their videos are compressed. The online tool provides manual control over size, format, resolution, and bitrate.
Clideo
Unlike the previous online tool we featured, Clideo automatically compresses videos. It only offers three compression presets that cannot be adjusted or tweaked manually. Although it offers less control, choosing a preset is still a good option for complete beginners who want to compress videos down to 5 MB via video compressors.
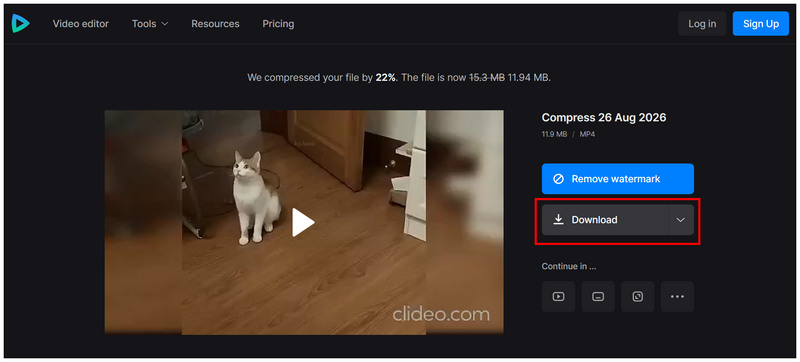
Unfortunately, selecting the free version presets in Clideo leaves watermarks on processed videos. As such, it is not advisable to send videos processed in Clideo for professional use. Keep this in mind when using the program for professional email communications.
Go to Clideo Online Video Compressor, then select Choose File in the main interface of the tool

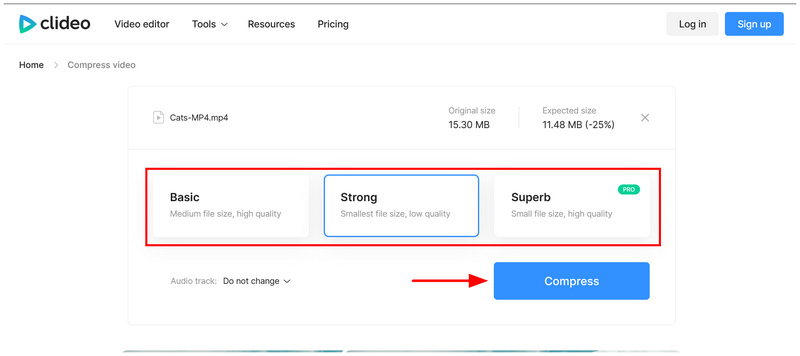
Once the file has been uploaded, free users may select between Basic, Strong, or Superb compression options. Click on Compress to confirm your option.
Wait for the compression process to finish, then select Download to save the video now compressed back to your computer.
When choosing an online tool that suits your needs, we recommend ArkThinker for users who prefer control. For complete beginners, Clideo is the better choice.
Part 5. Compress Video on iPhone & Android Before Emailing
Unfortunately, there are no built-in apps on either iPhone or Android to compress videos. As such, this section offers comprehensive tutorials on editing the camera settings on your iPhone or Android device to minimise the file size of your videos.
iPhone
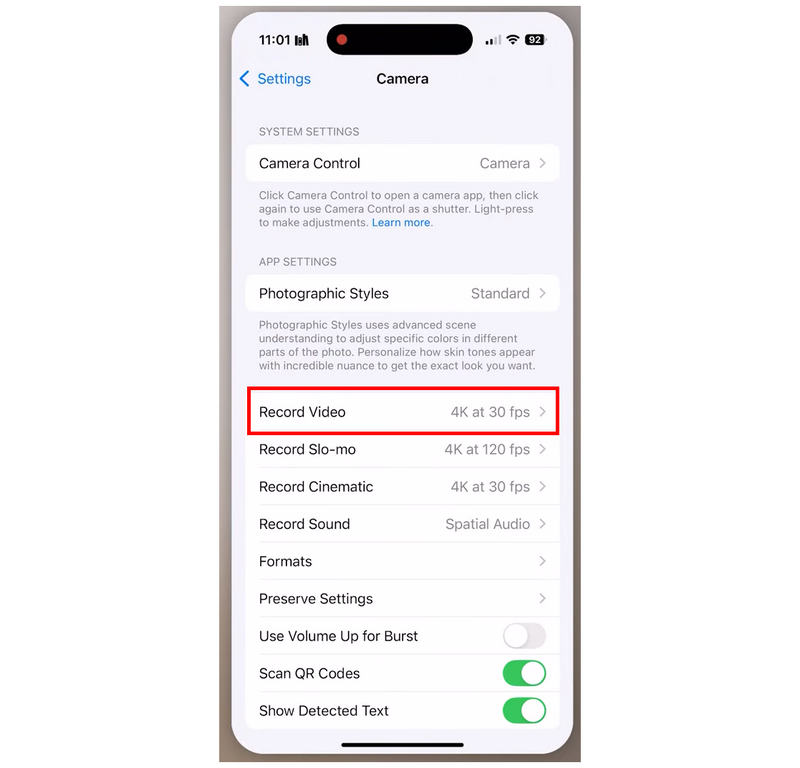
Open Settings and scroll down to select Camera.
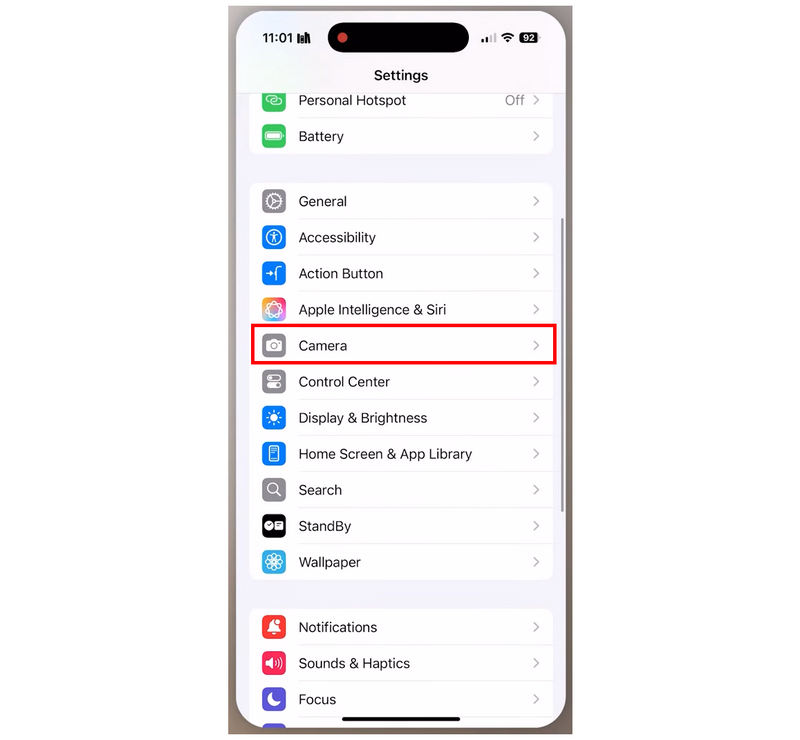
In the Camera settings, select the Record Video option.
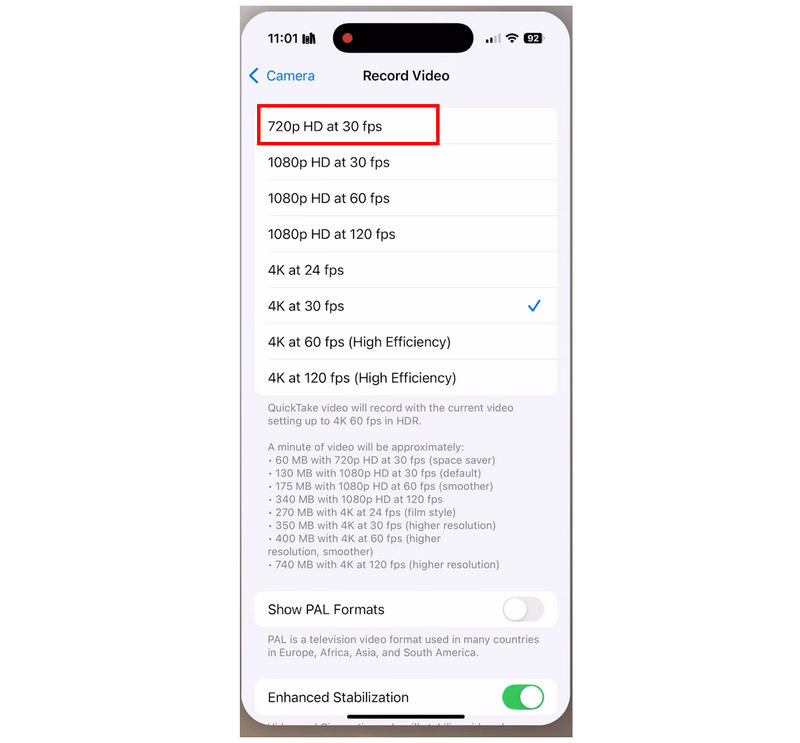
In the Record Video settings, select the 720p HD at 30 FPS option to make your future videos saved in that preset.
Unfortunately, iOS devices have no built-in apps to compress videos. If you want to learn how to compress videos on iPhone, you have to use how to use third-party apps.
Android
Open your camera app and go to the Video section. Then, select the Video Quality setting.
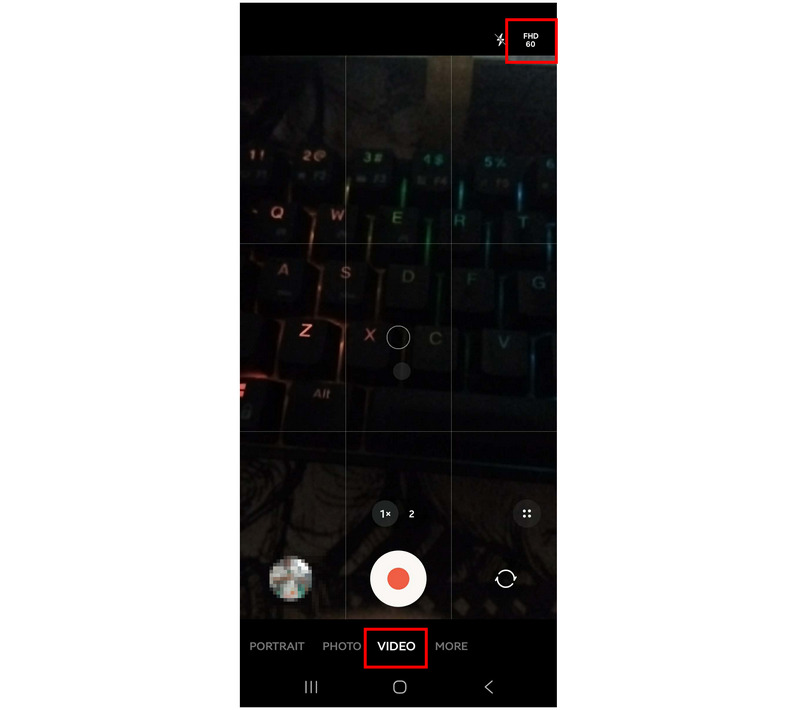
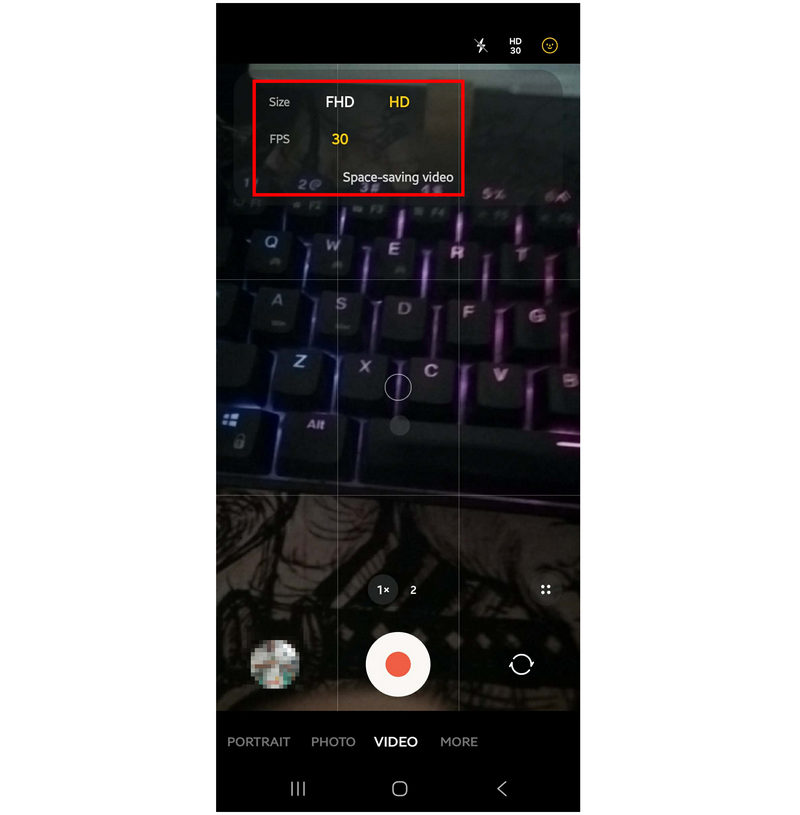
Based on your device, set the video capture settings to the lowest quality option. In this case, we set the settings to HD at 30FPS.
Since there are no built-in solutions to compress videos on Android/iPhone for email, we recommend using third-party video compressors, which can be downloaded from the App Store or Google Play.
Part 6. FAQs About Compressing Videos for Email
What is the attachment file size limit of email services?
It depends on the email service you will use. Gmail has a limit of 25MB, Outlook at 20-35MB, and Yahoo Mail limits at 25MB. These file size limits apply to all file types, making it necessary to learn how to compress images for email as well.
Can I send videos by email?
Yes, you can. You can send videos by email using the attachment function. However, you are limited to videos smaller than 20 - 35MB.
Is compressing video file size hard?
No, it is not. There are tools designed exclusively to compress video. Online tools are the most accessible, and ArkThinker Free Video Compressor Online is a good option.
Does compressing videos reduce video quality?
Yes, it may happen. File size compression works by editing the bitrate, resolution, and other advanced elements of your video. However, quality loss can be minimised by using exclusive file size compressors.
Can I trim videos instead to reduce their file size?
Yes, you can. Trimming video duration is the most aggressive way to reduce file size. If your video has unimportant sections, feel free to trim them to reduce their file size.
Conclusion
With some of the most reliable tools for compressing videos for email now discussed, we hope this article helps you send videos via email more smoothly. However, keep in mind that each tools in this article have different uses. For extremely large videos, use cloud-link sharing via Google Drive; for video trimming to reduce file size, use video editors like Clipchamp or iMovie. However, for direct video compression, we strongly recommend using dedicated video compression tools, such as ArkThinker Free Video Compressor Online.
What do you think of this post? Click to rate this post.
Excellent
Rating: 4.8 / 5 (based on 599 votes)


