


How to Fix Encoding Overloaded Error in OBS Using 6 Methods
OBS Studio is one of the most popular open-source screen recorders, digital streaming studios, and general multimedia software. Since its release, it has been one of the most trusted choices for streamers and educators who need to record on-screen footage for tutorials or lectures. Unfortunately, the advanced nature of the program made it prone to resource consumption issues, such as the OBS Studio encoding overload error. In this article, we will discuss everything you need to learn about this problem, including what it really is, what its common causes are, and the six proven fixes you can use to prevent it from recurring.

- GUIDE LIST
- Part 1. What Does OBS Encoding Overloaded Mean
- Part 2. Common Causes of OBS Encoding Overloaded Warnings
- Part 3. 6 Proven Fixes for OBS Encoding Overload Issues
- Part 4. OBS Encoding Settings Comparison Guide
- Part 5. FAQs About Fixing Encoding Overload in OBS
Part 1. What Does OBS Encoding Overloaded Mean

The issue causing encoding overload on OBS for macOS or Windows occurs when your computer’s encoding system fails to compress your video frames quickly enough to keep up with the recording. In simpler terms, your CPU or GPU cannot handle storing recorded video data in real time. Before the encoding overload error occurs, you can anticipate it if your video recording skips frames, stutters, or becomes choppy. Once the error notification pops up, your screen recording or streaming session will stop.
Part 2. Common Causes of OBS Encoding Overloaded Warnings
High CPU Usage During Encoding
Since video encoding may be handled by CPU resources, triggering the OBS encoding overload error while recording may be caused by your CPU memory usage reaching 100%. Since recording or streaming with OBS demands your computer’s resources, it can consume all your CPU, ultimately triggering the error.
GPU Resource Bottlenecks
Similar to CPU-side issues, GPU resource bottlenecks may also trigger encoding overload. This is basically identical to the error on the CPU. If your GPU’s memory cannot handle the encoding workload, it will become overloaded and stop abruptly.
Overly Demanding OBS Settings
Ultimately, both total consumption of CPU and GPU resources will be triggered if your OBS recording or streaming settings are too overboard. The most common cause of this problem is if your recording settings are too high. Usually, this occurs if the video you want OBS to produce has extremely high quality, resolution, and frame rate.
Part 3. 6 Proven Fixes for OBS Encoding Overload Issues
Fix 1: Lower Output Resolution and Frame Rate
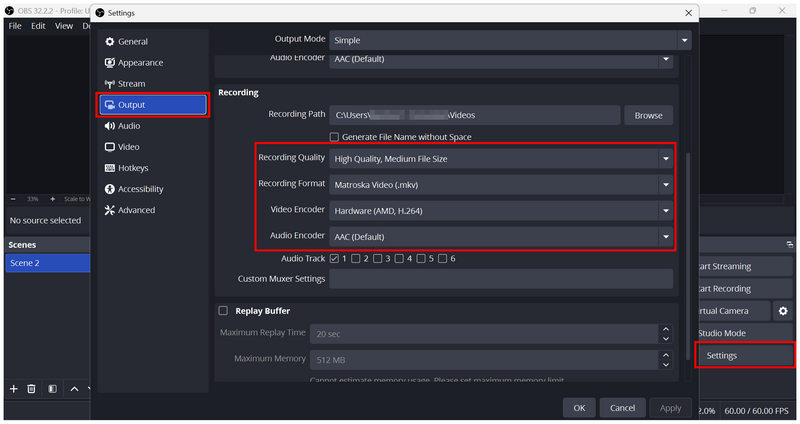
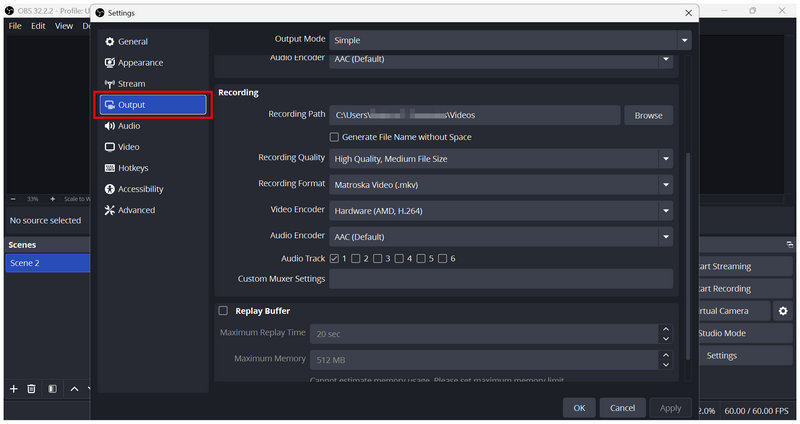
Open OBS Settings, then go to the Output section and scroll down to locate the Recording settings.
By default, the Recording Quality, Recording Format (MKV), Video Encoder, and Audio Encoder settings in OBS are generally safe against encoding overload. If you are using a higher-quality setting, you may consider lowering it to the default.
To edit frame rate, go to Video and select Common FPS Values. Since it is set to 60 by default, it has significant resource consumption. Lowering it to 24-30 FPS should be enough for basic screen recordings. Select Apply to save adjustments.
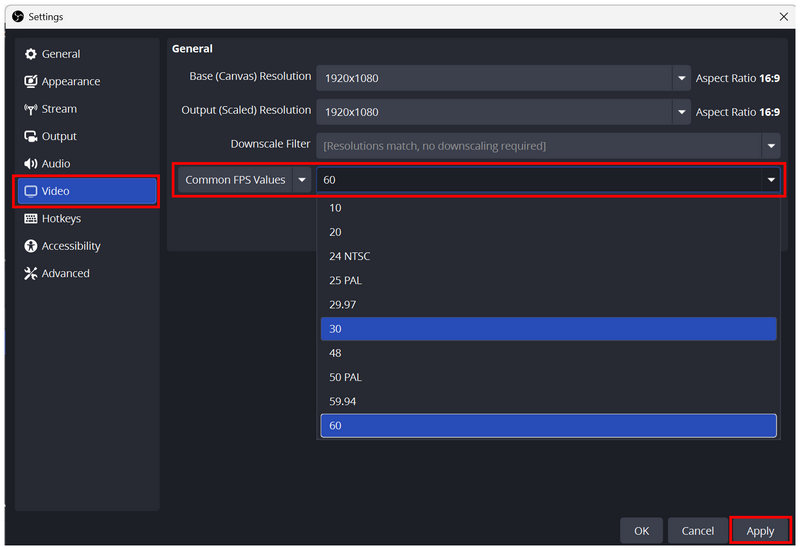
These OBS output settings are the safest way to avoid overload. However, they slightly sacrifice quality and smoothness. This may be worth it if your goal is to ensure the recording is captured without risk of errors.
Fix 2: Switch to Hardware Encoder (NVENC/AMF/QSV)
Go to Output settings, then Recording options.
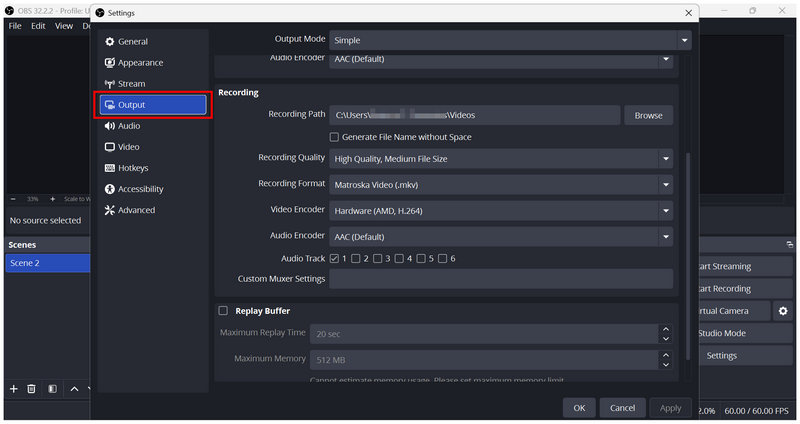
Under the Recording settings, select Video Encoder and choose the Hardware GPU option. Click Apply.
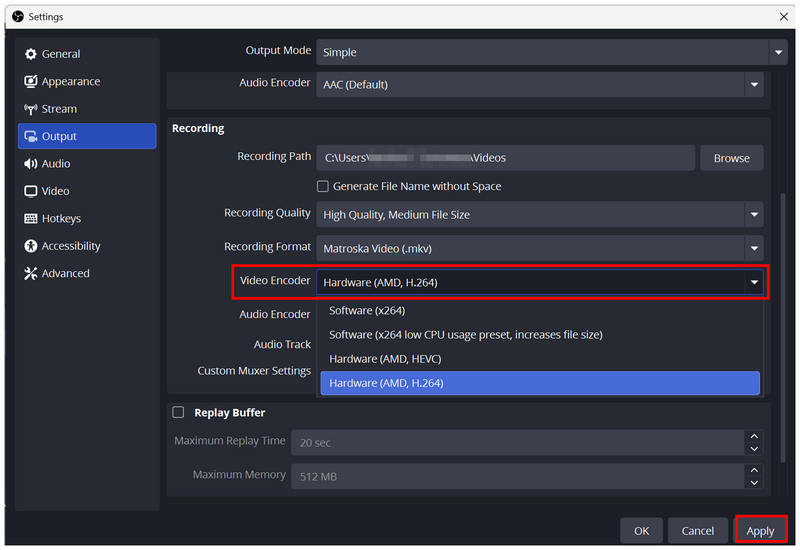
Switching to Hardware Encoder will primarily cause OBS to use your GPU’s resources for encoding. If you are using modern GPU hardware, it is advisable to set the main video encoder to it as an indirect fix to the OBS encoding overload issue.
Fix 3: Change x264 CPU Preset
Go to Output settings, then Recording options.
Select the Video Encoder option and choose Software (x264) to set the primary video encoder to work on the CPU.
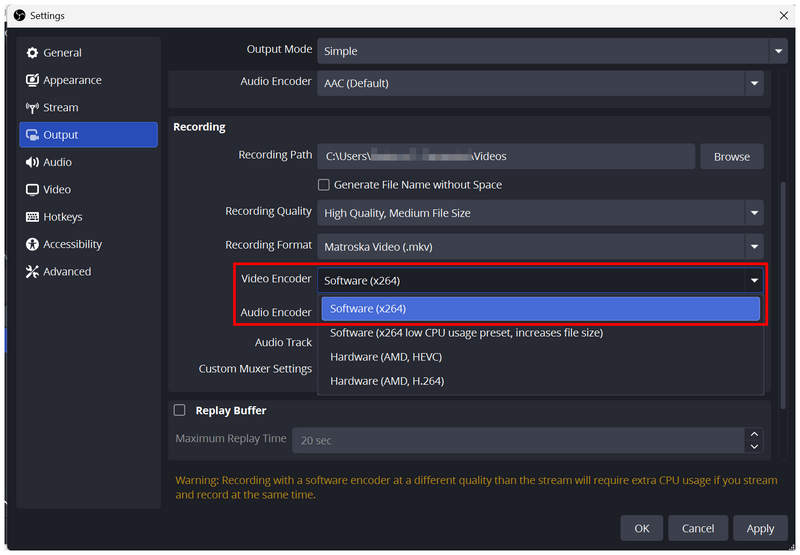
Similar to the second solution, this is also only a suitable option if your hardware’s CPU is more capable than your graphics hardware. Selecting Software as your primary video encoder causes OBS to use CPU resources during encoding.
Fix 4: Close Background Apps and Reduce Resource Usage
The next solution we will discuss does not require any settings adjustments in OBS. To ensure your computer runs at peak performance and uses all its resources for OBS video encoding, close all background apps and make OBS and the content you are capturing the only software active. Closing unnecessary background apps or any software will free up space on your chosen video encoding source.
However, the most effective in-app solution to avoid OBS encoding overload is to reduce video settings. Learn how to optimize OBS video settings in the next solution.
Fix 5: Optimize OBS Output Settings
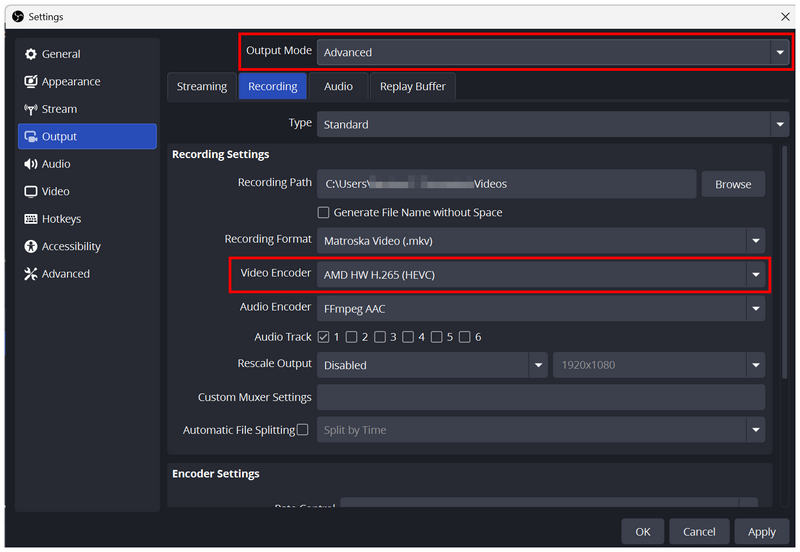
Go to Output settings, then set Output Mode to Advanced. Then, click on Video Encoder and set it to your GPU to offload resource consumption from your CPU.
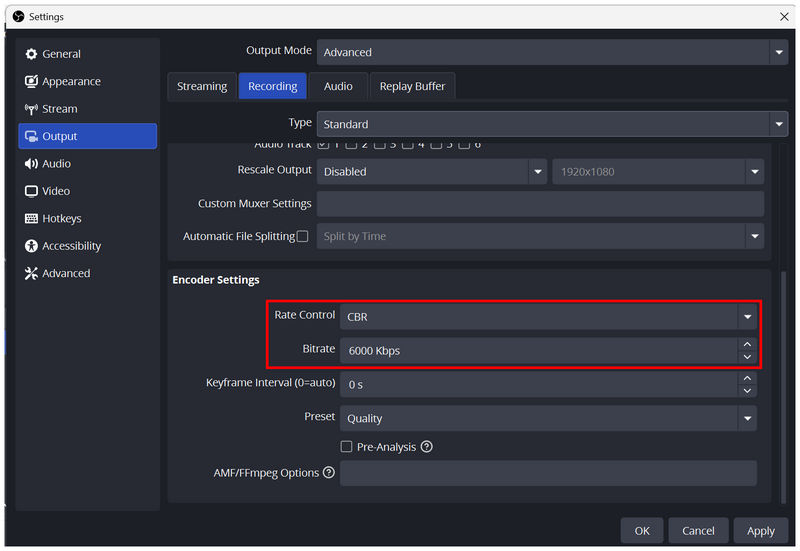
Next, scroll down on the Recording settings to go to Encoder Settings. Keep the Rate Control at CBR and set the Bitrate to 4000-6000 Kbps.
Finally, go to Video and set Output (Scaled) Resolution to a resolution lower than the default 1920x1080. For generic screen recordings, changing video resolution to 1280x720 should be enough.
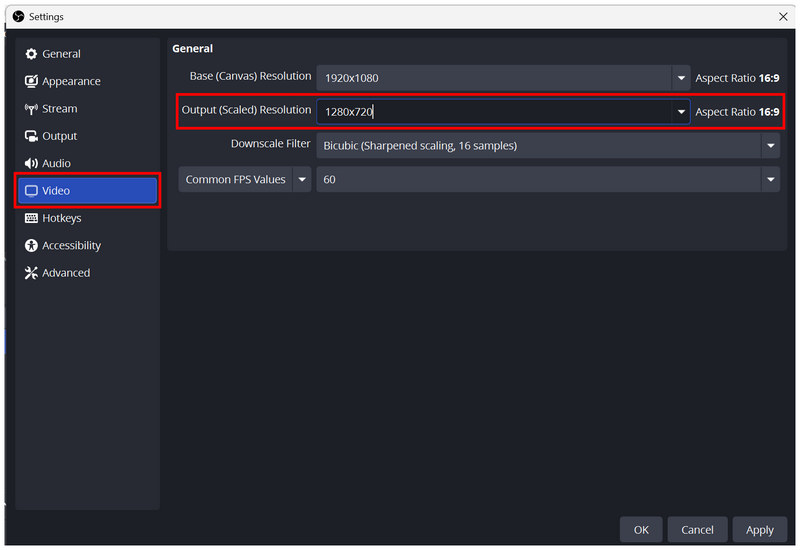
Since OBS is highly customizable, these optimized output settings should only be used as the baseline. If you have enough experience in using OBS as a recorder tool, feel free to play around with its advanced settings to find the balance between your desktop’s capabilities and the limits of OBS.
Fix 6: Use a Lightweight Screen Recorder
Now that we have provided OBS-based solutions to avoid encoding overload errors, the issue of OBS being resource-hungry will remain a background concern. As such, our sixth solution is to use a lightweight alternative, such as ArkThinker Screen Recorder.
If all you need is simple screen recording, basic video editing tools, and high-quality audio capture, using an easier-to-use recorder is a more practical solution than learning to optimize OBS settings.
Besides, ArkThinker Screen Recorder is versatile enough to be a viable choice for a variety of recording uses. It features most core recording options, including full-screen, window, webcam, and microphone recording. Additionally, it has an exclusive Game Recording mode with GPU acceleration for users who want to capture more dynamic gameplay.
To learn how to use the most practical lightweight alternative to OBS, download ArkThinker Screen Recorder and read our tutorial below.
Go to the software or content you want to screen record, then open ArkThinker Screen Recorder. For full-screen recording, stay in the Screen Recorder mode.
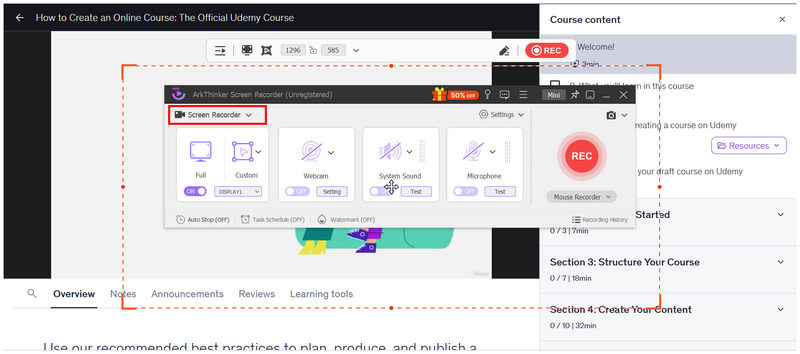
Set up the content you want to record. In this tutorial, we will set the video content and the ArkThinker recording interface to Full Screen.
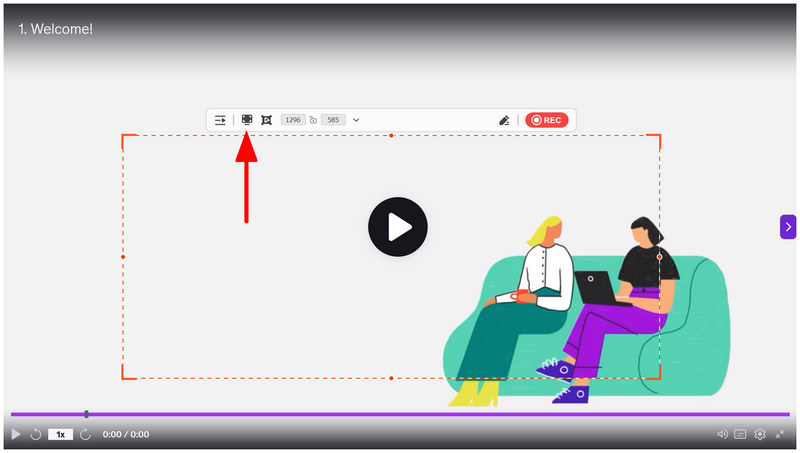
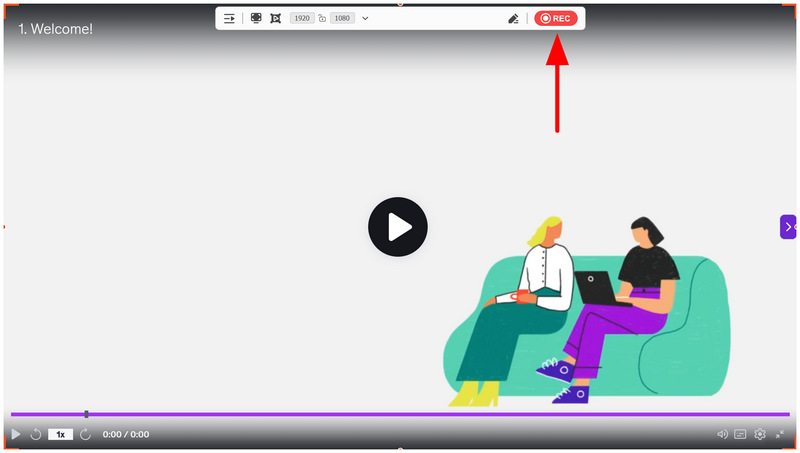
With the recording setup now done, select REC on ArkThinker’s recording interface to begin recording. To stop recording, click on the Stop button in the recording overlay.
Once the recording session is complete, ArkThinker’s post-processing video editing menu will open. Here, you will have access to the tool’s editing modes, including the Trimmer, Video Compressor, File Merger, and more. To find the save location of your recorded video, select the Folder button.
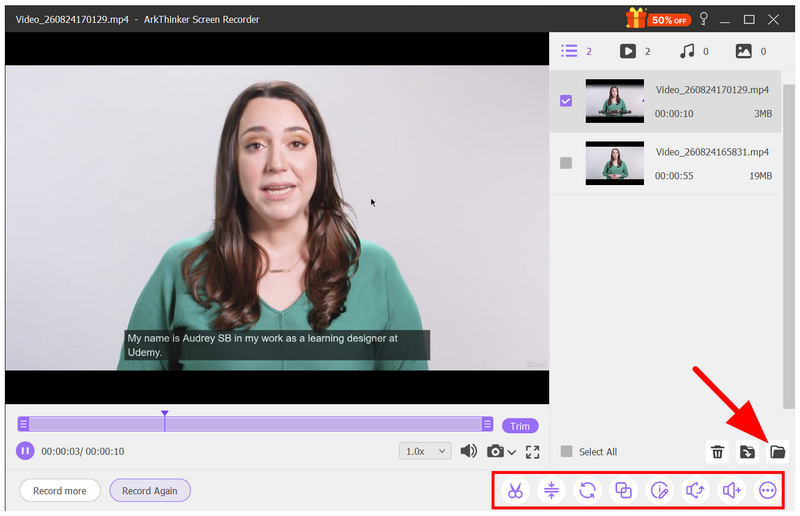
Although unconventional, using lightweight screen recorder software is the most effective choice to prevent encoding overload errors. It also helps that ArkThinker Screen Recorder is easier to use and offers nearly the same functionality as OBS for screen recording, with a fraction of the resource consumption.
Part 4. OBS Encoding Settings Comparison Guide
To learn the basics of the options in the Encoder Settings, we have provided a quick summary of rate control and bitrate. As well as how they operate when set in high or low settings.
Rate Control is how OBS manages your bitrate. Among the available options, the Contrant Bitrate (CBR) we selected is the most consistent in terms of quality, file size, and recording stability.
Bitrate is the amount of data OBS processes per second. When this option is higher, your recording quality will be better, but the file size will be larger. When the bitrate is lowered, the file will be smaller but lower quality.
Now that you have learned about bitrate and its effect on quality, you can customize OBS settings with greater control.
Part 5. FAQs About Fixing Encoding Overload in OBS
How to stop encoding overload in OBS?
Reduce the video quality settings of your recording. Also, use your GPU as the main video encoder. Make sure to free up CPU memory by closing all background and unnecessary apps.
Should you turn down OBS during encoding overload errors?
Yes, you should. OBS will not function well if the error is present. Restart the program and adjust your settings.
Is OBS easy to use as a screen recorder?
No, it is not. OBS is more advisable for intermediate users. However, basic recording in OBS is accessible for beginners.
Should I consider more beginner-friendly recorder tools?
Yes, you should. OBS is not beginner-friendly at all. There are simpler screen recording tools available, such as ArkThinker Screen Recorder or the built-in Snipping Tool recorder.
What are good OBS alternatives for screen recording?
Our recommended alternative is ArkThinker Screen Recorder. This program is easier to use and is also very lightweight. It can also rival OBS’s recording features with its versatile recording modes.
Conclusion
With our full tutorial on fixing the encoding overloaded error in OBS, we hope this article will help you if you encounter the same problem in the future. We expect the optimized settings we provide will help you prevent the error from recurring. To avoid the complexity of OBS, use ArkThinker Screen Recorder as an alternative.
What do you think of this post? Click to rate this post.
Excellent
Rating: 4.9 / 5 (based on 701 votes)


