


How to Record Gameplay Videos on PS4: Quick Fix [2023]
PlayStation 4, also famous as PS4, has delivered its enchanting power and excellent performance since 2013. Due to its extensive game library and multimedia capabilities, it is still a significant part in most gamers’ life. But how to record gameplay on PS4 with easy steps? Can you record gameplay videos on PS4? Read this article and find your answer.

- GUIDE LIST
- Part 1. How to Record Gameplay on PS4
- Part 2. How to Screen Record on PS4 with a PC
- Part 3. How to Use Capture Card to Record Video on PS4
- Part 4. How to Edit and Share PS4 Recordings
- Part 5. FAQs of PS4 Recording
Part 1. How to Record Gameplay on PS4
You can utilize the local recording feature on PS4 to capture gameplay and make settings for the recorded video according to your needs. Here is what you need to do.
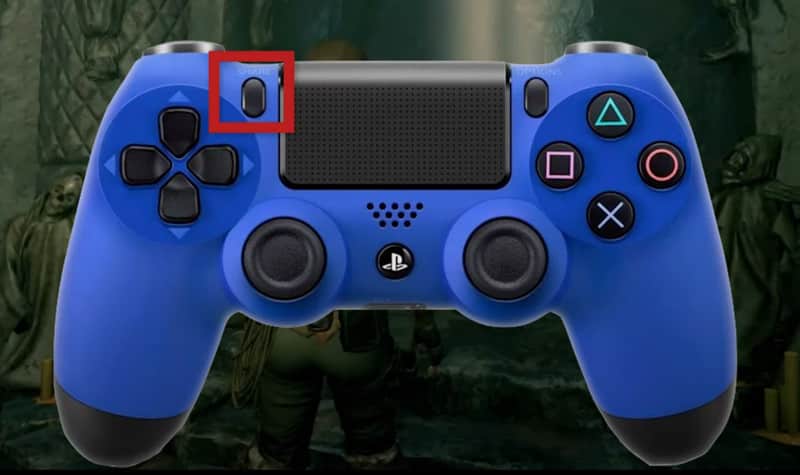
Click the Share button on your PS4 device and move to find the Sharing and Broadcasting Settings button.
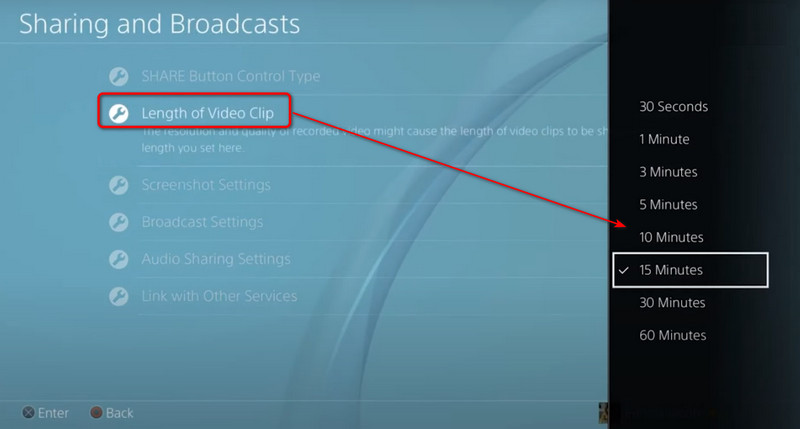
Under this column, select the Length of Video Clip and go on with your wanted video length.
Double-click the Share button and you can start to screen record on PS4. There will be a Recording icon on the left side.
To stop recording GTA5 and other PS4 games, you can double-click the Share button and you will see a notification saying the video clip is saved to the Capture Gallery.
Part 2. How to Screen Record on PS4 with a PC
To record HD gaming videos and make narrations during the recording, you are suggested to use ArkThinker Screen Recorder.
Compared with the built-in PS4 recorder or other external devices, you can enjoy PS4 recording with a basket of editing tools. You can use the drawing tools to add narrations, subtitles, make lines or highlight the glorious moment.
In addition to custom windows, hotkey settings together with a flexible webcam and microphone, you can also schedule a task to automatically record your gameplay and take screenshots wherever you want.
- Record your game videos with 4K/HD quality.
- Compatible with the latest Mac Ventura and Windows 11 systems.
- Offer video and audio recordings in MP4, MOV, MP3 and popular formats.
- No lagging, delays and ads when you play and record your games.
- Support custom settings on hotkeys to capture and edit your screen.
Install and Launch the Game Recorder
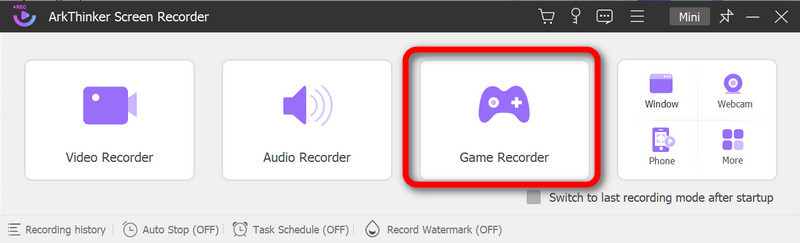
Click the above link to download and install ArkThinker Screen Recorder based on your devices. Then run it and choose the Game Recorder section.
Customize Settings to Record Gameplay
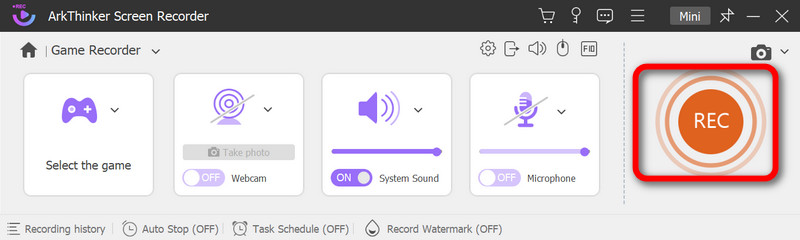
Here you can select the PS4 game window and change the recording area according to your needs. Then turn on the System Sound.
If you would like to add narrations or video record yourself when recording PS4 gameplay, you can turn on the Microphone and Webcam individually.
Record the PS4 Game Video
With everything ready, tap the REC button to start recording. During the process, you can click the menu buttons to make a pause, hide the menu, take snapshots, set the timing and change other settings.

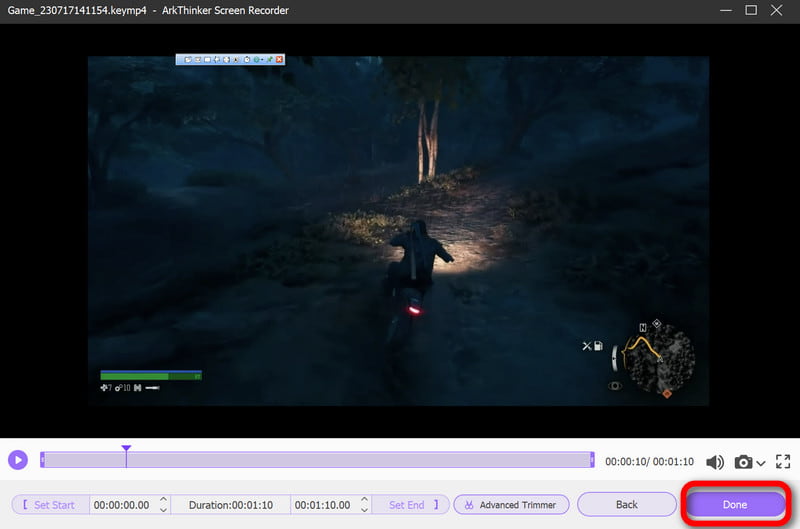
Preview and Complete Game Recording
Click the End button and you can preview the video in the following window. Move on with the Done button and you can generate your recording.
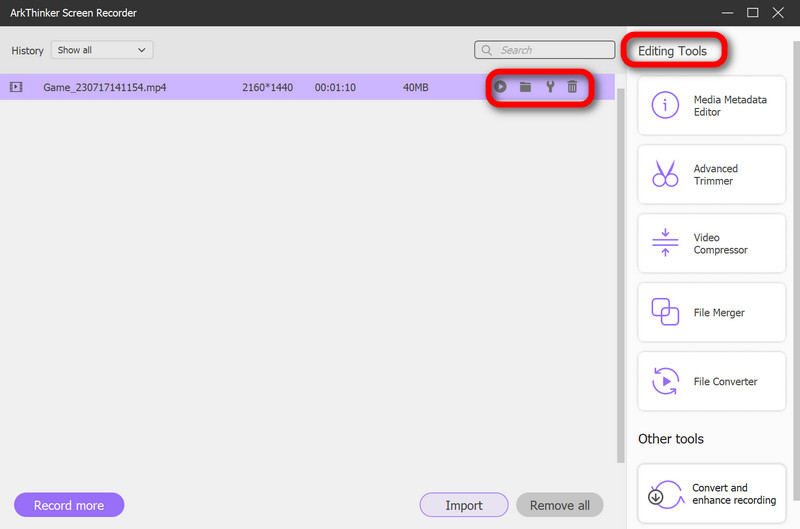
Now you can see all recordings in the list. And you can click the buttons below each file to play, rename, delete, edit and share it to others.
Part 3. How to Use Capture Card to Record Video on PS4
For most gamers, the capture card can also be a good choice if they are fond of recording and streaming the entire gameplay. You can connect it to the monitor and desktop devices and start recording PS4 gameplay with the steps below.
All Gadgets You Need
Devices: Your PS4 with a HDMI Port, a Computer, a Capture Card, a Monitoring Device (like TV)
Connections: Two HDMI Cables, a USB cable
Software: OBS(or Other Open Source broadcaster)
Steps to Record a PS4 Video with a Capture Card
Connect all the Gadgets in order. Use two HDMI cables to link among your HDMI Port of PS4, capture card and the monitoring device. The sequence will be like: PS4 HDMI Port (HDMI Cable 1: ) - Capture Card Port(HDMI Cable 1:In Side; HDMI Cable 2: Out Side) - Monitor/TV (HDMI Cable 2). Then connect your capture card to the computer via a USB cable.
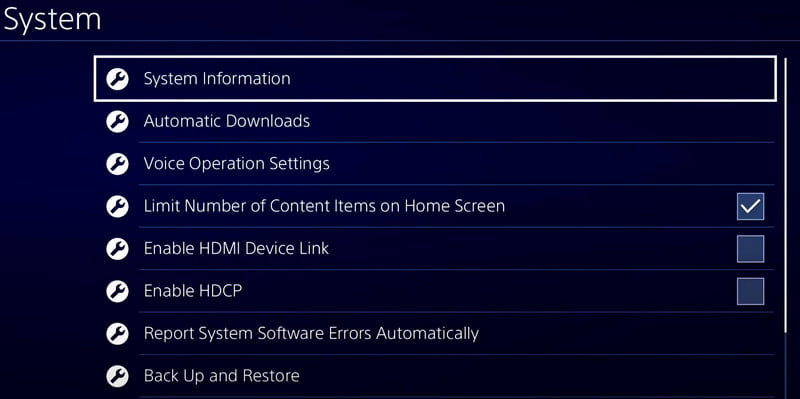
Update your PS4 and make settings for recording. You can get the latest version of PS4 for gameplay recording via Settings > System > System Information.
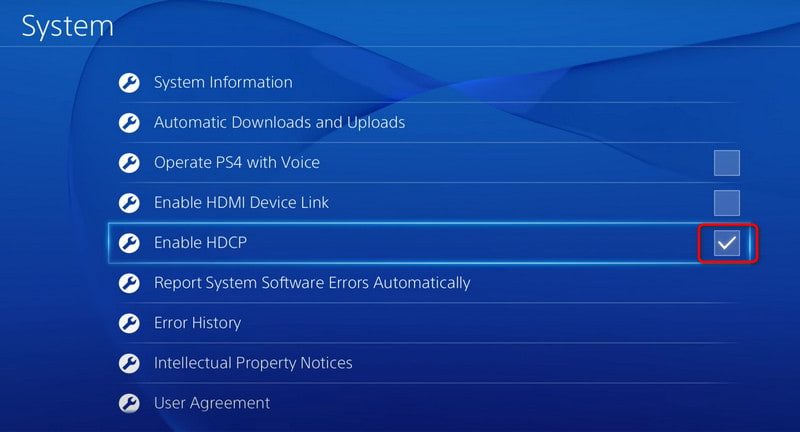
Then head back to System and untick the Enable HDCP (High-bandwidth Digital Content Protection for copy rights) option. By doing so, you can screen record on PS4 with external devices.
Install and run OBS or any broadcasting app that supports a video capture device on your computer. Customize all settings for capture card, video and audio then get your ideal recording.
Files recorded in PS4 can also be transferred to your desktop, but all of them are formatted in MP4. For further editing or sharing, you can also learn to convert MP4 to GIF.
Part 4. How to Edit and Share PS4 Recordings
After getting a PS4 gaming video, you can edit and share it to the desired social media platform like many YouTube gamers do.
To edit PS4 recordings:
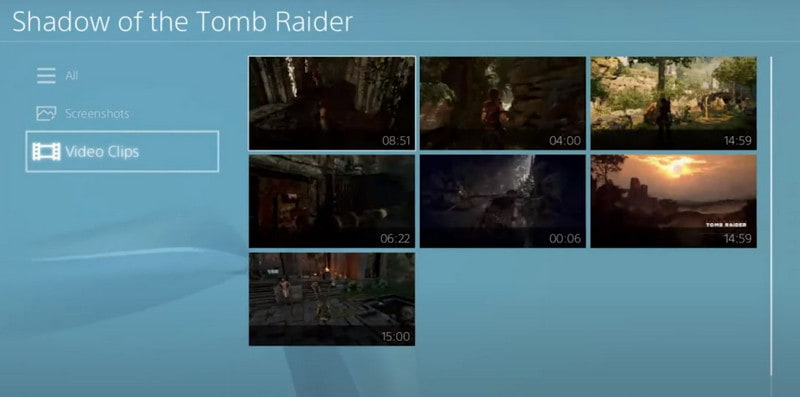
After you turn off gameplay recording on PS4, open the Capture Gallery and select the game you just recorded. Choose your wanted video clip.
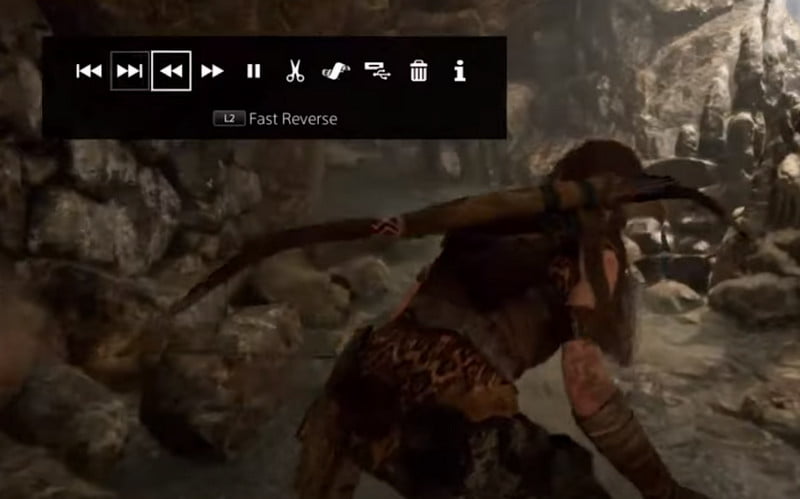
Click the Option button on your PS4 and you can see a row of buttons on the screen for editing.

Here you can move to the previous/ next video, fast reverse/forward the recording, trim your video and more easily.
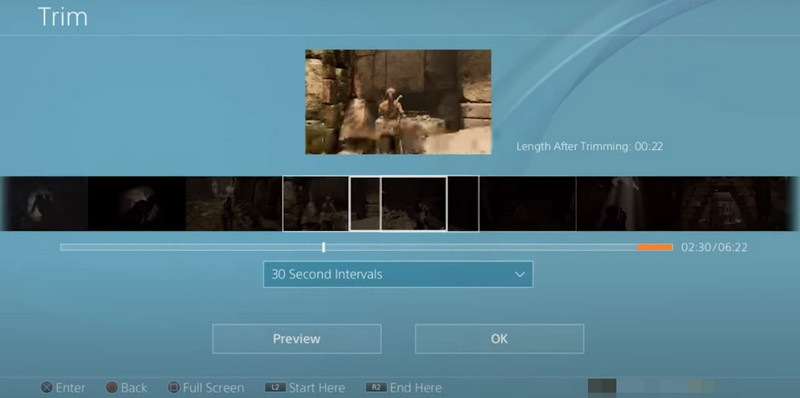
Click the Trim buttons to clip the video. You can also drop down the interval list to make changes. Preview your video and click the OK button.
Tips: To enjoy more editing functions that are not supported on PS4. you can use free video editors as alternatives.
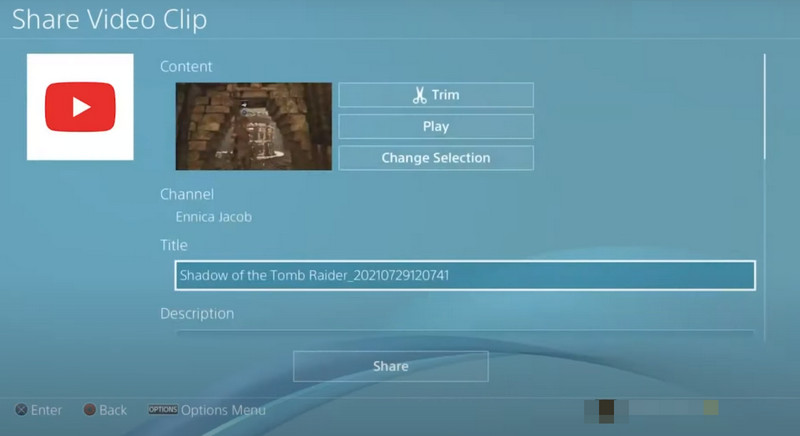
To share PS4 recordings:
Tap the Share button on your PS4 and select a wanted platform for video sharing. Here you can adjust the title and description for the final works.
Then click the Share button to get started.
Part 5. FAQs of PS4 Recording
Does PS4 have a built-in recorder?
Yes. You can double click the Share button to activate the recording feature and the default recording length will be 15 min.
What is the best recording software for PS4?
ArkThinker Screen Recorder is the most powerful and comprehensive software to record PS4 games. You can get a 4K recording in various formats as well as edit your recordings before the final output.
How do I stream from my PS4 to the computer with a capture card?
You can gather all connections, including two HDMI cables and a USB cable and then connect your capture card to the monitor device and PS4 HDMI port, respectively. Then use the USB cable to connect the capture card to your PC and you can start streaming from your PS4 to the PC.
Conclusion
This post has shown you how to screen record on PS4 and provided you with the best desktop recorder for gameplay. Please feel free to share your ideas in the comments below.
What do you think of this post? Click to rate this post.
Excellent
Rating: 4.9 / 5 (based on 498 votes)
Find More Solutions
Step into Xbox Game Bar: What Is It So Famous For? How to Record Gameplay on Xbox One, Series S, and Series X How to Record Steam Gameplay on Windows 11/10/8/7 PC and Mac Nvidia ShadowPlay Review and Best ShadowPlay Alternative 4 Easy Methods to Record Roblox with Voice on PC, Mac, and Phone 3 Easiest Ways to Record Minecraft Gameplay on Windows and macOSRelative Articles
- Record Video
- Detailed Guide on How to Record Gameplay on Nintendo Switch
- Screencast-O-Matic Review, Features, and Best Alternative
- Ultimate Review of FlashBack Express & Best Alternative
- Full oCam Screen Recorder Review and Best oCam Alternative
- Exploring the Benefits and Usage of Webex Recording
- CamStudio Screen Recorder: Key Functions, Pros, and Cons
- [Solved] How to Screen Record A Video on Instagram Smoothly
- Top 4 Mouse Movements Recorders for Windows and Mac
- How to Use Adobe Screen Recorder to Record Your Contents
- Top 7 Ubuntu Screen Recorders Online and Offline for Ubuntu Users