


2 Notable Techniques to Remove Watermark in GIMP from Image
Do you have a picture that contains a watermark and plan to remove it? Well, these watermarks usually spoil the beauty of a certain photo. Hence, some couldn’t use it whenever they wanted because of the watermarks. GIMP is one of the many ways you can use to eliminate watermarks. With that, we have provided a step-by-step guide to using GIMP on how to remove watermarks. Not only that we have also shared an alternative you can try. Thus, you’ll have another option. Read and scroll here.

- GUIDE LIST
- Part 1. How to Remove Watermark with GIMP
- Part 2. Best Alternative to GIMP
- Part 3. FAQs About How to Remove Watermark with GIMP
Part 1. How to Remove Watermark with GIMP
Removing watermarks indeed become a common necessity. Some do it for personal use, while others do it for creative projects. With that in mind, GIMP is one of the tools that many use for this type of need. GIMP stands for GNU Image Manipulation, which is a popular image editor on the internet. It offers free approaches to eliminate unwanted watermarks. In this part, we’ll discuss two effective methods using GIMP to remove watermarks from images. Without further ado, let’s now proceed.
Method 1. Use the Clone Tool
The Clone tool method is the easiest way to remove watermarks from your images. It is a method where you’re copying a similar part from the photo. Afterward, you’ll paste it to your watermark and blend it. Here’s how:
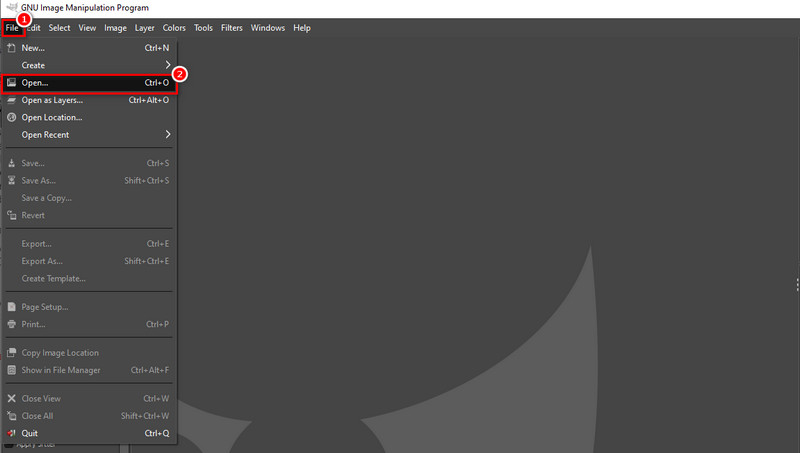
Ensure that the GIMP software is downloaded and installed on your computer. Go to the File tab and click the Open option from the drop-down menu. You can also press the CTRL+O to upload the image.
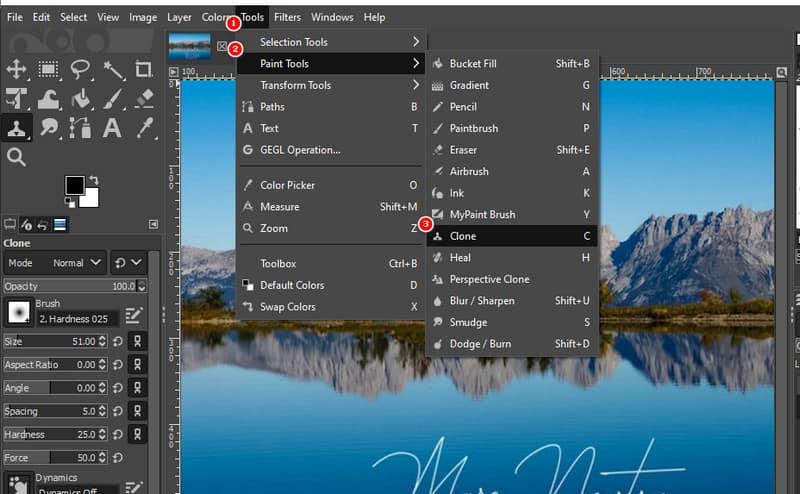
Afterward, navigate to the Tools tab and select Paint Tools. Then, click the Clone option. Adjust the brush size to match the part around the watermark. Now, select and copy a similar area from your image. While doing this, click the CTRL key.
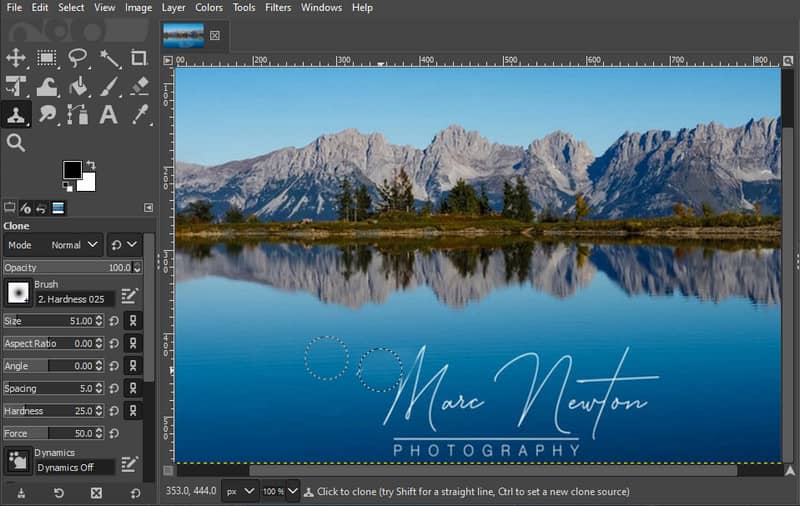
Now, begin removing your watermark by painting the watermark with the area you have chosen. Do it by releasing the CTRL key while moving your cursor to paint the watermark. Ensure to blend it with the sampled pixels so it will look smooth.
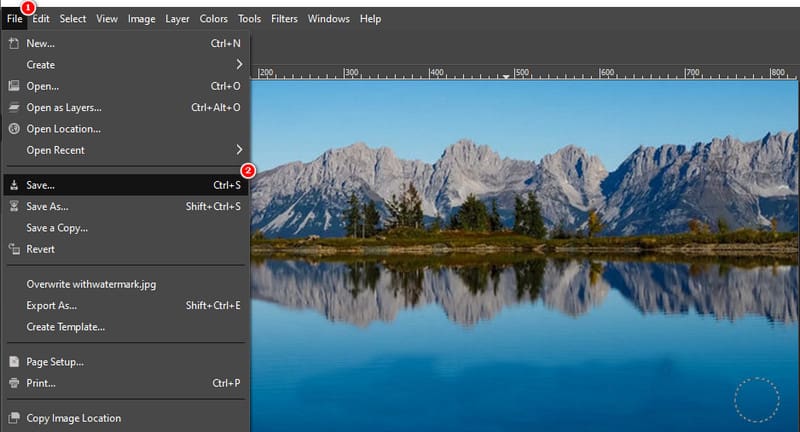
When you’re done, it’s time to save your image without a watermark. Head to the File tab and choose the Save option. Finally, select a destination folder to export the file. And that’s it!
Method 2. Resynthesizing with the Heal Selection Filter
Resynthesizer is a plugin you installed in your GIMP. It provides different tools to edit your images. With it, you may also remove a watermark in GIMP. First, ensure the resynthesizer plugin is installed. Once ready, here’s how to remove a watermark in GIMP with Heal Selection:
Choose a selection tool you want to use as per your preference. You have the option to use Free-Select or Scissor Tool to select the watermark area.
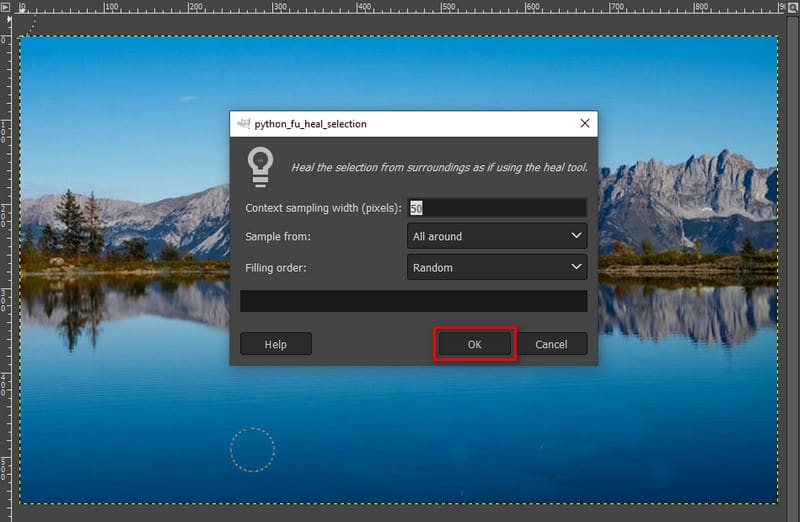
After the selection, go to the Filters tab and choose the Enhance option. From the drop-down menu that prompts, select the Heal Selection option.

A dialog window will appear, and you need to specify the healing process. Adjust the settings according to your needs. Once satisfied, click OK to heal your chosen region from the photo.
When everything is ready, save your image without a watermark. Finally, you can use it for your needs.
Part 2. Best Alternative to GIMP
If you find the methods from above complicated and looking for an alternative to GIMP, we’ve got you covered! One of the best alternatives we recommend is ArkThinker Free Watermark Remover Online. It is a dedicated watermark remover that can eliminate logos, text, stamps, and more. The tool also supports different types of image formats such as JPG, JPEG, PNG, and so on. It also applies AI technology to erase watermarks from your photos. Thus, it restores the original image after the watermark is removed. Plus, it maintains the quality of your photos. Now, here’s how to eliminate watermark with this platform:
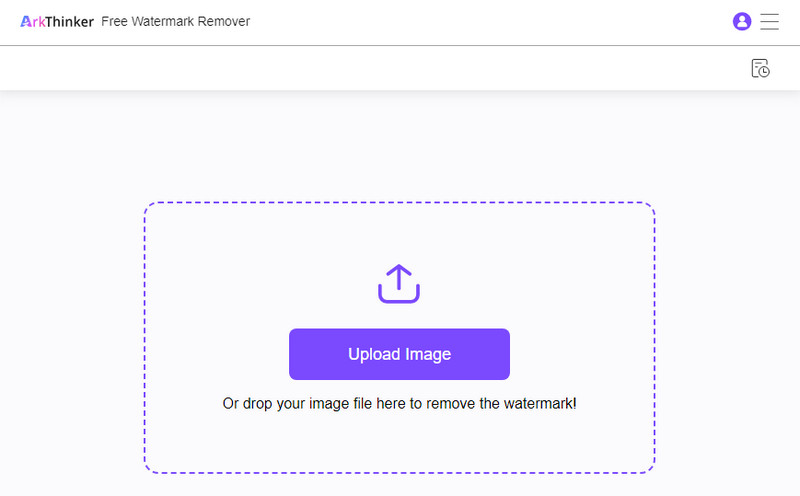
Upload the photo with a watermark.
Head to the official website of ArkThinker Free Watermark Remover Online. Once there, hit the Add File to Start button to begin. Now, choose Upload Image to add the image with a watermark.
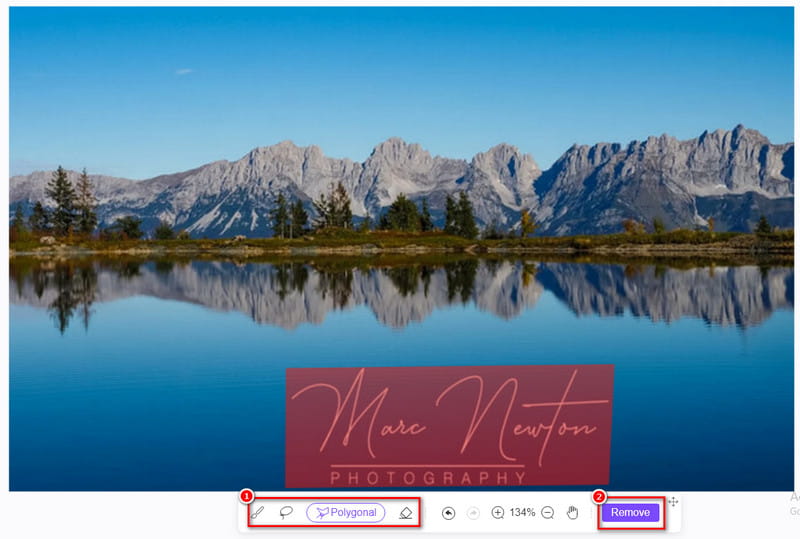
Choose and remove the watermark.
Using the selection tool such as Lasso, Polygonal, and Brush, to choose the watermark part. Once you have finished the selection, click the Remove button. Then, the removal process will start.
Save the photo.
Once you’re satisfied, hit the Download button to export your images. Also, you can Crop it first before saving it.

Part 3. FAQs About How to Remove Watermark with GIMP
Is GIMP watermark removal safe to use?
Of course, yes! GIMP itself is safe to install and use on your computer. Go to its official website to download it. As for its watermark removal, it is also safe when used responsibly and within legal boundaries. Always ensure you have the right to modify the images.
How to remove a semi-transparent watermark using GIMP?
In removing semi-transparent watermarks, GIMP uses a resynthesizer. But note that you must have an installed resynthesizer plug-in on your browser. Now, here’s how to eliminate semi-transparent watermark with GIMP:
Step 1. Upload the picture with a watermark on the tool. Use a selection marker (free tool or scissor tool) to choose the watermark.
Step 2. Next, go to Filters and click Enhance from the option. After that, hit the Heal selection option from the sub-menu. Then, provide the necessary details.
Step 3. Finally, click the OK button to continue. Then, you have your image without the watermark. Save the edited picture on your computer.
Can I use GIMP to remove watermarks from videos?
GIMP is primarily an image editor, and its tools are designed for static images. Removing watermarks from videos may require video editing software, and the process could be more complex.
Is it possible for GIMP to add a new watermark to an image?
Yes, GIMP allows you to add watermarks to images. You can create a text or image-based watermark and adjust its transparency, position, and size. This is often done to protect your own work or add branding.
Conclusion
To sum it up, that’s how to remove a watermark with GIMP using 2 methods. Apart from that, you’ve got to know the best watermark remover alternative to use. And that is the ArkThinker Free Watermark Remover Online. It is a tool that can remove almost all types of watermarks on your pictures. The good thing about it is that it is 100% free. Plus, it does not require any skill to help you get rid of watermarks. To know more about its capability, try and use it today!
What do you think of this post? Click to rate this post.
Excellent
Rating: 4.9 / 5 (based on 470 votes)
Find More Solutions
Remove Adobe Stock Watermark from Image [Full Guide] Top 2 Methods to Remove Getty Images Watermark Quickly How to Use Photoshop to Remove Watermark Effectively How to Add Watermark to Video on Different Devices 2024 Remove Watermark from Video with 4 Video Watermark Removers Full Guide to Remove Wondershare Filmora WatermarkRelative Articles
- Edit Image
- How to Edit and Crop Animated GIFs with 4 Effective Ways
- 10 GIF Converters to Convert Between Images/Videos and GIFs
- Best GIF Editor Tools Suitable to Any Computers and Devices
- How to Make GIF from Images on Desktop and Mobile Phone
- Quick Steps on How to Add Text to a GIF Using Caption Maker Tools
- Add Music to GIF: Incorporate Music to Your GIF After Converting
- GIF Resizer: Ultimate Tools to Resize Your Animated GIF
- [6 Tools] How to Set a GIF Loop Change and Play It Forever
- GIF Cutter: How to Cut GIF with Easy and Fast Methods
- How to Remove Alamy Watermark from Images (100% Working)