


Simple Guide How to Record Vocals in Ableton on Mac or Windows
Digital Audio Workstation (DAW) is a program capable of recording, editing, and producing audio. Ableton is one the considered Digital Audio Workstation (DAW) of choice for numerous producers and songwriters. It has a clean interface that can navigate whether you are a beginner or an expert in audio recording. If you want to learn how to record vocals in Ableton, count on this post. This post will guide you through recording your audio using this program. In addition, it will present insightful pointers that can help you. To get started, proceed to the following parts.

- GUIDE LIST
- Part 1. Preparations for Recording Vocals in Ableton
- Part 2. How to Record Vocals in Ableton
- Part 3. Tips for Recording Vocals
- Bonus: Powerful Vocal Recorder You Should Not Miss
- Part 4. FAQs about Recording Vocals in Ableton
Part 1. Preparations for Recording Vocals in Ableton
Before you proceed with recording your vocals using the program, it is necessary to make the following preparations. You must set up everything you need before recording your vocals. The essential equipment for recording vocals is a computer, microphone, audio interface, studio headphones, and the program. It is a must to ensure your equipment is working properly and ready to go.
Part 2. How to Record Vocals in Ableton
First and foremost, connect your microphone to the program. Connect your microphone’s XLR cable to an audio interface input using a condenser mic. Also, if you use USB microphones, you can connect that directly to your computer.
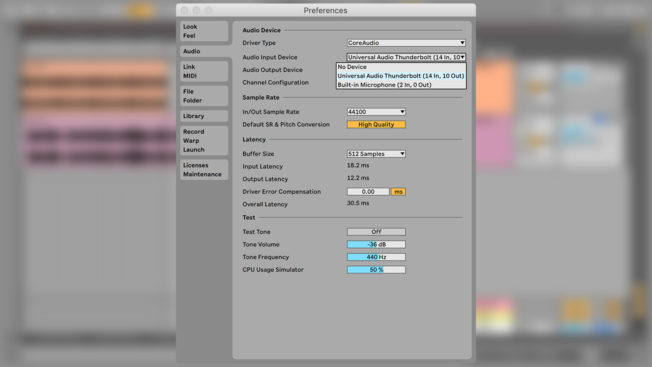
To set your microphone in the program, locate the File, proceed to Preferences, select the Audio tab, and then Audio Input Device. In addition, make sure that you also select the Audio Output Device, where your headphones are connected. Select Built-in Output if your headphones are connected to your desktop computer.
Locate the Control Bar, change the Tempo of your song, and enable the Metronome button to sync in your record. After enabling the button, it will start ticking after hitting the Record or Play buttons. When recording your vocals, it would be better to have a beat or an instrument track. It might be from guitar, piano, or violin, or import a sample loop or add an existing arrangement. If you want to sync notes in time with the tempo, enable Ableton quantize while recording technique, where you can easily control and correct the timing of the notes. From the Edit menu, enable the Record Quantization, and select the meter where the notes will snap when recording.
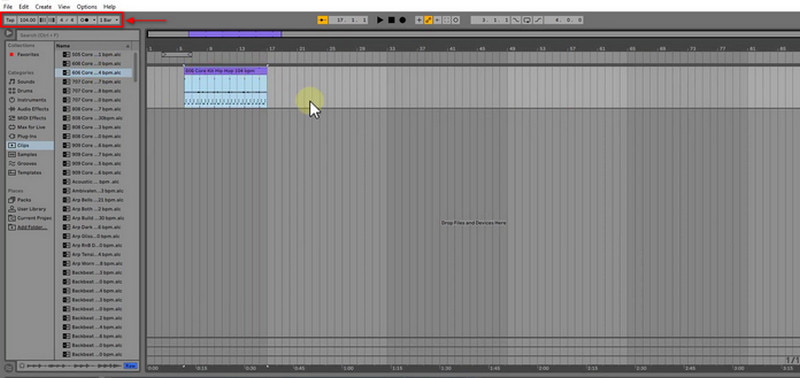
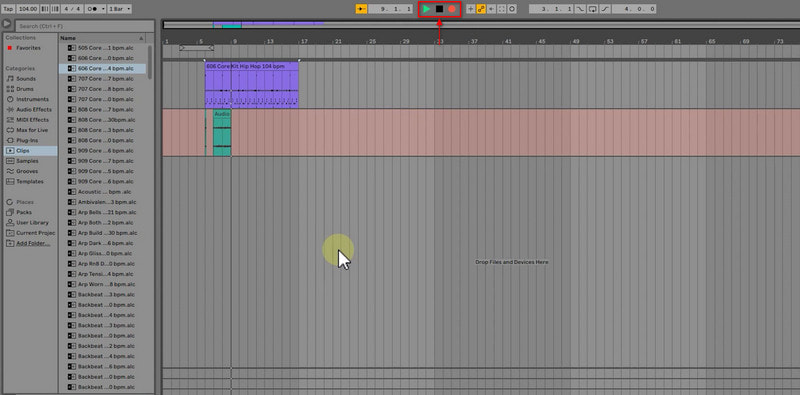
When creating a new audio track for recording your vocals, click CMD+T if you are a Mac user and CTRL+T if you are a Windows user. After that, open Mixer’s In/Out section. Choose the input for your microphone from the Input Channel chooser. Once done, you can start recording vocals by clicking the Arrangement Record button on the Control Bar section. If you want to hear your voice playback while recording, go to Mixer’s In/Out section to turn on that option. Next, click the Red encircled button above the interface to start recording your vocal. Once done, click that button again, or simply press your Spacebar. After that, you can add reverb, delay, and other effects to your recorded vocals if you prefer. To save your file, go to the File tab, proceed to Save Live Set, and then it will save your recorded vocal.
Part 3. Tips for Recording Vocals
This part will present pointers that can help you record your vocals. The following guidelines listed will help you to record your vocals - professionally.
◆ Before anything else, make sure that you warm up your voice. It is important to do vocal warm-up exercises to ensure your voice is ready to sing and perform. If you did not perform a warm-up, you might experience vocal strain, leading to bad performance or, worse, damage to your voice.
◆ Record the song for at least two takes. With that, your voice is warmed-up, and it will make you comfortable with the direction and dynamics of the song.
◆ Apply the comping technique to record your vocals section by section. It is called comping, as it is the short-term for compilation.
◆ When you are recording, a microphone is needed, so you must choose a better microphone.
◆ The sound of your recording space has a huge part and impact when recording your vocals. It is an essential key element in accomplishing greater output.
◆ Consider working with another vocalist. With that, you can exchange comments after every take, which will help you improve your performance.
◆ Make sure that you can hear your voice when you are recording. It is important to ensure the singer can hear the mix, as it will make them feel comfortable when recording.
◆ It would be better to use a pop filter to prevent unwanted explosive consonants from distorting the output.
◆ Do not put much reverb or other effects to have a pleasing recorded output.
Bonus: Powerful Vocal Recorder You Should Not Miss
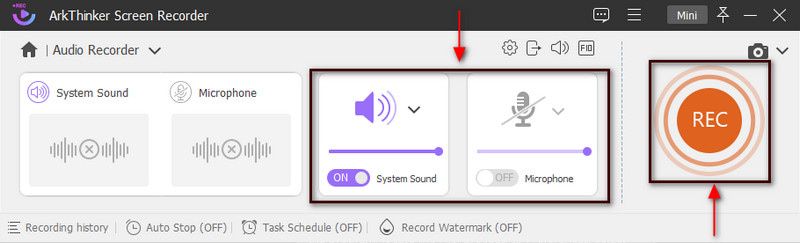
ArkThinker Screen Recorder has built-in features that can record video, audio, game, window, webcam, and phone. This program has powerful recording features capable of recording your voice and even leaving out the parts you do not need. To accomplish that, you can manually retain the essential parts on the timeline or set the time on the start and end times options. This program can record and produce the high-quality audio you want. Once you are done recording, your recorded audio will be placed on the recording history. From there, you can watch your output if you need to. If you want to use a program that has a user-friendly interface and is compatible with both Mac and Windows, count on this program. To begin the process, proceed to the presented steps to record your vocal.
Download and Install
Download and Install the program on your desktop computer. After the installation process, launch the program to get started.
Open Audio Recorder
From the program’s main interface, open the Audio recorder. After that, it will bring you to the recording options. From there, turn on the System Sound and Microphone, and at the same time, adjust their volume. Once done, hit the REC button to start recording your vocal.
Start Recording Vocal
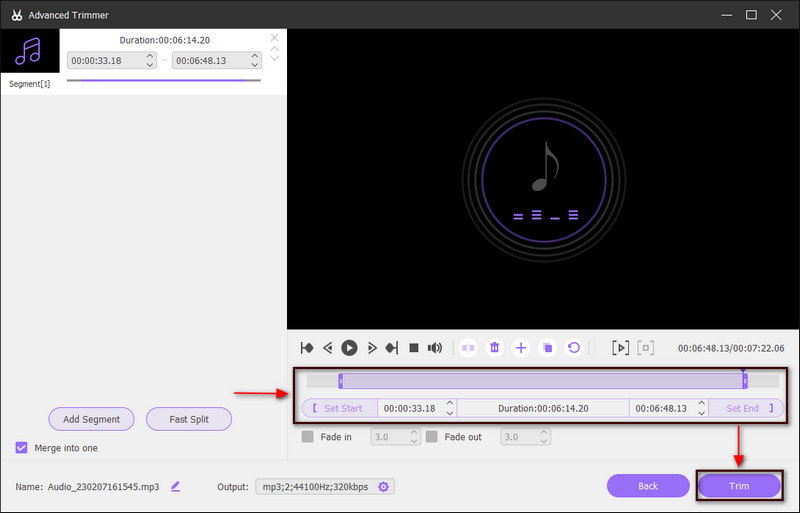
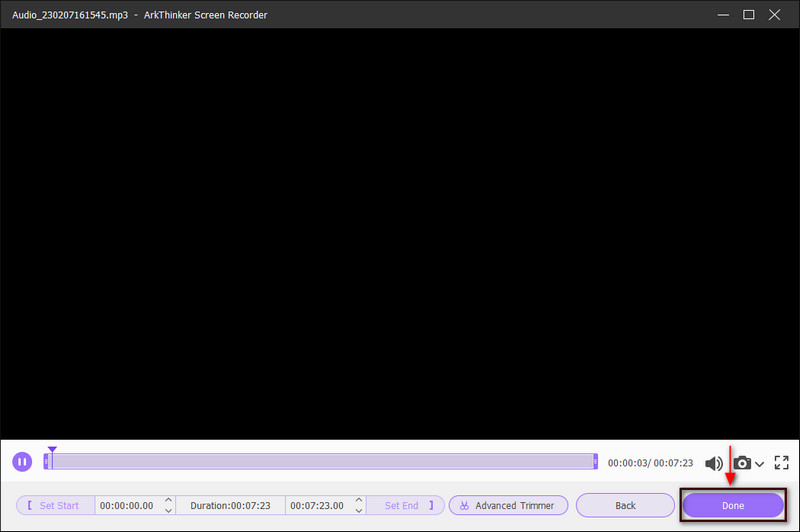
Once the recording starts, begin to record your vocal. Also, you can use this to warm up, practice, or sing the whole song. After that, you can listen to your recorded vocal and re-record it. For instance, if you want to pause for a minute, click the Pause button. Once you are done recording your vocal, click the Red box that signifies Stop. After that, another window will appear on your screen, where your recorded vocal is playing. Hit the Advanced Trimmer button to remove unnecessary parts from your recorded audio. After that, click Trim to remove them successfully. Afterward, it will bring you back to the preview window.
Save Recorded Vocal
Once done, click the Done button to save your recorded vocal. Afterward, it will bring you to the recording history, where you can locate your output on the top list.
Part 4. FAQs about Recording Vocals in Ableton
Can beginners use Ableton?
If you are a beginner and starting to learn beat-making and songwriting, you can use this program. This program is one of the most popular for creating music. It is commonly used by hip-hop and electronic music producers because of the loop-based composition.
How long does it take to learn to use Ableton?
It is said that you need more than six months to learn to use the program correctly. It will take you time to take advantage of everything it offers. In addition, when learning to use this program, your focus is on learning the basics.
Is Ableton still free?
Ableton's free version only offers limited features and tracks. It will give you a free 30 days trial for all the versions.
Conclusion
When recording your vocals, choosing a recording application that satisfies the users is a must. The better the recording application, the better the result or output will come out. This post provided information on what to prepare and pointers to consider when recording vocals. In addition, it helps you to enable Ableton quantize while recording. With that being said, you have learned a lot about Ableton. Also, you can use ArkThinker Screen Recorder to record your audio easily and hassle-freely.
What do you think of this post? Click to rate this post.
Excellent
Rating: 4.9 / 5 (based on 438 votes)
Find More Solutions
How to Replace Audio in a Video On Different Devices 2022 How to Compress Audio Files Without Losing Sound Quality How to Combine 2 or More Audio Files on Different Devices 5 Best Music Tag Editors for iPhone, Android, PC, and Mac Effective Technique on How to Split a Track in Audacity Audio Cutters: Offline and Online Tools to Cut Audio FilesRelative Articles
- Edit Audio
- Audio Cutters: Offline and Online Tools to Cut Audio Files
- Effective Technique on How to Split a Track in Audacity
- How to Replace Audio in a Video On Different Devices 2022
- How to Clip Audio in Audacity, WMP, iMovie, Online, Trimmer
- 4 Easiest Ways to Change and Edit Audio Volume on PC and Mac
- 4 Easy Methods to Edit Audio Files on Windows and Mac
- How to Compress Audio Files Without Losing Sound Quality
- How to Combine 2 or More Audio Files on Different Devices
- 5 Best Music Tag Editors for iPhone, Android, PC, and Mac
- Add Album Art to MP3 on Windows, Mac, iPhone, and Android