


How to Record Facetime With Audio on iPhone, iPad, and Mac
Facetime is an application accessible for voice and video calls over the internet. It is one of the best applications to stay in touch with your family and friends. This application is available on devices made by Apple, such as iPad, iPhone, and Mac. For instance, you may want to save an essential or particular conversation; it might be personal or for business purposes. With that, you need to learn how to record Facetime with audio on your Apple devices. It will help you save your conversation, and you have something to look back on if you need or want to re-watch it. This post will walk you through how to screen-record Facetime.

- GUIDE LIST
- Part 1. Can You Screen Record Facetime?
- Part 2. How to Record Facetime on iPhone/iPad
- Part 3. How to Record a Facetime Call on Mac
- Part 4. Alternative Way for Recording FaceTime Calls
- Part 5. FAQs about FaceTime
Part 1. Can You Screen Record Facetime?
The question is, can you screen-record facetime? At this moment, you may be wondering if it is possible to record a Facetime conversation. The answer is - yes! You can record your screen using the built-in recording feature of your iPhone/iPad. Also, you can record your Facetime calls on Mac using the pre-installed QuickTime Player. In addition, you can record using alternative recording tools that you can access offline.
Part 2. How to Record Facetime on iPhone/iPad
This part will provide information on recording your screen using iPhone/iPad’s built-in recording tool. If you prefer to record Facetime calls using your iPhone/iPad, refer to the following steps.
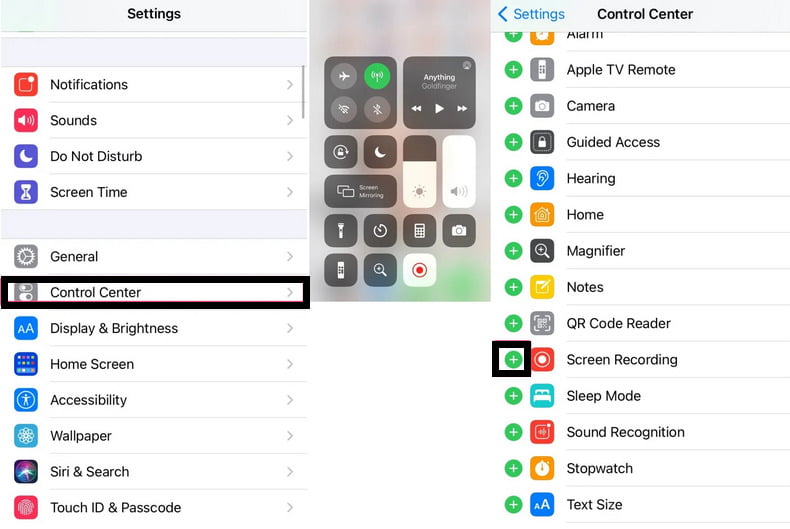
First and foremost, open the Settings app, find the Control Center, and click it. Next, scroll down the menu, look for Screen Recording, and hit the green (+) icon to add it.
Go back to your home screen, open Facetime, and join a video call using your device. To enable the recording, navigate to the Control Panel, and click the Screen Recording button again.
After 3 seconds, it will start recording your screen. Go back to the Facetime application and proceed to your video call. Once the conversation or video call ends, swipe down Control Center and select Stop Recording. After that, the recorded Facetime video call is then saved on Photos by default.
Part 3. How to Record a Facetime Call on Mac
It is also possible to screen-record Facetime calls using your Mac computer, and the best option is QuickTime. Apart from being a media player, it can also record your screen. In addition, this pre-installed application enables you to play videos, edit your project, and share audio and video easily. To know how to record a facetime call using your Mac computer, rely on the guidelines presented.
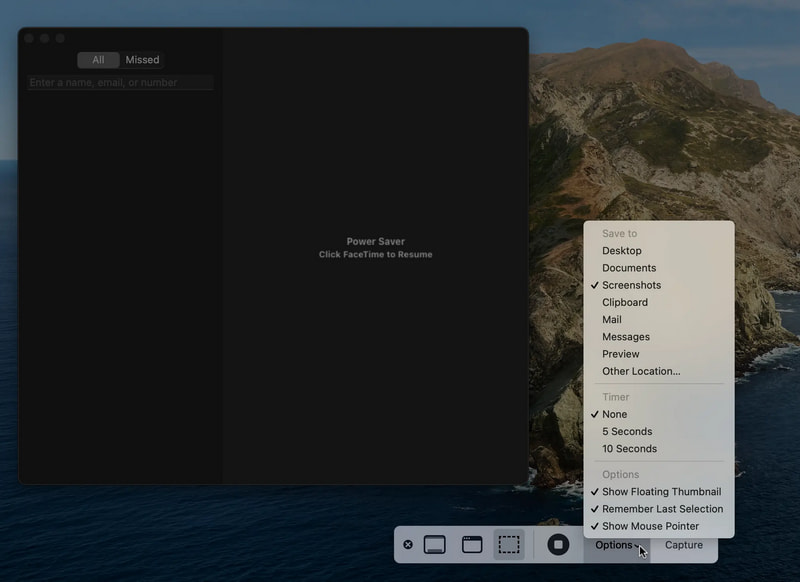
From your Mac, open the QuickTime player. Once the program is opened, proceed to the menu bar, hit the File tab, and click New Screen Recording. From there, choose the small down arrow labeled options, and select MacBook Microphone.
Using your Mac, open or perform your Facetime application to start or join a video call. Afterward, go back to the QuickTime player, and click the Record button once to start the recording.
Once the video call ends, click the Stop button to stop the recording. After that, your recorded Facetime video call is saved on your Mac.
Part 4. Alternative Way for Recording FaceTime Calls
If you are looking for an alternative tool to record your Facetime calls, you can rely on ArkThinker Screen Recorder. This program can record as it has built-in features that can record audio and video in original resolution. The good thing about this program is that it is compatible with Windows and Mac. It can record your screen activities and audio, and you can record as long as you want. After recording the Facetime call, you can use the trimmer if there are unnecessary parts from your recorded screen video. It will help you extract the essential parts and eliminate unnecessary parts. To discover how to record Facetime with audio, follow the steps below.
Download and Install the Program on Your Mac
To fully access the program, visit the official website and then download and install the program to your Mac computer.
Open Video Recorder Feature
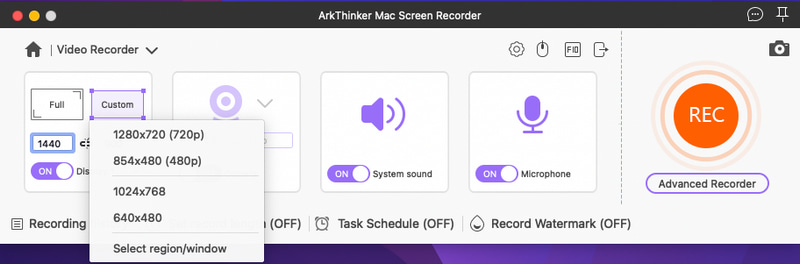
From the program's main interface, open the Video Recorder to record a Facetime video call on your Mac. Turn-on Display, System Sound, and Microphone options. In the Display option, hit the Custom button and Region/Window. After that, open your Facetime application to set the screen recording area.
Start Facetime Screen Recording
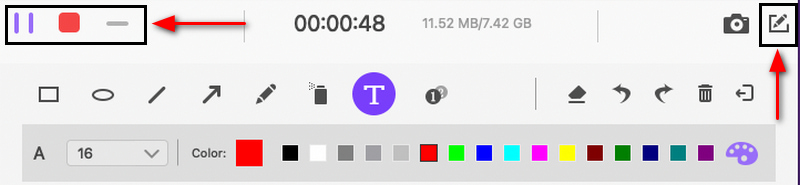
Once settled, hit the REC button to start recording your Facetime call. You can pause and resume your recording process freely. In addition, you can click the Edit icon if you want to use the on-screen drawing tools. Once the conversation or the video call is dropped, hit the Stop button to stop recording your screen.
Play Your Screen-Recorded Facetime Call
From the new window, click the Clip button to cut off unnecessary parts from your recorded screen video. Afterward, hit the Save button to save your screen-recorded Facetime call. In the recording history, you can play your recorded-screen Facetime call on the media player and locate it in your folder.

Find More Solutions
3 Ways to Add Text to Video Using Online and Offline Tools Top-Notch Video Trimmer Available on Windows, Mac, Android, and iOSPart 5. FAQs about FaceTime
Can you Facetime on an Android device?
It permits you to join a Facetime call by clicking a link sent by an Apple device user if you are using Android or PC. The person that sent you the link must have at least iOS 15, iPadOS 15, or macOS Monterey. Once you have the Facetime call link, you can open it on your Android phone or your PC using a web browser.
Is FaceTime free internationally?
Yes, you can use the Facetime application whether you or the other Facetime user is outside the country. It is possible to make international FaceTime calls as long as you are connected to an internet connection.
Do FaceTime calls cost money?
It will not cost you anything if you use Facetime with an Apple device, as it is free to use and access.
Are FaceTime calls private?
The sender and the receiver are the only ones with access to their audio and video contents. It is because Facetime calls are protected by end-to-end encryption. It prevents third parties from accessing their data, so your communication is secured.
Conclusion
With the mentioned methods above, it is possible to record your Facetime calls on your iPhone/iPad and Mac. Using the built-in recording tool, you can record your Facetime calls on iPhone/iPad. On the other hand, if you are using Mac, you can record your Facetime calls using QuickTime Player. There is no time limit when recording, but you must consider your phone’s battery and storage. In addition, if you want to know how to record Facetime with audio, this post has already presented a solution. You can count on ArkThinker Screen Recorder as an alternative to record your Facetime calls in easy and quick ways.
What do you think of this post? Click to rate this post.
Excellent
Rating: 4.9 / 5 (based on 135 votes)
Relative Articles
- Record Video
- Thorough Ways to Record Screen With Quicktime on Apple Devices
- OBS Screen Recorder: Powerful Screen and Broadcasting Tool
- How to Fix Audacity Won’t Record Issues in 5 Basic Methods
- How to Enable Google Meet Recording on Your Desktop
- Guidelines on How to Trim a Video on Facebook Effectively
- How to Zoom in on a Video with Most Helpful Methods
- Top 7 Video Cropper that Excellently Crop and Resize a Video
- Top-Notch Video Trimmer Available on Windows, Mac, Android, and iOS
- How to Create an Instagram Filter Using Excellent Tools
- Easy Guidelines on How to Trim a Video on Snapchat