


Learn How to Resolve Audacity Voice Recorder Issues
There are cases where you need to record broadcasts, songs, online lectures, or voice chat conversations. Therefore, you will need an audio recorder application to capture sound from a desktop speaker or microphone.
Audacity is a free audio editor and recorder that can be accessed using Mac, Linux, and Windows. It is an open-source multi-track audio program that you can download without restriction. Audacity can record live audio, cut unnecessary parts, copy, splice, or mix audio. However, recently, some users experienced that this program is not recording, whether mic or sound. This post will provide information about Audacity’s recording issue and methods to fix it. To learn about Audacity won't record issues, read more about the following parts.

- GUIDE LIST
- Part 1. Why Is Audacity Not Recording
- Part 2. How to Fix Audacity Not Recording Issue
- Part 3. Best Audacity Alternative to Record Any Sound Easily
- Part 4. FAQs about Audacity Not Recording
Part 1. Why Is Audacity Not Recording
Audacity is a cross-platform audio program allowing users to record and edit audio. This program was used by users who love to sing, record their voices, or edit their audio. However, some users encountered that the recording option needed to be fixed. For instance, you hit the recording button and start recording your voice, but the program fails to record it. They cannot hear anything after spending a lot of time recording using the program. This part will provide information about the error opening recording device Audacity.
◆ First and foremost, check your speaker because the audio problem usually starts from a defective output device. In this case, you must check if your speakers are in good condition and adequately connected to your computer system.
◆ There are cases in which you change something from the program setting, which might be one of the causes of the problem. For that reason, you need to recall what you change from the program settings that cause the problem. With that, you can bring back the original program setting, which might help you fix the problem.
◆ If you cannot remember the changes you have made to the program setting, uninstall your Audacity application. After that, you need to remove all the remaining files that it has and reboot the system. The next thing you need to do is to reinstall the program again on your desktop. With that, you will get the program’s latest version with a clean slate. In addition, you will start again, as you do not have the previous settings, which triggers another problem.
Part 2. How to Fix Audacity Not Recording Issue
This part will present a list of workable solutions that help you to fix the audacity recording issue.
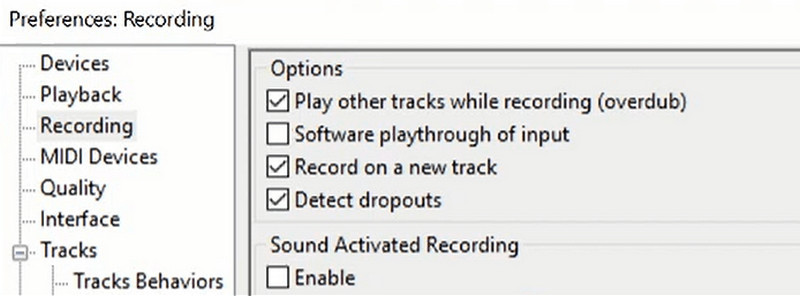
◆ There are cases in which you did not notice or missed the essential options, and the recording is affected. The first thing you need to check is the program's settings. Locate the Edit button, and select Preferences. After that, look and enable the Recordings button.
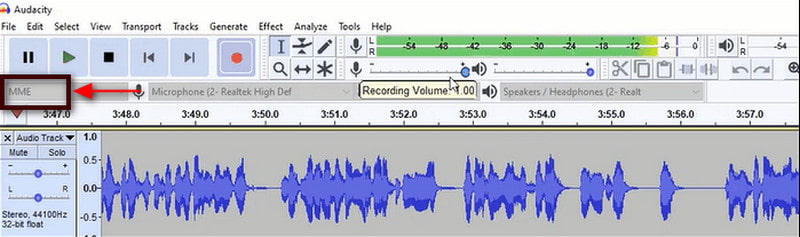
◆ If you are using another host, choose Microsoft Multimedia Environment (MME) as your audio driver below the interactive controls.
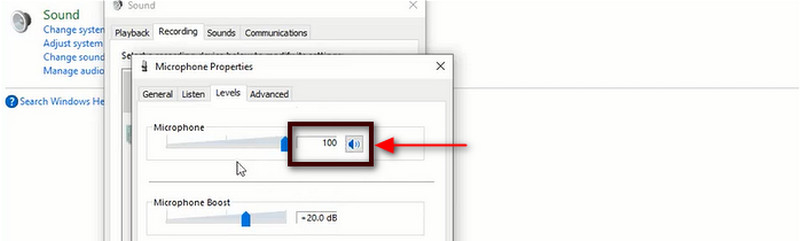
◆ No matter what audio recorder you use, it is important to note that you should enable Microphone settings. You can only proceed to record using the program if your desktop permits you to use the recording tool.
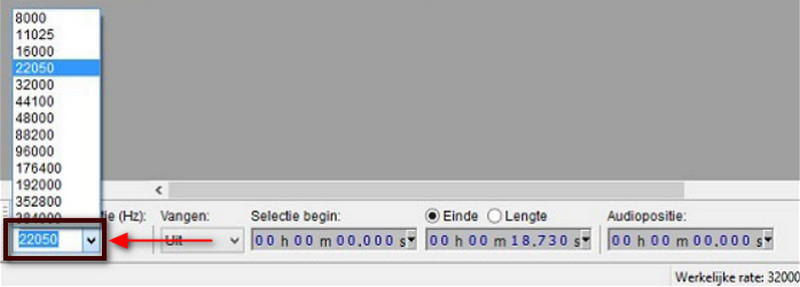
◆ When using this program, it would be better if you set the proper audio sample rate. The higher the sample rate, the more it would benefit capturing sound. To set that, find the button from the lower left of the interface, and choose your preferred audio rate.
◆ If the Audacity voice recorder issue is still present, you can fix it by restarting the program. If the program is still not working correctly after the restarting operation, it would be better to download the program again.
Part 3. Best Audacity Alternative to Record Any Sound Easily
Suppose that you learned how to fix Audacity recording software issues. But none of the above solutions is helpful, and you should consider using another recording tool.
ArkThinker Screen Recorder is a professional recording software that has a user-friendly interface. It has built-in features that are capable of recording screen activities. It also has an audio recorder capable of recording sound from the System and Microphone. It allows you to record your audio by simply turning on the System Sound and Microphone. In addition, it has cut or trim editing options that permit you to retain the necessary parts. Also, leave out the unnecessary ones from your recorded audio. This program works whether you are using Mac or Windows computer. To start, proceed to the following steps.
Download and Install
To have complete access, download and install the program. After the installation process, proceed to launch the program to get started.
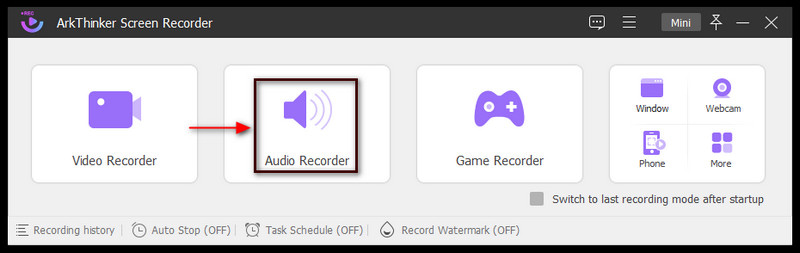
Select Audio Recorder
Once you open the program, the built-in features will appear on your screen. From the list of features, click the Audio Recorder button. After that, it will bring you to the Audio Recording section.
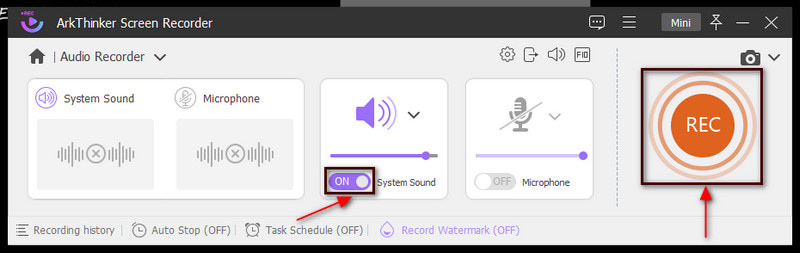
Record Your Audio
On your screen, you will see the two buttons: System Sound and Microphone. These buttons are off by default setting. To start recording your audio, turn on the System Sound and Microphone. Next, hit the Rec button, and wait for the recording to start. When you are recording, you can lower or increase the volume of your audio. If you want to stop for a while, click the Pause icon. And if you are done recording, hit the red Box icon that signifies stop.
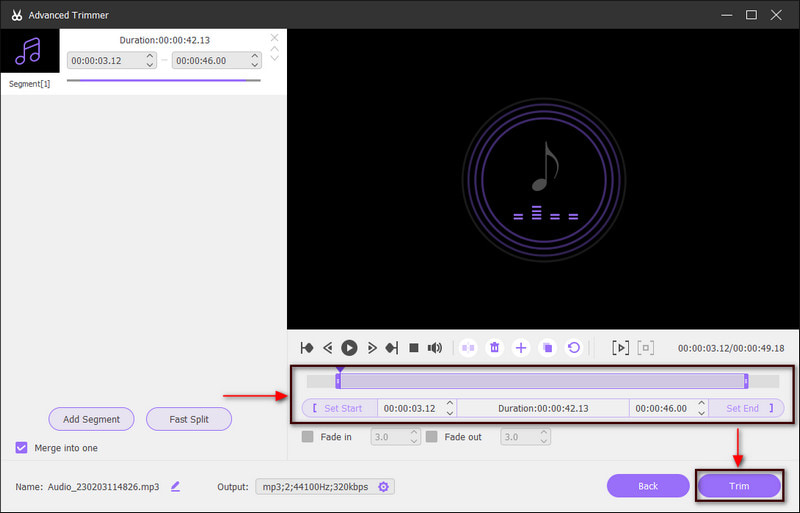
Trim Your Recorded Audio
While you were recording, you couldn’t help but stop, stutter, there was noise in the background, or forget lines. Instead of repeating everything from the beginning, you can trim the parts where you made a mistake. To remove unnecessary parts from your recorded audio, you can use the Start and End Time options to set the time. In addition, you can manually retain the necessary parts by marking them on the timeline. Once you are done, hit the Trim button on the lower right of your screen.
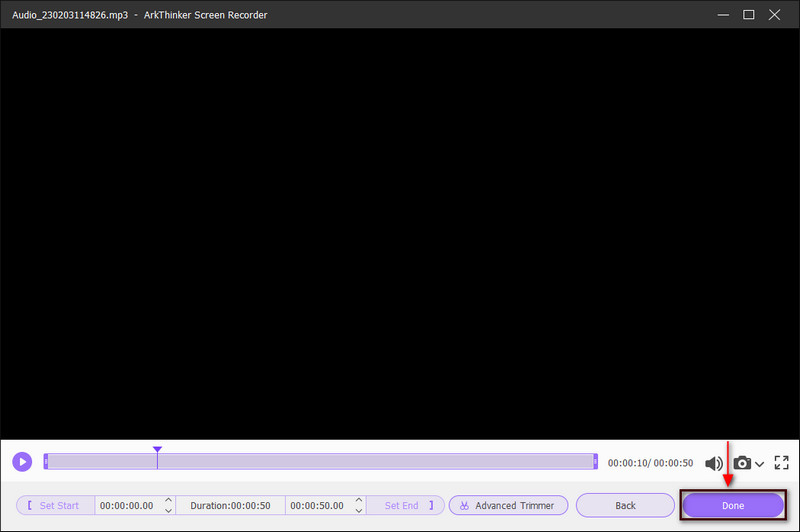
Save Recorded Audio
Once you are satisfied with your recorded audio, click the Done button on the lower-left of your screen. After that, you will see on your screen the recorded history. You can play your recorded audio from the media player and locate your output from your folder.
Find More Solutions
Effective Technique on How to Split a Track in Audacity 4 Easy Methods to Edit Audio Files on Windows and MacPart 4. FAQs about Audacity Not Recording
Which audio format is best for Audacity?
Audacity supports common audio formats like MP4, AIFF, and WAV. Additionally, if the FFMpeg library is installed on your desktop, a more extensive range of audio formats like WMA is supported. It is capable of importing the audio content of most video files.
Is Audacity good for beginners?
Audacity has a beginner-friendly interface that can use by beginners. This program is easy to learn even without prior knowledge of audio editing. In addition, Audacity is an excellent audio recording program that is ideal for recording songs, podcasts, and many more.
What is a good recording level in Audacity?
When recording in Audacity, the exemplary level range is between -12 and -6 decibels. That is the better maximum signal level to aim for. Audio too far below that range is too quiet, while audio above that range might be too loud. It is essential to consider your listeners so that they don't need to adjust to hearing your project.
Conclusion
Audacity is one of the most popular audio recording and editing programs. It is open-source software that is many people's go-to for recording output. Even so, some users complained about Audacity recording computer audio problems. This post provided information on why the program is not recording and the methods to fix the issues. In addition, you can rely on ArkThinker Screen Recorder, which can excellently record your audio in quick and easy steps.
What do you think of this post? Click to rate this post.
Excellent
Rating: 4.9 / 5 (based on 213 votes)
Relative Articles
- Edit Video
- Guidelines on How to Trim a Video on Facebook Effectively
- How to Zoom in on a Video with Most Helpful Methods
- Top 7 Video Cropper that Excellently Crop and Resize a Video
- Top-Notch Video Trimmer Available on Windows, Mac, Android, and iOS
- How to Create an Instagram Filter Using Excellent Tools
- Easy Guidelines on How to Trim a Video on Snapchat
- Easiest Ways to Shorten a Video on Different Devices
- 3 Ways to Add Text to Video Using Online and Offline Tools
- Methods to Add Watermark to GIF and Remove Watermark on GIF
- How to Create an Instagram Filter Using Excellent Tools