


Voice Changer Recorder: Come to Know the Application With Steps
Nowadays, you can use a different voice using a voice changing app. You can use your or someone else’s voice, like other famous personalities, robots, animals, and funny voices. Changing the voice in your audio recording is also a way to share the fun with your audience. Many content creators usually use a different voice to provide entertainment. The viewers will surely enjoy the video by just listening to the voice sound.
If you plan to change your voice in a recording, this article is dedicated and meant for you. This post will provide applications that you can use to change voice recording into another voice. With that, take a look at the suitable tools you can rely on to change voice in a recording.

- GUIDE LIST
- Part 1. How to Change Your Voice While Recording
- Part 2. Best Way to Record Your Voice with High Quality
- Part 3. FAQs about Audio Recording
Part 1. How to Change Your Voice While Recording
Changing your voice while recording using Voice Changer with Effects on your mobile device is possible. It is an application with a built-in feature to record your voice and change it by applying voice changer effects. This mobile application includes more than 40 voice changer effects, including Android, Aliens, Drunk, Helium, Monsters, Robot, and many more. It excellently changes your voice to the voice you prefer to use. To learn how to change your voice in recording, rely on the methods presented.
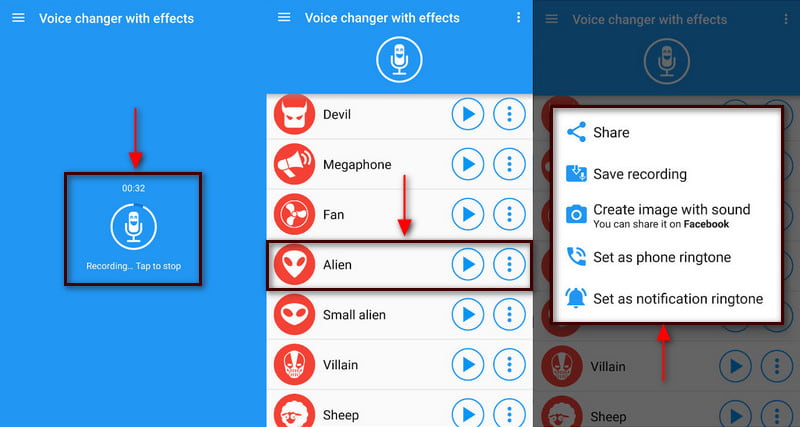
Download and install the Voice Changer with Effects application on your mobile device. Once the installation process is done, open the application, and start to start the process.
When you open the application, it will bring you to the recording section. To start recording, tap the Recording icon, hit Allow, and start recording your voice. While it is in the recording process, say something that you want to say and share. You can say anything you want, as it does not have a time limit. In this part, you can record short or long audio based on the message you will deliver. Once you are done recording your audio, tap the Recording icon again to stop. The recording process will stop the moment you click the icon, and the voice changer section will appear.
On your screen, you will find plenty of voice changers with effects. You can see android, killer, drunk, giant, squirrel, dark cyborg, grand canyon, and much more voice changers. From the list, select one that you want to use as a voice that will change your original recorded audio. After that, hit the Play button, and the recorded audio will play using the voice changer you selected.
Once you have chosen your preferred voice changer, hit the Three-dots icon next to the play icon. Another window will appear, allowing you to share it on your social media and set it as a phone ringtone.
Part 2. Best Way to Record Your Voice with High Quality
If you want to record your voice with high quality, you can count on ArkThinker Screen Recorder. This program is one of the best screen recorders, as it can record video, audio, game, window, webcam, and phone. This program has professional recording features that allow you to record your voice and even cut or trim the parts you do not need. Also, you can manually remove the unnecessary parts directly on the timeline instead of recording once more. This program can record and produce the high-quality audio you want. To begin the process, follow the steps to start recording your voice using ArkThinker Screen Recorder.
Download and Install ArkThinker Screen Recorder
First and foremost, download, install, and run the application using your desktop computer to have complete access.
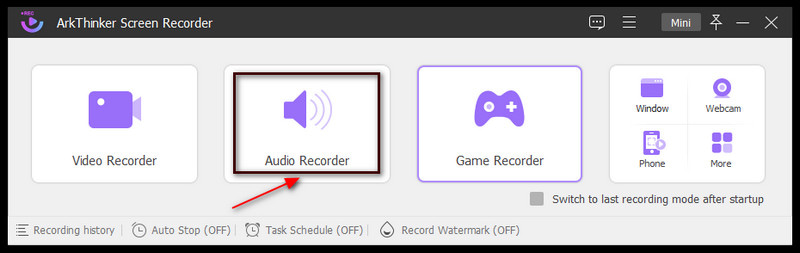
Choose the Audio Recorder
On the program's main screen, you will see Video Recorder, Audio Recorder, Game, Recorder, and other features. From there, click the Audio Recorder button, which will direct you to the Audio Recording section.
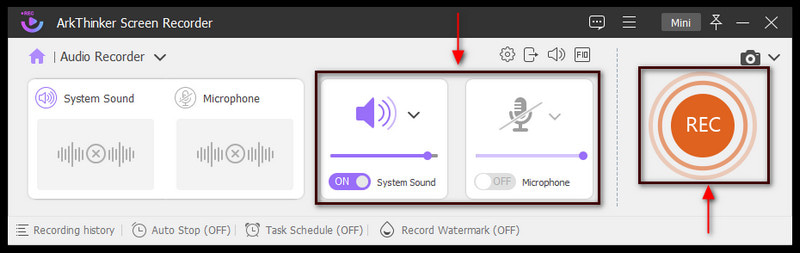
Start Audio Recording
Once you are directed to the Audio Recording section, proceed to record the audio you want to get a copy of. To begin, turn on the System Sound and Microphone. After that, tap the red REC button, and wait for the audio recording to start. Based on your preference, you can lower or increase the System Sound and Microphone volume when the recording starts. Once you are done recording your audio, click the Red box icon beside the pause icon to stop the recording.
Save the Recorded Audio
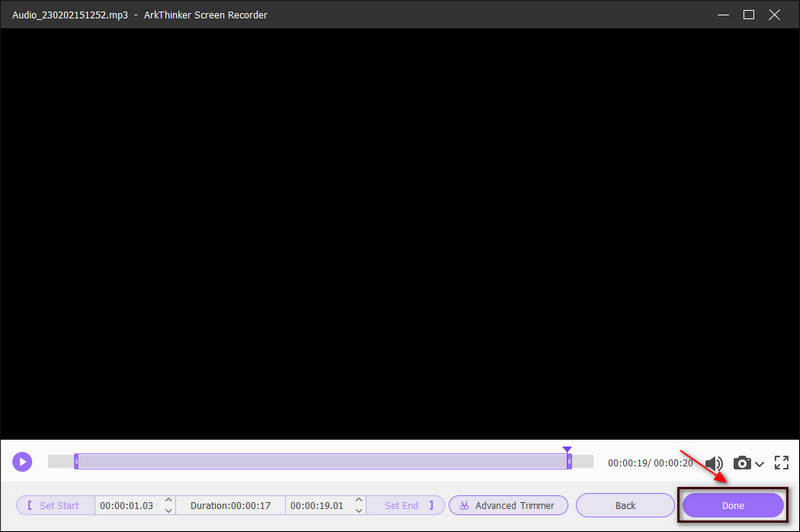
If you stop, stutter, or forget your lines in the middle of the recording, you can click the re-record button to record again. In addition, you can set the start and end times if you want to remove parts from your recorded audio. Also, you can manually remove the unnecessary parts directly on the timeline by moving the sliders. But if you are satisfied with your recorded audio, proceed to the Done button. After that, the recording history will appear on your screen, where your recorded audio is located. Look for your recorded audio from the recording history, and play it. With that, you can listen to your recorded audio using your desktop media player. In addition, your output will automatically be saved in your file folder.
Part 3. FAQs about Audio Recording
Is there a benefit in editing your recorded audio?
When you are editing your audio, you improve the quality of the recorded audio and correct errors or mistakes.
What is the importance of sound in editing?
Sound is one of the essential elements in the video. It helps the listeners to understand the message or story through the use of audio. With that, it can touch the feeling and emotions of the listener. So, some may add music to their videos to express specific feeling.
What is the importance of audio recording?
The help of high-quality audio recording enables the audience to understand the message you are trying to convey quickly. A low-quality recording is hard to listen to, which will be hard for the audience to understand.
Which audio format is best quality?
The best audio formats with better quality are uncompressed or lossless compression files, which are WAV, FLAC, and M4A. These formats have the best quality, as they retain the original sound quality.
Conclusion
It is familiar to see and hear content creators using a different voice. Some content creators use different voices to entertain the viewers while watching. It makes their audio or video content more engaging and exciting and adds extra fun. Nowadays, many voice changer recorder applications are available on your desktop or mobile device. Using the tools mentioned above, you can record your audio and apply a different sound. After that, you can share your audio recording output on your social media accounts.
What do you think of this post? Click to rate this post.
Excellent
Rating: 4.9 / 5 (based on 321 votes)
Relative Articles
- Edit Audio
- Audio Cutters: Offline and Online Tools to Cut Audio Files
- Effective Technique on How to Split a Track in Audacity
- How to Replace Audio in a Video On Different Devices 2022
- How to Clip Audio in Audacity, WMP, iMovie, Online, Trimmer
- 4 Easiest Ways to Change and Edit Audio Volume on PC and Mac
- 4 Easy Methods to Edit Audio Files on Windows and Mac
- How to Compress Audio Files Without Losing Sound Quality
- How to Combine 2 or More Audio Files on Different Devices
- 5 Best Music Tag Editors for iPhone, Android, PC, and Mac
- Add Album Art to MP3 on Windows, Mac, iPhone, and Android