


Discover the Steps to Enlarge Images without Losing Quality
Can you bring out the details in your pictures without compromising their quality? Would it be possible to enlarge your most treasured photos while preserving their quality by highlighting details? As we start to tackle how to enlarge image without losing quality, we will search into the different factors and the guidelines to resize an image and the possible ways to make your pictures clearer as well as to improve and enhance your visual portraits to help our pictures stand out whether you are a beginner or expert in photography it doesn’t matter. But before that, we need to know why, in some cases, we experience blurry pictures. Join me to see the reason behind it.

- GUIDE LIST
- Part 1. Why is an Image Blurry When Enlarged
- Part 2. How to Enlarge Image without Losing Quality Online
- Part 3. How to Enlarge Image without Losing Quality in Photoshop
- Part 4. FAQs about Enlarging Images without Losing Quality
Part 1. Why is an Image Blurry When Enlarged
Have you ever enlarged a picture to learn more, only to be disappointed by the annoying blurriness? We've all experienced the true struggle. Pixels are the building pieces of an image, and they serve as a representation of various colors and visual content. As you enlarge, you're expanding every pixel. Understanding how to enlarge an image without losing the quality is the first step towards preventing distortion when you upscale a photo. This simple guide will explore the whys behind the common visual puzzle.
Small pieces, big picture
Consider an image as a pixel-by-pixel puzzle composed of tiny squares. These pixels must expand when the image is enlarged, much like when you pull on a rubber band. The problem is that they lose detail when they exaggerate too much. Because of this, there may be some blurriness. The pixels are doing their hardest, but there is a limit to how far they can bend before losing clarity.
Pixel challenges
When an image enlarges, additional space must occupied by each pixel, which might be challenging. Similar to using a larger crayon to color a picture, the level of detail may decrease. The computer attempts to estimate the new pixels' appearance with the existing ones, but this guessing game frequently results in a softer, blurrier image.
Bitmap basics
When you enlarge some photographs, such as those composed of small squares in a grid, you are essentially making those squares larger, which makes it harder for them to display the fine features. Bitmaps struggle more to maintain clarity as they get bigger than other types of images that employ arithmetic to adjust when you zoom in.
Resolution matters
Stretching an image that starts with many details will help it stay clear when it gets larger; however, if the original picture didn't have many features, stretching it will make things appear fuzzier.
The next time you're wondering why your larger image looks a little grainy, just keep in mind that it's similar to expanding a little square picture. There is a limit to how far the pixels can extend and maintain the crystal clarity of the image despite their best efforts. We encounter a slight visual difficulty, but knowing why it occurs makes us enjoy the wonder of digital images even more. So, most apps and software have the features and solutions to it. By learning these details, we must consider how to enlarge an image without losing quality.
Fractal Interpolation
Consider that you want to enlarge one of the objects in a painting. Interpolation is similar to adding additional colors in between your existing ones. It's a clever way of estimating the different colors needed so the painting stays lovely and sharp even at larger sizes. It resembles completing the picture by adding the missing jigsaw pieces.
Vector Graphics
Imagine the picture using a magic pen that knows the math tricks to sketch. Vector graphics are precisely that. These images employ arithmetic to produce shapes and colors rather than small colored dots or pixels. The magic happens when you adjust the size of your drawing; it expands or contracts without introducing any blur, maintaining the smoothness and clarity of the entire image. It's similar to owning a unique drawing that, no matter how much you expand it, never loses its enchantment! Most software programs for developing photographs use vector imaging or vector graphics to increase image size without sacrificing quality.
Part 2. How to Enlarge Image without Losing Quality Online
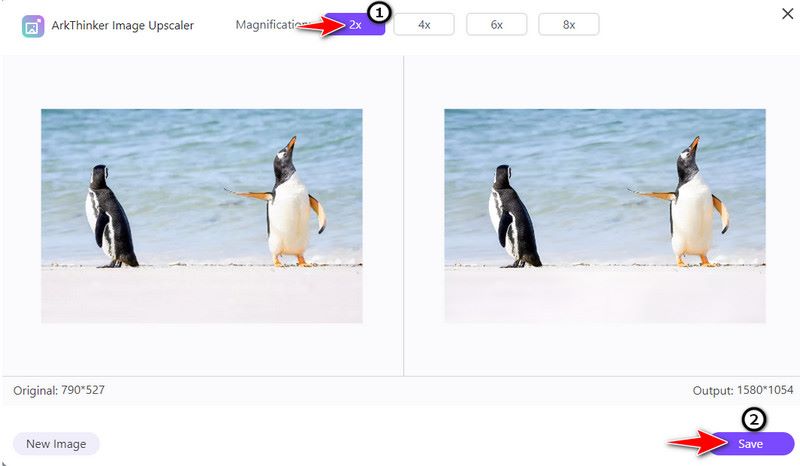
A free tool called Arkthinker Online Image Upscaler provides a straightforward user interface to enlarge image without losing quality online. It is the greatest that I could recommend since it uses cutting-edge AI scaling technology and accepts a variety of picture formats, such as JPG, JPEG, BMP, and PNG. You can enlarge the image for a clearer perspective by using the 8x zoom feature, whether it's for personal, business, or social media content. Here's how to find out so you can experience the tool's power! Take a look at these procedures.
Visit the official website of ArkThinker, where you can find the Online Image Upscaler under the Free Tools drop-down menu.

Once the photo is submitted, the result will appear on the right side. You can adjust the magnification below to see the photo's intricacies. If you're finished, click the Save button beneath the corner. Once accomplished, you may share your images with others and enlarge them without sacrificing quality!
Part 3. How to Enlarge Image without Losing Quality in Photoshop
One of the expert tools that can help you improve the quality of your photos is Adobe Photoshop. Naturally, do we want to avoid looking back on a memorable occasion with grainy images? With the help of Adobe Photoshop, users may transform their ideas into aesthetically spectacular works of art by using it as a virtual canvas. Photoshop enlarges image without losing quality and can open and modify the most popular picture file formats. JPEG, TIFF, PNG, and GIF are supported. Photoshop has several tools for improving low-quality photos, including increasing image resolution and making photos HD, among many other features!
It is also the industry standard for graphic design and photo editing. When you're ready, let's get started with these Photoshop methods for enlarging an image.
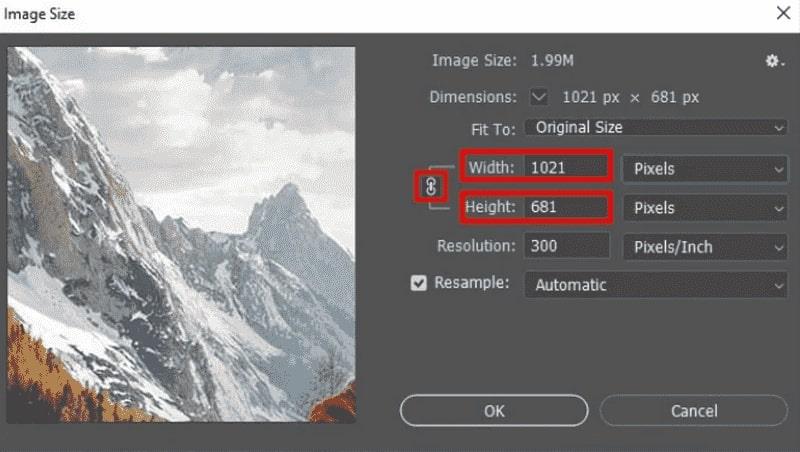
Open the chosen image after starting the application. Select the picture on the menu bar and choose Image Size.

There will be a pop-up window. Measure the size of your image and enter the ideal ratio. When you change the height, you can unlink the aspect ratio so that it will automatically adjust the width and vice versa.
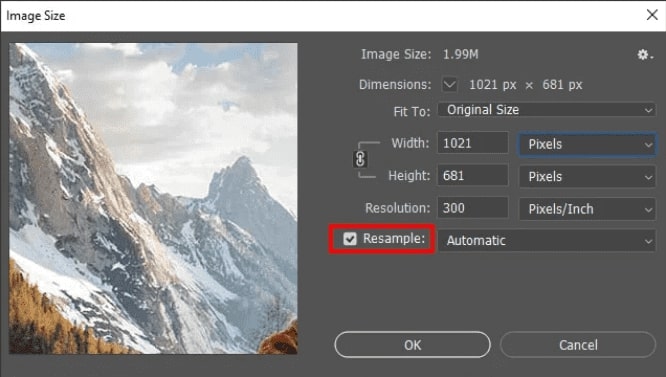
Selecting the Resample option will alter the pixels in your image dimensions. Although you can choose automatic, we advise using Bicubic resizing mode for the best outcome.
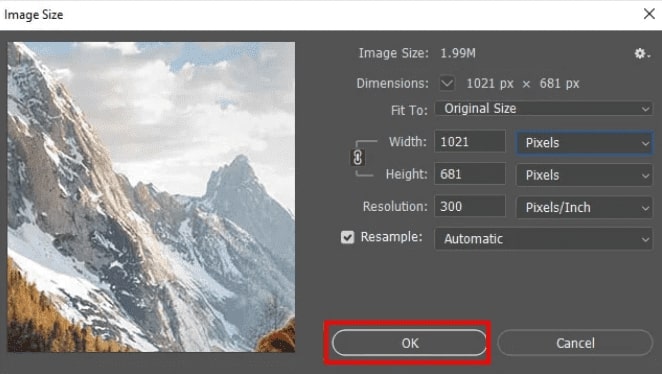
To save the configuration, click the OK button. Once you're satisfied, you can Hold onto it. And that's it! Here are some tips for enlarging images without losing the quality of your photos taken with the app.
That’s all for all the ways to enlarge the image without losing quality. If you want more tips for using Photoshop to enhance images, check how to improve low-quality image in Photoshop here.
Part 4. FAQs about Enlarging Images without Losing Quality
Are there any free tools available for enlarging images without quality loss?
Arkthinker Online Image Upscaler is the recommended tool that offers basic AI-based enlargement features that can reduce pixelation. It can be useful for digital art or photography.
Can I use image enlargement to enhance photos taken in low light?
While image enlargement won’t directly improve low-light performance, AI-based tools like Arkthinker Online Image Upsacler may help reduce noise and enhance details during the enlargement process.
How can I check the quality of an enlarged image?
Zoom in and inspect details closely; artifacts, blurriness, or pixelation may indicate a loss of quality during the upscaling process. Compare details, colors, and overall clarity to identify any discrepancies introduced during the enlargement of photos.
Conclusion
Ultimately, the answers on how to enlarge image without losing quality require a delicate balance between technological advancement, like using an application, and a nuanced understanding of visual perception. As we learn the guide and details, continual research and innovation will likely yield more refined solutions. Experimenting with methods will also help you to achieve satisfactory results in maintaining image quality during the enlargement process. Embrace the journey and stay curious!
What do you think of this post? Click to rate this post.
Excellent
Rating: 4.9 / 5 (based on 474 votes)
Find More Solutions
GIF Resizer: Ultimate Tools to Resize Your Animated GIF How to Enlarge an Image in Adobe Illustrator (3 Methods) Quick Steps on How to Add Text to a GIF Using Caption Maker Tools How to Edit and Crop Animated GIFs with 4 Effective Ways Video Enhancer – How to Enhance Video Quality and Resolution How to Improve Zoom Video Quality During and After MeetingsRelative Articles
- Edit Image
- How to Edit and Crop Animated GIFs with 4 Effective Ways
- 10 GIF Converters to Convert Between Images/Videos and GIFs
- Best GIF Editor Tools Suitable to Any Computers and Devices
- How to Make GIF from Images on Desktop and Mobile Phone
- Quick Steps on How to Add Text to a GIF Using Caption Maker Tools
- Add Music to GIF: Incorporate Music to Your GIF After Converting
- GIF Resizer: Ultimate Tools to Resize Your Animated GIF
- [6 Tools] How to Set a GIF Loop Change and Play It Forever
- GIF Cutter: How to Cut GIF with Easy and Fast Methods
- How to Remove Alamy Watermark from Images (100% Working)