


iMovie 101: How to Trim Video in iMovie on Mac [Bonus Tip]
iMovie is a professional editing tool for Apple users. With a simple user interface and powerful functionality, you can edit your media files efficiently. To obtain efficiency in iMovie, you just need to learn how to trim videos in iMovie. Besides, this post also introduces several useful tips for beginners who want to use iMovie to trim videos. Furthermore, if you want to have more advanced features and achieve synchronization between Windows and Mac, you may also check the detailed guide on how to cut in the iMovie alternative. Move along and check it now.

- GUIDE LIST
- Part 1: How to Trim Video in iMovie on Mac
- Part 2: How to Cut in iMovie Alternative
- Part 3: FAQs about iMovie Cut Video
Part 1: How to Trim Video in iMovie on Mac
Whether you are a beginner or a pro, these small tips on how to cut a video in iMovie can help you better master the cutting skills of iMovie on Mac. Apart from dragging and dropping actions, there are other methods like key combinations you can use to cut video clips in iMovie. Follow the guide below to learn how to trim video in iMovie with three different solutions.
iMovie Cuts Clips into Two Parts
You can use iMovie to cut clips into two parts with your mouse, shortcut menu, or key combination. Check how to cut in iMovie roughly below.
Go to Launchpad on your Mac and open the iMovie app. Click the Projects button to select a video project or create a new one.
You can press the Space key to play your video and locate the exact moment you want to cut/split.
Use the Cmd and B key combinations to cut. After that this operation will split your video clip into two parts.
Additionally, you can also use right or left arrow keys to locate the moment you want to cut. Then right-click on that moment and in the shortcut menu, click the Split button to cut.
Remove/Add Certain Frames
How to cut on iMovie and remove certain frames from the video or movie? Here is the answer you need. The following steps offer you a detailed guide on how to remove or add certain frames in a video using iMovie.

The Clip Trimmer in the iMovie can help you add or remove frames in a video. In the iMovie app, click on the clip you want to trim.
Click the Window button on the menu bar, and then click the Show Clip Trimmer button to activate the tool.
Two white lines will appear on your clip, drag the start or the end line to select an area you want to remove. Press Return to confirm and cut.
After that, a gap will show up on the timeline, you can then drag and drop a clip from your file folder to fill in.
Tip: You may also press and hold the R key and drag your mouse cursor across the timeline and select frames you want to abandon. Then, right-click on that part and click the Trim Selection button from the shortcut menu.
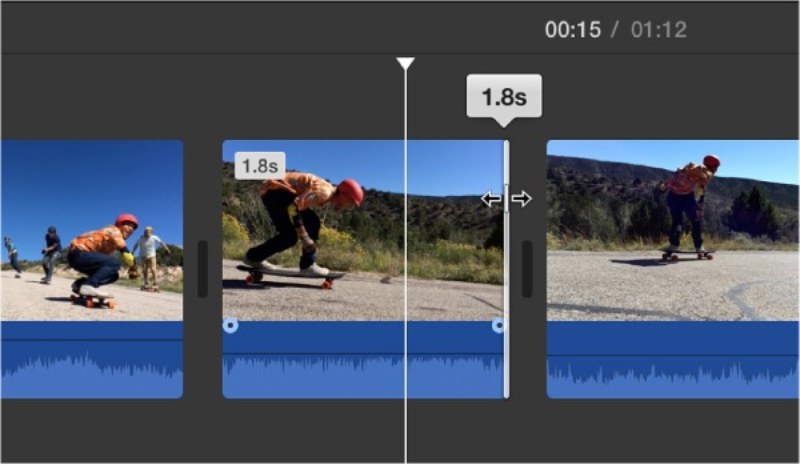
Change Duration Precisely
iMovie can cut a video precisely and change the duration of your video using the Precision Editor. You can also use this tool to do small adjustments to your audio clips.
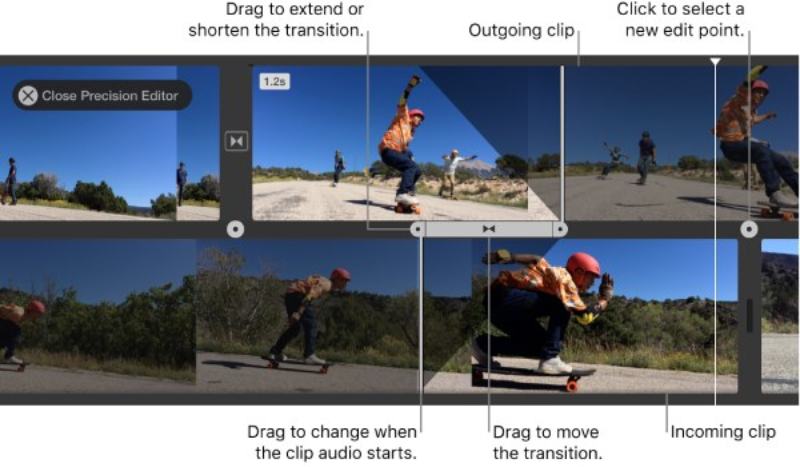
On the timeline of iMovie, select one clip if you have many, and click one side of that clip.
Click the File button on the menu bar. Then, click the Show Precision Editor button. Your clip will expand, and you can see the frames clearly.
An auxiliary tool will also appear under the frame. You can drag the point on both sides of that tool to extend or shorten the duration of a clip.
Once finishing your editing, press Return on your key button to close Precision Editor.
Part 2: How to Cut in iMovie Alternative
Using iMovie to cut clips can be a real good choice for Apple users who are also video editors. However, if you also own a Windows computer, it becomes tricky to have synchronization of your video editing between macOS and Windows. Therefore, here comes the ArkThinker Video Converter Ultimate, a video converter with advanced features for you to edit videos and audio. Meanwhile, this program is compatible with both Windows and Mac and supports a wide range of media formats. No need to convert before editing.
- Enhance video quality after editing your video
- Support over 1000 formats for audio and video files.
- Apply funny filters and themes for your video.
- Spice up the video with 3D Maker, GIF Maker, etc.
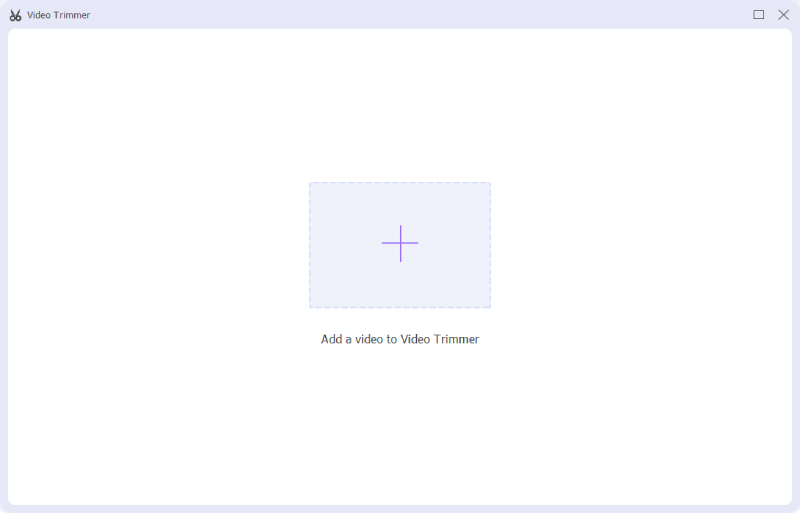
Get a free download and install this program on your device. Launch it and click the Toolbox button on the main interface. There, you will see many tools for video editing, and you can use them after finishing trimming your video clips.

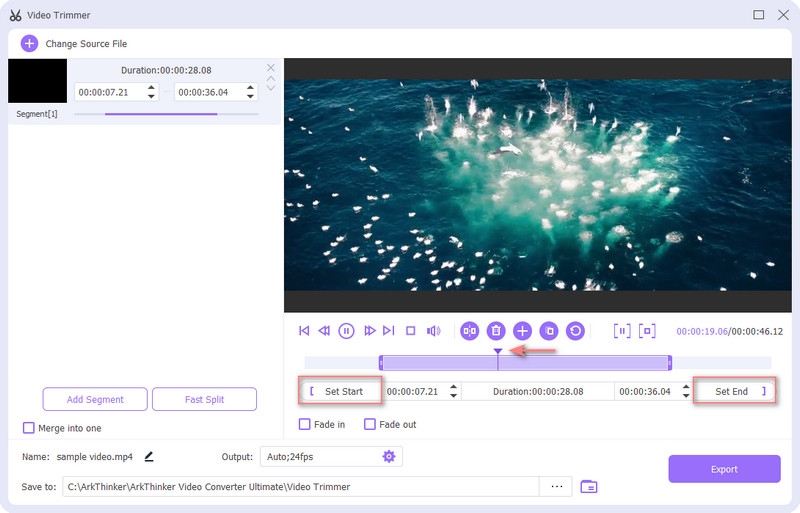
Locate the Video Trimmer and click on it. This tool enables you to change the duration of your video clips, merge video clips, crop videos, and split a video into several segments. Then, click the Plus icon to import your video.
Then you can use this iMovie alternative to cut clips by entering the start and end points under the time bar. Or you may click the Fast Split button to cut your video into several clips evenly. Once done, you can click the Export button to save your trimmed video.
Part 3: FAQs about iMovie Cut Video
How to trim video in iMovie on iPhone?
In the iMovie app on your iPhone, you can tap the Create New Movie button to import some clips from the Photos app. Then you can tap and drag the yellow trim handle on the timeline to cut the video or shorten its length.
How to save iMovie cut videos?
After finishing editing your video, you can click the Share button in the upper right corner of iMovie. Several options for sharing will show up, you may click the File button at last to export your video file and save it on your computer. You can also edit a description and title for your video. Finally, click the Next button to finalize.
Can iMovie cut clips in MKV format?
No, it cannot. MKV format is not compatible with macOS. However, for the Mac with macOS Mojave, you can convert the incompatible media files in iMovie. Launch the iMovie app. On the menu bar, click the File and Check Media for Compatibility buttons. Choose the one from the incompatible list and click the Convert button.
Conclusion:
To summarize, this post gives an ultimate guide on how to cut videos in iMovie for different purposes. Whether you want to split a clip into two parts, add/remove frames, or precisely cut videos, you can all find the corresponding answer here. Meanwhile, if you are looking for a video editor with advanced features that is accessible across platforms, the ArkThinker Video Converter Ultimate will not let you fail.
What do you think of this post? Click to rate this post.
Excellent
Rating: 4.9 / 5 (based on 188 votes)
Find More Solutions
iMovie Change Aspect Ratio – How to Crop a Video on iMovie How to Combine 2 or More Audio Files on Different Devices Video Filter – How to Add and Put a Filter on a Video 2022 Top 16 Video Editing Applications on Windows/Mac/iPhone/Android 100% Working Procedure to Trim a Video Using VLC Media Player Top 10 MP4 Cutters for Windows, Mac, iPhone and Android DevicesRelative Articles
- Edit Video
- Learn How to Rotate and Flip a Video in VLC Media Player
- Split Your Large Video File with 3 Best Movie Trimmers 2022
- Detailed Guide on How to Trim a Video on an Android Phone
- How to Cut out Parts of a Video on iPhone Android Computer
- Learn How to Cut a Video Clip in Adobe After Effects 2022
- Slow Down a Video on iPhone Easily [Bonus Tip]
- 3 Simple Ways to Learn How to Speed Up TikTok Videos
- Detailed Guide to Learn How to Trim Videos on TikTok
- Useful Tips That Help You Learn How to Cut Video in iMovie
- How to Trim a Video and Cut out Parts of a Video on iPhone