


How to Change Video Size and Dimension in Full Guide
Videos are an important tool for capturing and expressing moments in the age of digital content creation and sharing. Sometimes, though, you'll need to crop a video file to fit certain dimensions for posting on widely used social media platforms in TikTok, YouTube, Twitter, and more. Or we need to resize a video dimension to eliminate extraneous elements from the frame. We'll look at 5 different techniques and tools in this guide to crop and resize video files.

- GUIDE LIST
- Part 1. How to Resize a Video via ArkThinker Video Converter Ultimate
- Part 2. How to Resize Video in Premiere
- Part 3. How to Crop Video in CapCut
- Part 4. FAQs
Part 1. How to Resize a Video via ArkThinker Video Converter Ultimate
Changing the size of a video involves adjusting the dimensions or scale of the video frame while preserving its initial aspect ratio. Additionally, resizing a video can entail modifying the file size to either increase or decrease it.
That is why we recommend ArkThinker Video Converter Ultimate as the first method. ArkThinker Video Converter Ultimate is a versatile tool that offers comprehensive features for both resizing and compressing video files. It can crop the video aspect ratio into 16:9. 4:3. 21:9. 16:10. 9:16, and more ratio. Moreover, it lets you customize the video dimension into any size by moving the border to get rid of the area you want. Besides, this video resizer offers the compression tool to reduce the large file size into the smaller without changing the dimension. The bulk resizing video feature can save your time greatly.
- AI technology to upscale video resolution in 4 ways.
- Convert video, audio and DVD in over 1000 formats.
- Edit video like a pro without any skills in 20+ tools.
- Collage video in multiple screens, and make MVs instantly.
Here are the steps to use ArkThinker to resize a video file.
Crop a Video Ratio
Follow these steps to learn how to use ArkThinker Video Converter Ultimate to resize a video file on your computer after downloading and installing it:
Download the program, run it, then select Video Cropper under the Toolbox tab.

Click the Plus icon in the middle of the interface to improt the video file you want to resize. To keep the selected portions of the video, drag the aspect ratio and change the points. In order to change the aspect ratio, you can optionally set a value for the Crop Area.
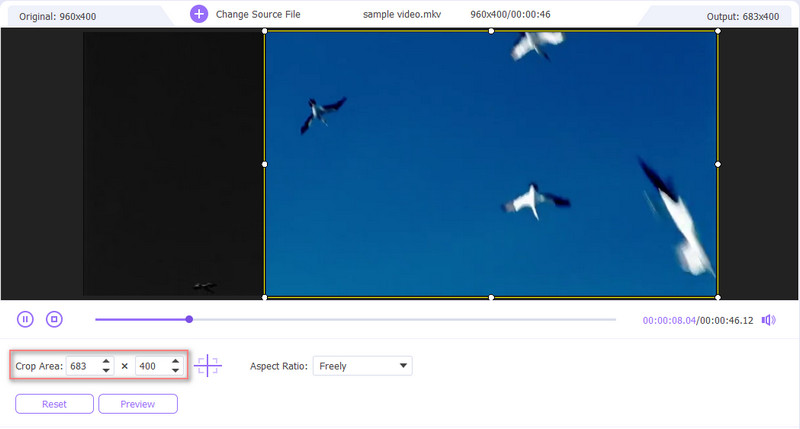
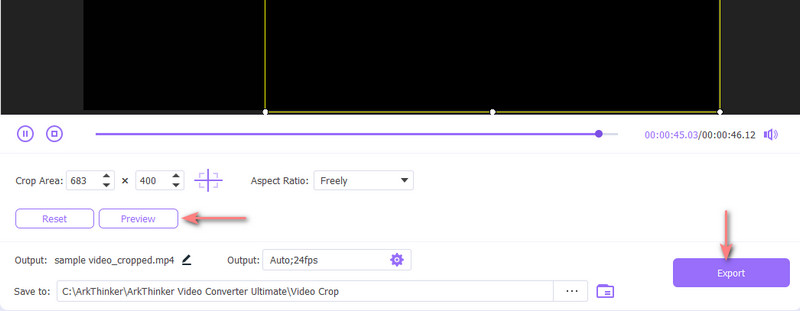
To preview the final file before it is created, click Preview. If you're happy with the cropped video, click the Export button to save it.
Compress a Large File into Smaller Size
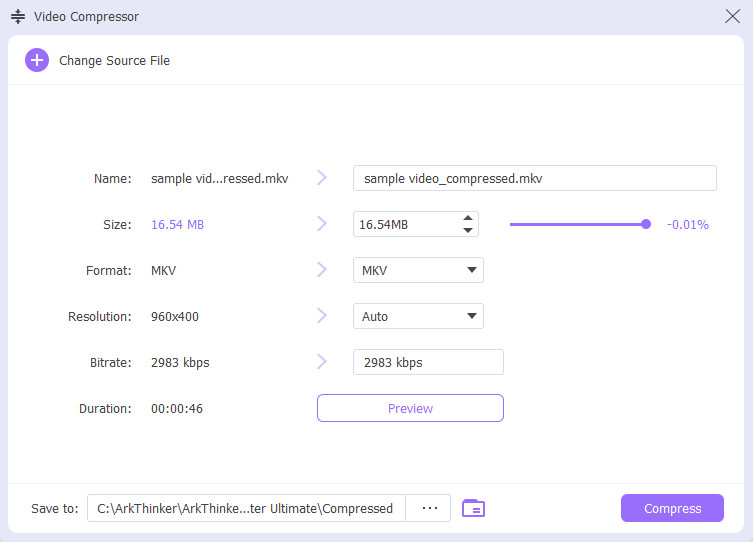
Under the Toolbox tab, locate the Video Compressor option. Click the Plus sign button from the window that displays to import the video in order to compress it.
Change the value next to Size to compress the video to the desired size.
Click the Compress button to begin the process if you are satisfied with the results.
Trim a Video Length to Make Compression
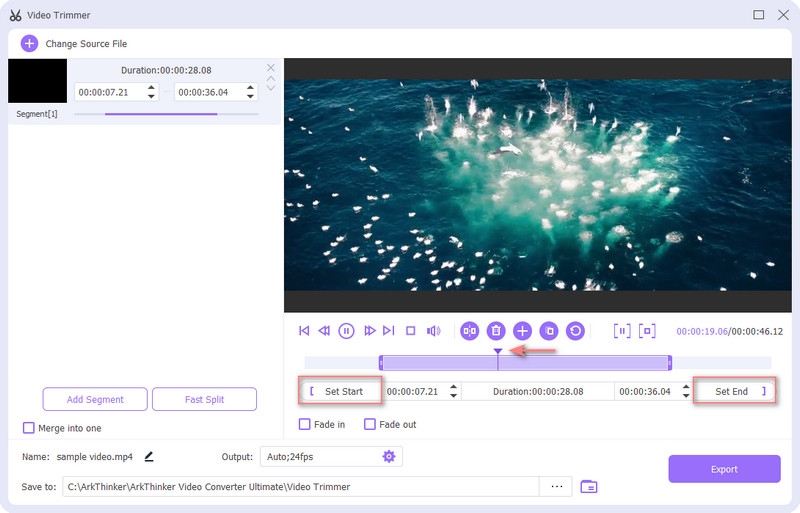
From the Toolbox tab, navigate the Video Trimmer option. Load a video to be trimmed next.
To remove undesired clips, drag the left and right handlebars on the progress bar or input the beginning and ending points at the bottom of the progress bar. The Fast Split feature can divide each part separately based on average or time.
Click the Export button to save the resized video file on your computer locally.
The above 3 ways are resizing a video file in ArkThinker Video Converter Ultimate on your computer. Very easy, right?
Part 2. How to Resize Video in Premiere
Adobe Premiere Pro, a famous and professional video editing software in the video editing, it provides you with a straightforward process for resizing videos. Here's a step-by-step guide:
Open Adobe Premiere Pro on your computer and either initiate a new project or access the project where you intend to resize the video. Within the Project Panel, right-click and select Import to bring your video clip into the project.
Right-click on the imported video clip in the Project Panel and opt for New Sequence From Clip to generate a sequence with identical settings to your video clip. Drag the video clip from the Project Panel to the Timeline at the bottom of the screen.
Select the video footage in the Timeline, and locate the Effect Controls panel. If it's not visible, reveal it by choosing Window, and next Effect Controls.

Within the Effect Controls panel, locate the Scale property, representing the video clip's scale. Adjust the value in the Scale property to resize the video. A 100% value implies no change, and you can input a percentage to scale the video up or down.
If necessary, modify the video's position by altering the values for the Position property.
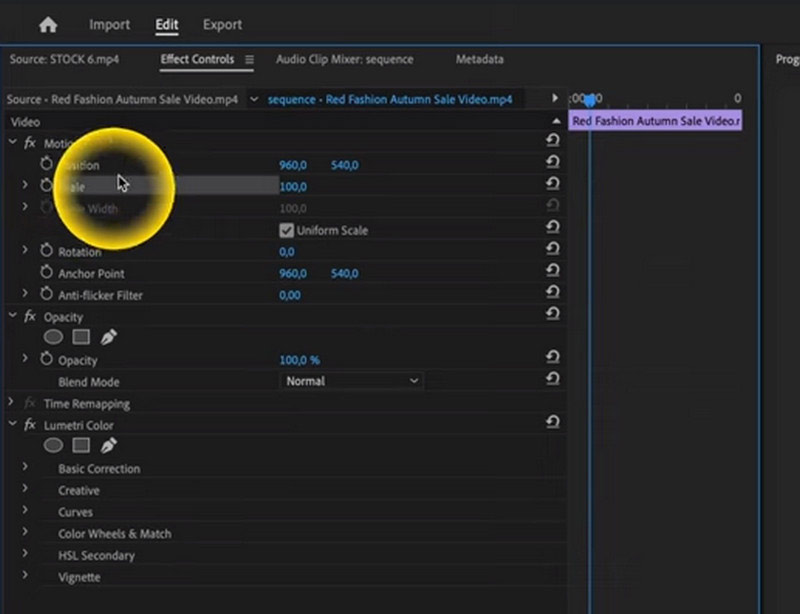
Preview the video in the Preview panel to assess the appearance of the changes. Once content with the resized video, proceed to render and export it by navigating to File, then Export, and Media. Next, configure your export settings and click Export.
By following these steps, you can effectively resize your video clip within Adobe Premiere Pro.
As you can see that this software is very professional, and it is not easy for the beginners to resize a video file, and this software is not costing for anyone.
Part 3. How to Resize Video in CapCut
CapCut is a popular video editing tool on the web, desktop and mobile devices. It allows users to edit and upscale their videos. With the well-known video editing tool CapCut, users can resize a video file easily.
The general procedures to resize a video in CapCut on a mobile phone are as follows:
Run the CapCut app on your mobile phone. Create a new project or open an existing one if you're beginning a new one by clicking the New Project button to add the video that you wish to resize to your timeline.
Once the video is imported the Media section. Tap the video that needs editing. This will cause the video to launch in the app's Editor area.

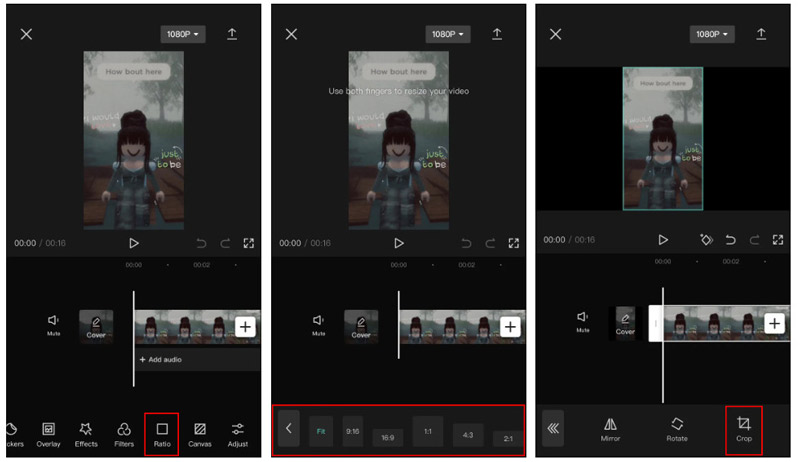
From the toolkit at the bottom of the screen, tap the Ratio button. This will display a menu with numerous aspect ratio selections.
From the available options, select the aspect ratio that you want, such as 9:16, 4:3, 16:9, 1:1, etc.
You might have to cut down some parts of your video if you need to modify the ratio. To make the necessary adjustments to the movie, utilize the Crop tool.
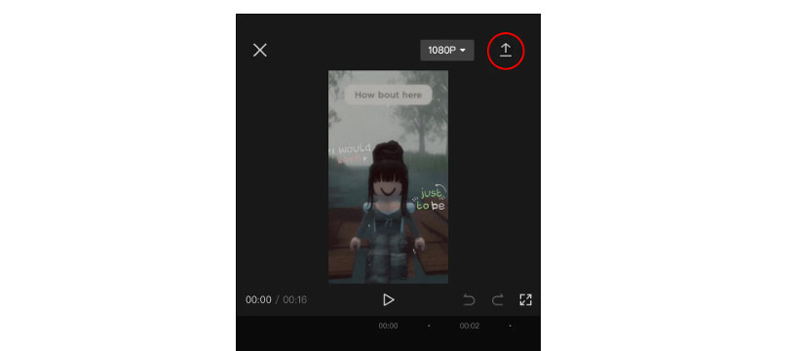
After you are satisfied with the settings, tap the Save option to save your video modifications. After that, you can share or export the video.
While CapCut is widely recognized for its expertise in creating vertical, short-form content akin to TikTok, it seamlessly accommodates the editing needs of YouTube videos. Nevertheless, it is important to note that CapCut does enforce a 15-minute time constraint. For more apps like CapCut for cropping a video on Android or iPhone, you can check it here.
Part 4. FAQs
How do I resize a video in the gallery?
Gallery applications typically offer fundamental editing capabilities. To resize a video, open it, locate the edit or adjust option, and make the necessary adjustments.
Can video size be enlarged?
Increasing the size of a video may lead to a decrease in quality. It is advisable to capture footage in a higher resolution if a larger size is expected. Nevertheless, there are still video enhancers available that can assist in upscaling the video resolution.
Will resizing a video lose its quality
Adjusting the size of a video can affect its quality, particularly when enlarging. To minimize the loss of quality, it is advisable to select a reliable method and preserve the original aspect ratio.
Conclusion
Effectively compressing and resizing video files is crucial for efficient storage, easy sharing, and smooth playback. Whether you are using professional software like ArkThinker Video Converter Ultimate, and Adobe Premiere, or mobile apps like CapCut, the key is to choose a method that suits your needs while maintaining the best possible video quality. With the right tools and techniques, you can effortlessly manage your video files and enhance your overall multimedia experience.
What do you think of this post? Click to rate this post.
Excellent
Rating: 4.9 / 5 (based on 417 votes)
Find More Solutions
How to Resize a Video for Instagram Story, Feed, and IGTV GIF Resizer: Ultimate Tools to Resize Your Animated GIF How to Compress Audio Files Without Losing Sound Quality 6 Best MP4 Compressors to Reduce the Video File Size 2023 Top 7 Video Cropper that Excellently Crop and Resize a Video iMovie Change Aspect Ratio – How to Crop a Video on iMovieRelative Articles
- Edit Video
- How to Make a Short Video Longer with 3 Different Methods
- Loop a Video on iPhone, iPad, Android Phone, and Computer
- Free Video Editing Software – 7 Best Free Video Editor Apps
- 3 TikTok Watermark Remover Apps to Remove TikTok Watermark
- Video Filter – How to Add and Put a Filter on a Video 2024
- How to Slow Down a Video and Make Slow Motion Video 2024
- Split Your Large Video File with 3 Best Movie Trimmers 2024
- How to Add Watermark to Video on Different Devices 2024
- 5 Best MP4 Compressors to Reduce the Video File Size 2024
- Detailed Guide on How to Slow Down a Video on Snapchat 2024