


Guide
Get Started
Introduction
ArkThinker Screen Recorder is the best all-in-one screen recording software. It has multiple recording modes that could satisfy your different needs. By using the system’s powerful editing tools, you can easily get a high-quality audio and video recording files. In a word, it would also be very simple for you to create more professional-looking videos on all kinds of devices.
Below, we provide you with some quick instructions on how to use the screen recorder.

Download, Purchase, Register, and Update
Select the appropriate installation package based on the type of Windows or Mac computer and download the application. Install and start the ArkThinker Screen Recorder on your computer.
Now, you can use some of the screen recording and editing capabilities for free. Of course, if you want a more complete and better experience, we also offer different purchase options to meet your actual use needs.
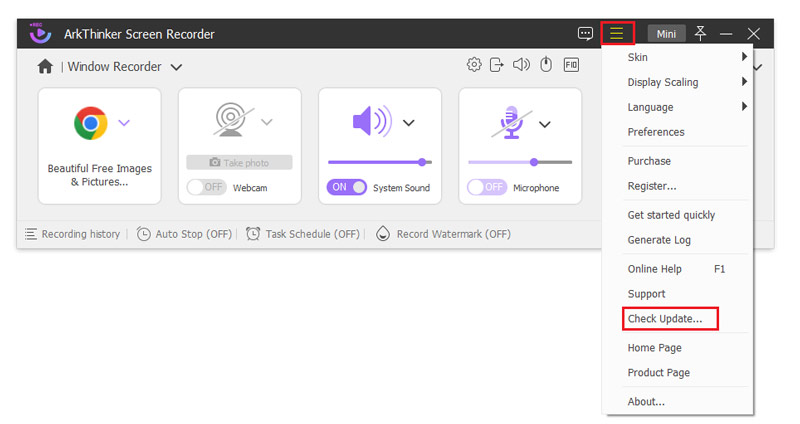
By clicking the Purchase icon from right-top menu, the you can select a suitable purchase plan.
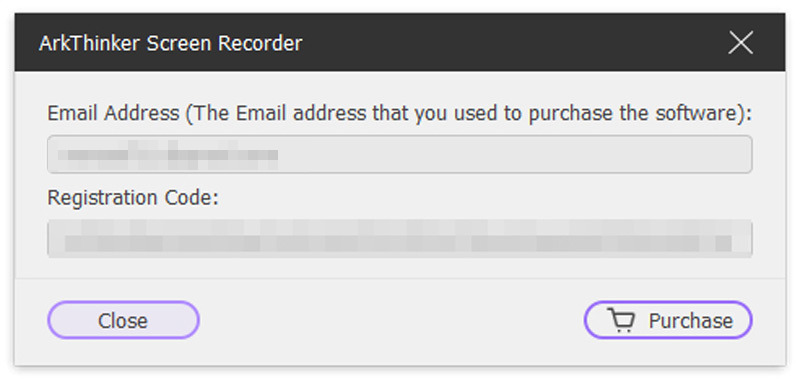
After purchasing, you would receive a registration code on your email. Now you should click key icon on the right-top of the Menu. Next, input your email dress and the registration code to start your registration.
If you want to know if the software is updated, you can check and update by clicking check update on the Menu option. You’ll also learn about the new or improved features of the application and get a better user experience.
General Recording options
You can set preferences by clicking on the menu option or change the default configuration to suit your needs for a more personalized experience.
Display settings
Click on the menu icon to navigate to the skin, display scaling and language options and modify as needed.
Preferences
To get a desired screen recording, you can go to Menu and adjust following recording options.
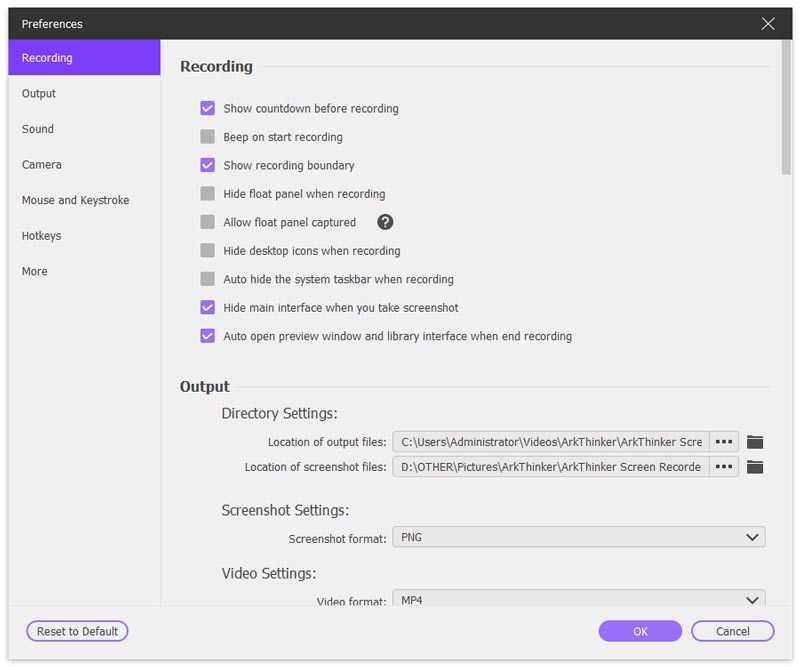
Recording: In the Recording option, you can select from Show countdown before recording, Beep on start recording, or Show recording boundary.
Output: In the Output tab, you can set the location of files, video and audio’s format and quality.
Sound: The Sound settings is for you to adjust the system sound and microphone volume by moving the slide bar.
Mouse and Keystroke: In the Mouse and Keystroke tab, you can choose to show the mouse cursor and show mouse and Keystroke.
Hotkeys: In the Hotkeys tab, you can select the hotkeys by clicking board to save them automatically.
More: The More tab lets you enable hardware acceleration, automatic updates and so on.
Support and help
If you have any questions about using screen recorder, you can click on the menu bar for online help or for more detailed guidance.
Main Recording Modes
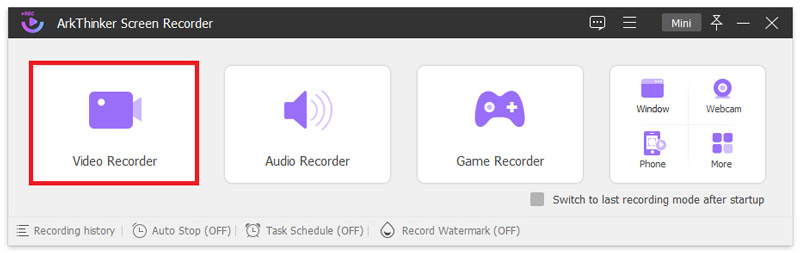
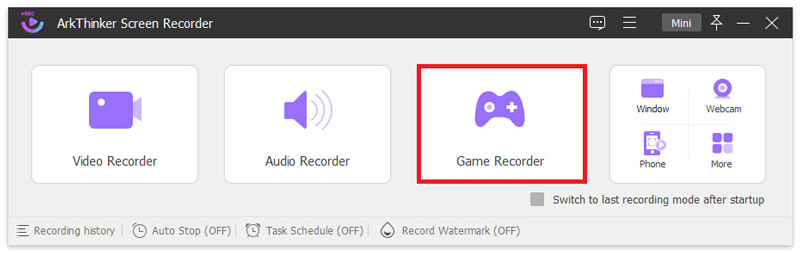
ArkThinker Screen Recorder offers six modes for your different recording needs. Let’s know more about the recorder.
Video Recorder
If you want to record your computer screen, this mode gives you the option of full screen and custom screen size.
Select Video Recorder
On the left side of the software home interface, click on this video recording option.
Select a full or a custom screen
In the Video Recorder window, the screen scaling can be divided into 1920*1080, 1280*720, 854*480, 1024*768, 640*480. In addition, you can also draw a recording area with your cursor by selecting region/window.
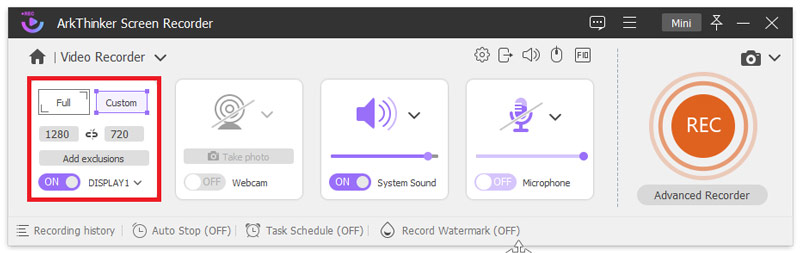
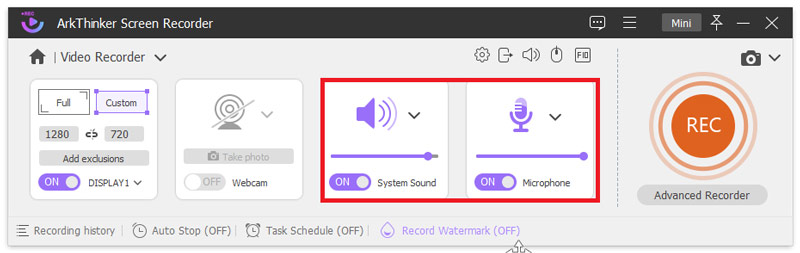
Select the audio source
You can turn on the System Sound option, Microphone option, or both, according to your video needs.
Start to record and edit video
Click REC button to start the screen recording. Now you can add text, line, arrow, and specific labels to the captured video by clicking the edit icon on the right bar.
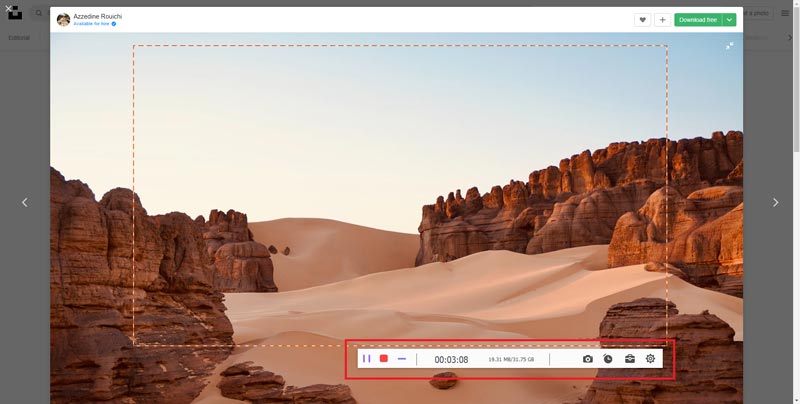
End the screen recording
You can click the Stop button to preview the recorded video, and then click the Save button to save the recording to your computer until finished recording.
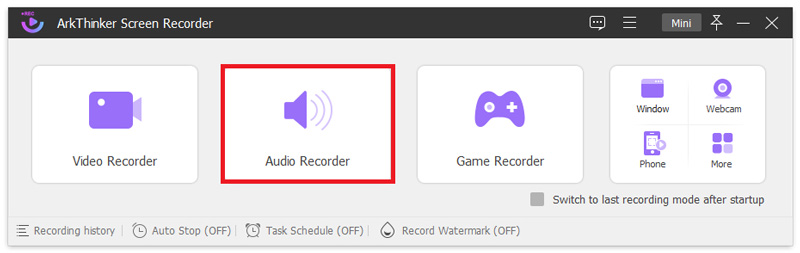
Audio Recorder
If you want to record high quality audio files, such as music or meetings, this mode can satisfy all your recording needs.
Choose Audio Recorder
On the software home interface, find the second option and click on Audio Recorder to record audio resources.
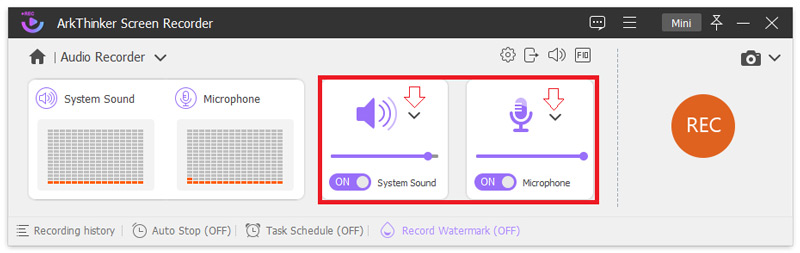
Set recording audio from System Sound or Microphone
You can record your voice immediately, or the sound from your computer. If you want to record both voices, turn on Microphone and System Sound at the same time.
To get better audio effect, you can click the Drop-down icon of the System Sound. There are 3 options.
The Default Device or Sound check option you can see and set Microphone noise cancellation and Microphone enhancement.
The Volume Mixer option is for you to adjust volume of Realtek high-definition audio, system audio, and the screen recorder audio. Certainly, you can also click the Drop-down icon of the Microphone and set Microphone noise cancellation or Microphone enhancement directly.
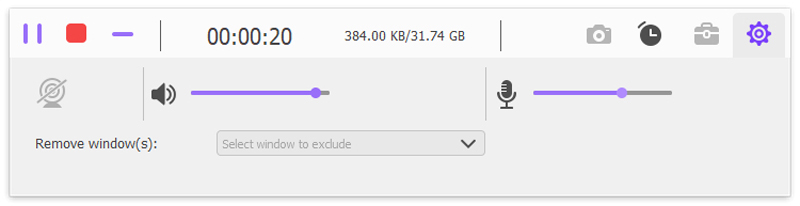
Start the audio recording
Click REC button to start the audio recording. Then you can click the Stop button to listen the recorded audio.
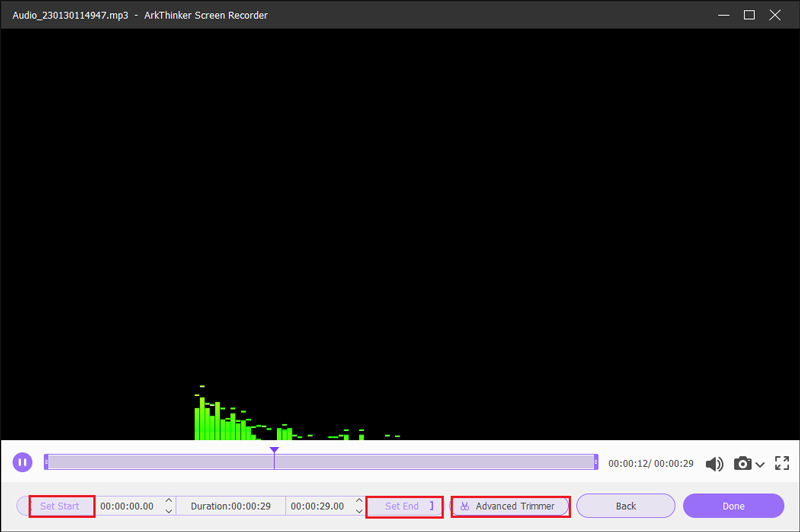
Start to edit audio
You can click the Advanced Trimmer button to edit it. Then click the Trim button and save the recording.
Game Recorder
With the growth of gaming, you may want to create HD gameplay videos and commentary videos. This recording mode can help you.
Pick up Game Recorder
On the software home interface, click Select the game option and choose a running game that you like.
Turn on/off the Webcam
If you have decided to capture your photo, turn on the Webcam button.
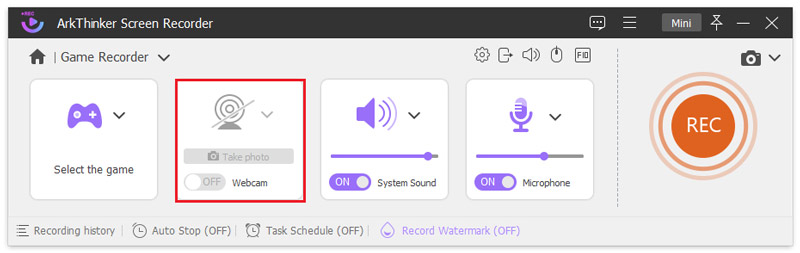
Select the audio source
You can set the System Sound, Microphone, or both to gain better game sound effects.

Start the game recording
Click REC button to record the running game. At the same time, you can use snapshots-taking to capture your images.

To find files more quickly later, you can rename them and store them in specific folders.
Then, click on the Next button to export your recording files. After exporting the video successfully, you will be taken to the recording library where you can play, rename it, and delete the files.
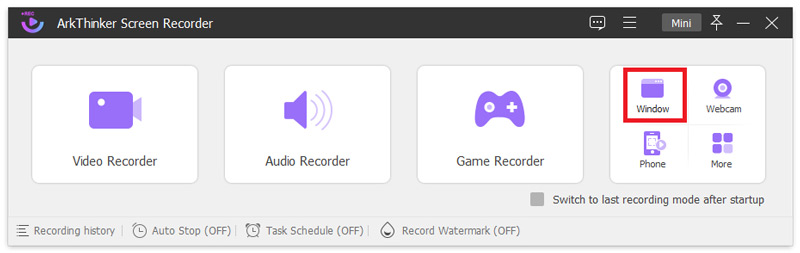
Window Recorder
The Window Recorder can customize your window size and process if you want to capture your running programs.
Enter the Window Recorder window
Click on the Webcam option on the right panel of software home page and start your recording process.
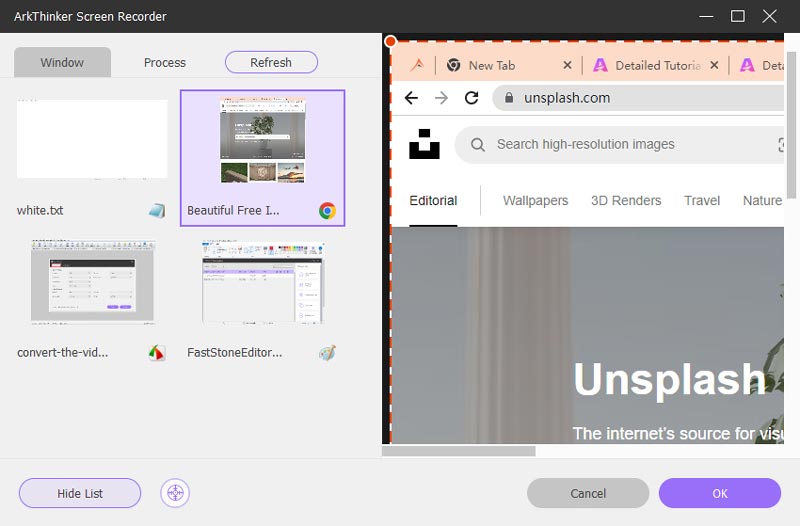
Select the recording window
Select a window or process you want to record on the left. Then, you can customize the recording area of the selected window by dragging the border in the preview area.
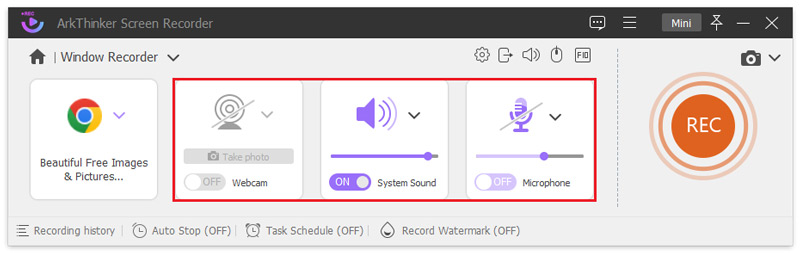
Set the webcam and audio options
You can turn on or off the Webcam, System Sound and Microphone according to your recording needs.
Start the window recording
Click the REC button and then you can do some settings such as recording time and ways. Certainly, you can also draw or input text by clicking Edit icon.
Manage the recorder files
Click on the Stop button to finish the recording process. Then you can clip the video or directly save it.
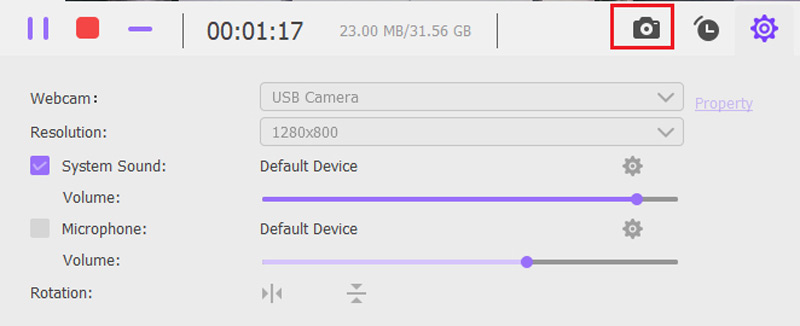
Webcam Recorder
You can use this mode to record a screen with your own photo for recording and sharing knowledge at any time during your work and study.
Enter the Webcam Recorder window
On the right panel of software home interface, click on the Webcam option and start your recording.

Preview and set the camera effects
You can see a preview window of your camera image. If you want to change some settings, a setting window would help you. After adjusting the camera effects, choosing resolution, modifying volume, and rotating the image, maybe you’re satisfied with it and can click the Record button on the top now.
Take a snapshot
While recording, you can stop the process at any time. You can also take a snapshot by clicking the Camera icon on the floating bar.
Save the video
You can preview and trim the current video. After editing the recording, you can select the Done button in the right-down corner to save the video.
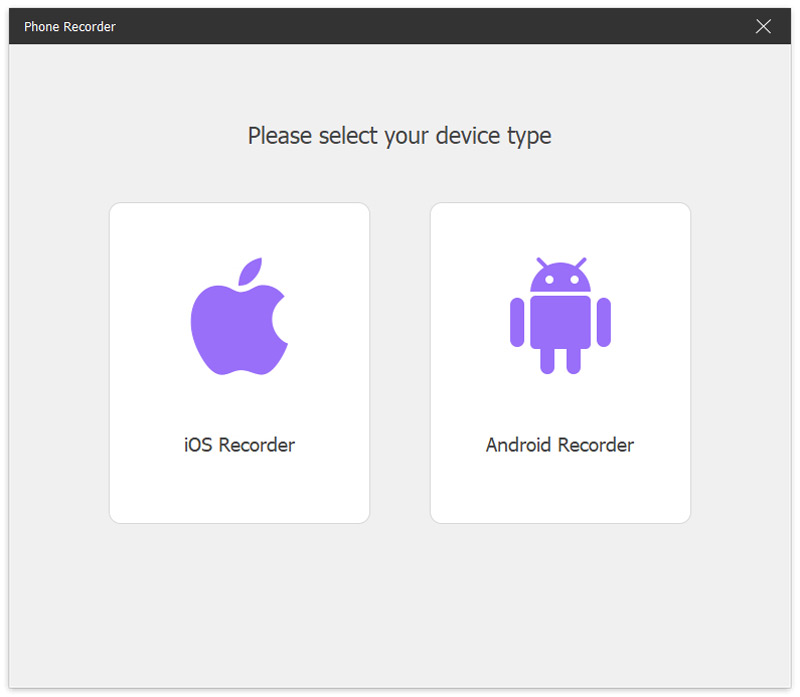
Phone Recorder
You can select the appropriate phone recording mode depending on the type of phone device used, when you want to share a phone screen and record it on your computer.
Enter the Phone Recorder window
The Phone option in the main panel includes iOS Recorder and Android Recorder.

Select the device type
You need to choose from iOS Recorder and Android Recorder and decide which one to use according to your device.
Connect your device
If you are iPhone users, you’ll be asked to mirror the phone screen to the computer first. To mirror your iOS device to the computer, you need to make sure your iPhone and computer has connected to the same WLAN.
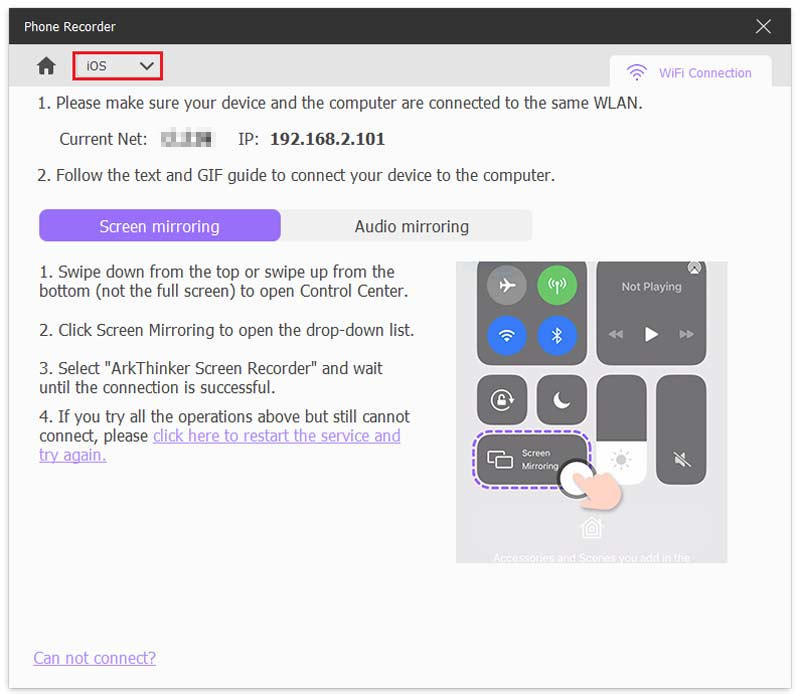
Then you can swipe down from the top of your iPhone, and open the Control Center on your device.
Find the Mirror icon and select ArkThinker Screen Recorder as the output device.
As for Android users, you can choose to mirror your phone screen through Wi-Fi or USB Connection. There you’ll be provided 2 Wi-Fi connection modes and pick one from PIN Code and QR Code.
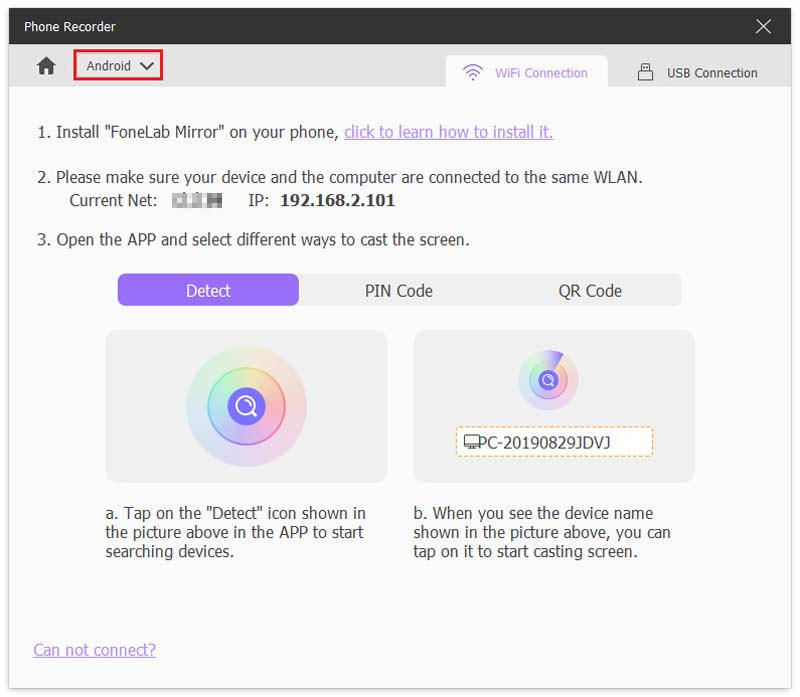
Record phone screen
Once connected, you can view your phone screen on the computer. Then, start your recording.
Edit Phone Screen Recorder
After recording, you can preview and edit the recorded video according to your needs. Click Export if you find the result satisfied.
Editing tools
After every recording, you can see and edit the file Recording history. On the right panel of the page, there are 5 editing tools for you to create wonderful works.
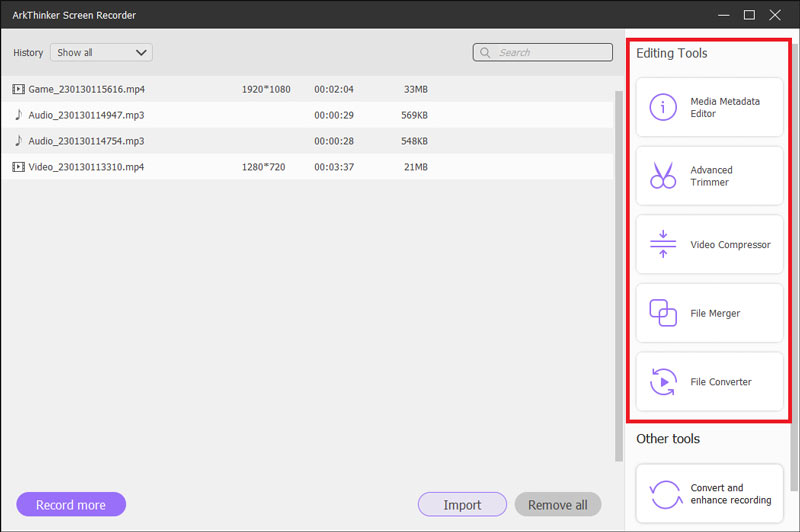
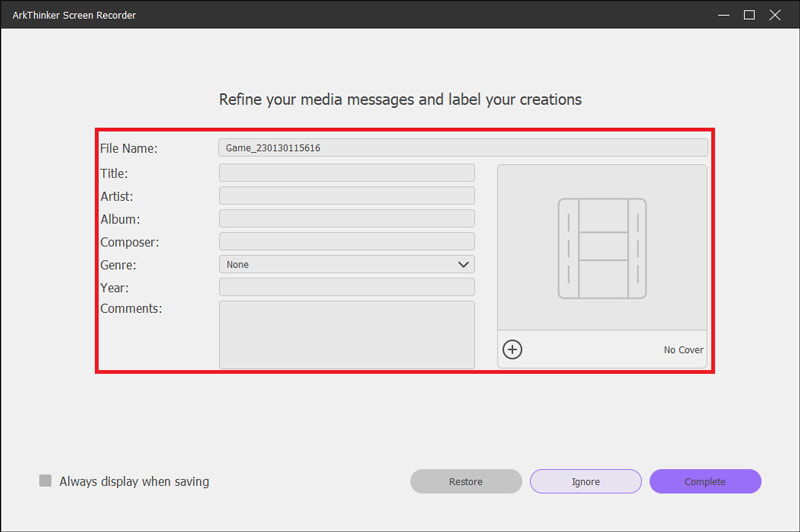
Media Metadata Editor
By using Edit Media Metadata, you can add your personal tag on exported video or audio recording files. It includes many features such as adjusting the file name, title, artist, album, composer, genre, year, comments, and so on.
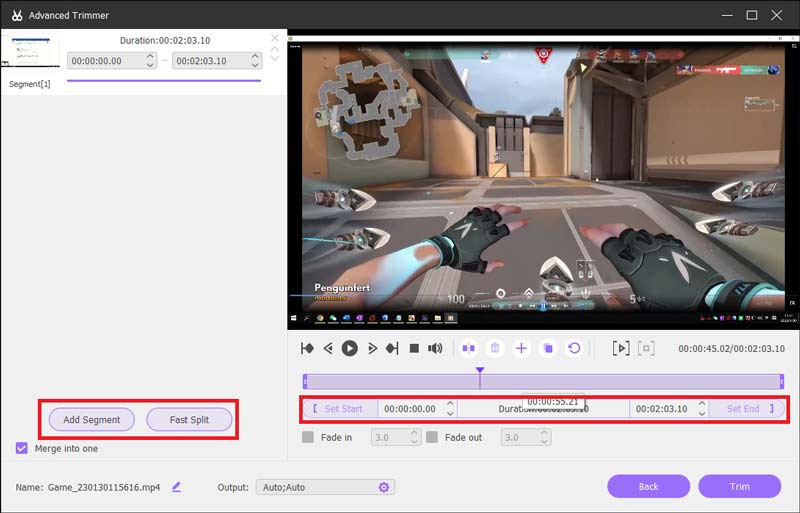
Advanced Trimmer
To trim your recording file in an advanced tool, you need to select Advanced Trimmer.
There are 2 options on the left panel.
Add segment: At the right panel, you can move the processing bar to create a new segment, copy and paste a clip, or split a file.
Fast Split: Any one recording file can be split into several parts. Now, you can click Trim to confirm your operations and export it to your computer.
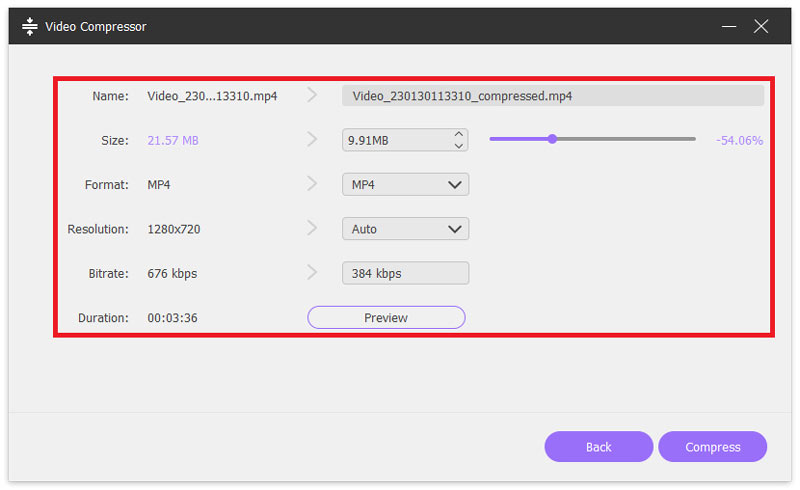
Video Compressor
Select one video from your recording history and click Video Compressor on the Editing Tools.
Next, you can adjust the Name, Size, Format of recorded video to compress a recording file your needed. After that, click the Compress button to complete the Video compression on your computer.
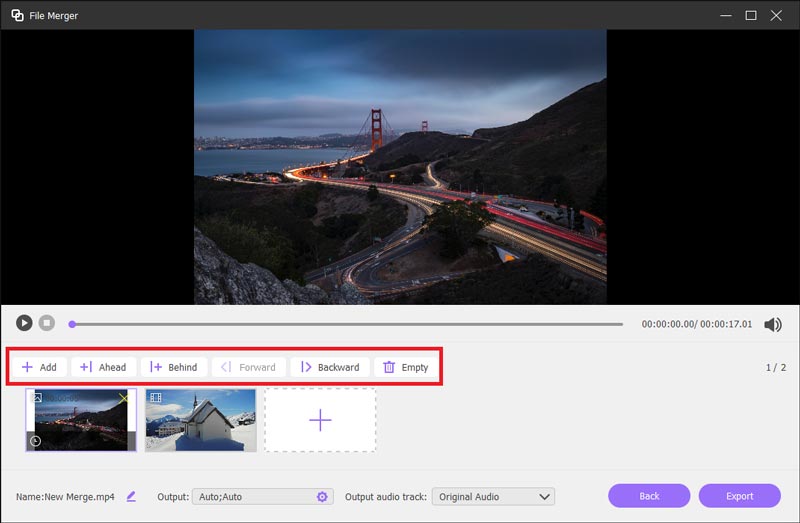
File Merger
Click the File Merger button first. If you want to combine several video clips into one file, you can click the plus icon to import the photo, videos, or audio from your recording history or local computer. After these segments are prepared, click the Export button to save the merged file.
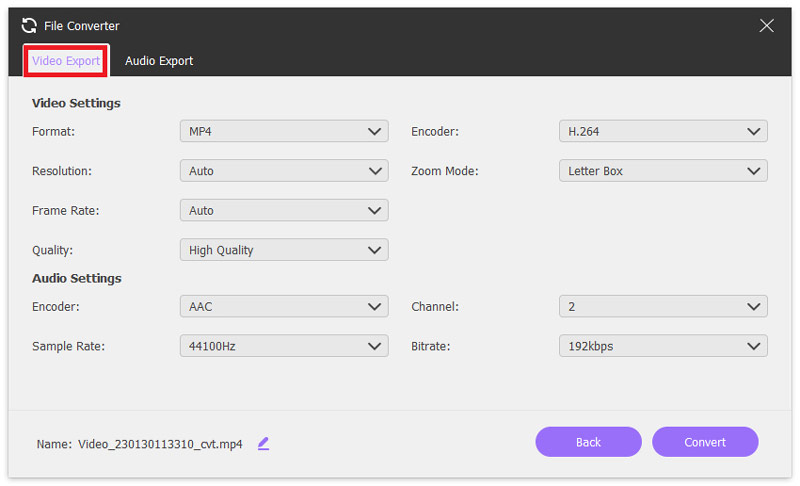
File Converter
If your device fails to play some recording file, you need to convert the video or audio formats via File Converter. Then, navigate the Video Export or Audio Export tab, and select the proper video or audio format. Click Convert button and complete the file converting.
More Features
At the bottom of the software home interface, four options can also be your recording choices.
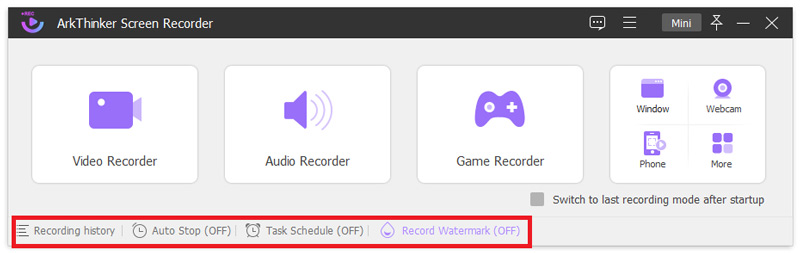
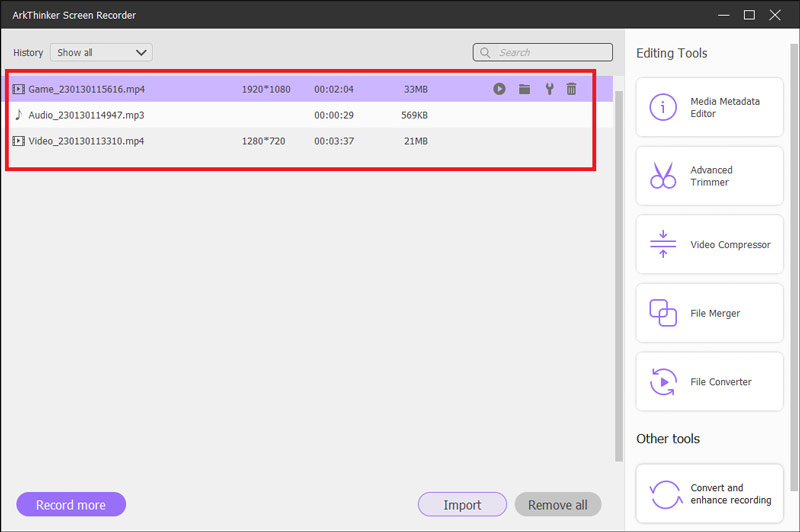
Recording History
Find the Recording history on the home interface and you can see all the audio or video files you have recorded. You can play, rename, share to social platforms, or delete it.
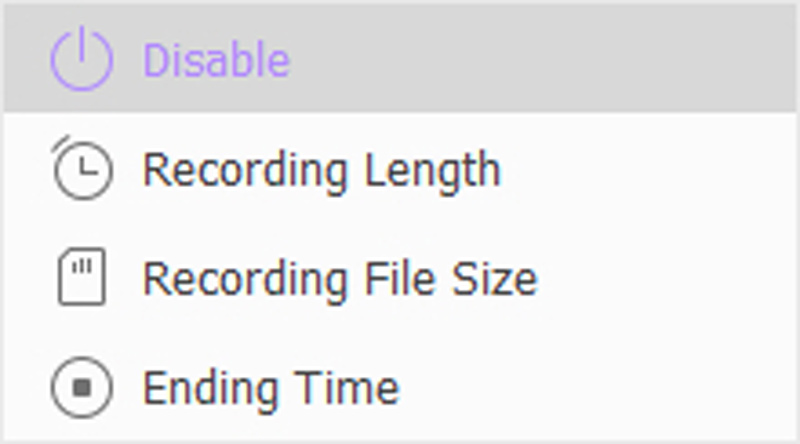
Set Record Length
By clicking Set record length on the bottom of the home interface, you can set your own recording time or file size. Or you can set a stop time to have the program stop recording automatically.
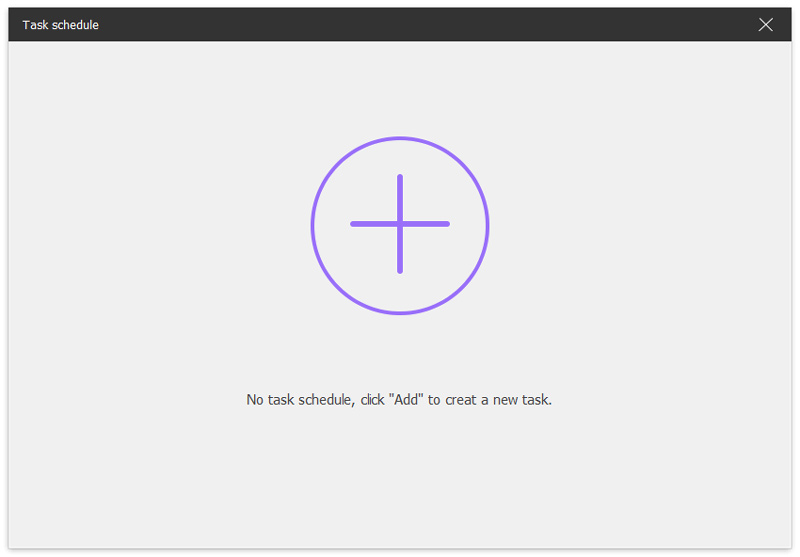
Task Schedule
You can set up your own recording tasks by clicking Task Scheduled on the home page. It includes task name, recording mode, start time and stop time. In addition, you can also choose to record a single segment or segment recording.
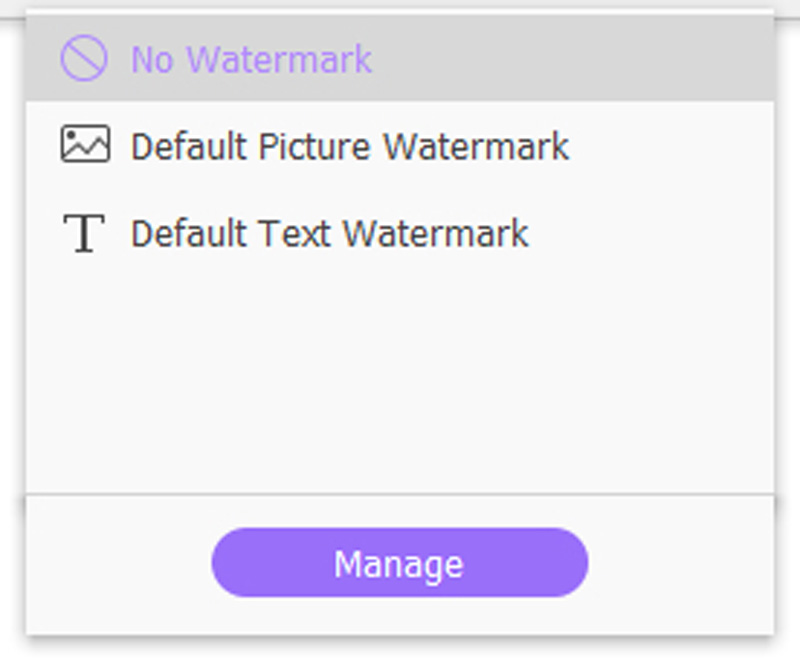
Record Watermark
By clicking the Default Text Watermark on the home page, you can decide whether the recorded video is watermarked or not. There are three modes including No watermark, Default Picture Watermark, and Default Text Watermark. Then click the Manage button, you can customize the watermark position and size as well as the detail settings of the image or text.
Quick Links


Can’t find your answer?
Don’t worry! We are glad to help you out. Contact our support team by clicking the button. We will reply to you within 24 hours on business days.