


How to Take a Screenshot on Mac Computer in Various Situations
A screenshot refers to a screencap or screengrab. It is a static image that shows the content of a computer monitor. It lets you capture exactly what you are seeing on your display so that you can share it with others or online. This guide tells you how to take screenshots on Mac for different purposes. So that you can save important information and images on your MacBook Pro/Air or iMac.

- GUIDE LIST
- Part 1: One-stop Solution to Make Screenshot on Mac
- Part 2: Introduce Mac Screenshot Shortcuts and Menu
- Part 3: Screenshot the Entire Webpage on Mac
- Part 4: How to Screenshot a Section on Mac
- Part 5: How to Crop a Screenshot on Mac
- Part 6: Where to Find Screenshots on Mac
- Part 7: FAQs about Taking a Screenshot on Mac
Part 1: One-stop Solution to Make Screenshot on Mac
When taking a screenshot on Mac, the big concern is the complicated commands. According to our research, that is the main reason why Mac users look for a third-party tool to do the job. Fortunately, ArkThinker Screen Recorder for Mac is just the solution that you need.
- Grab screenshots on Mac computers with one click.
- Capture an area, an entire screen, a window, a popup menu, or a webpage.
- Edit screenshots after capturing directly.
- Save screenshots on your Mac or your clipboard.
How to Make a Screenshot on Mac in One Click
Grab a Mac screenshot
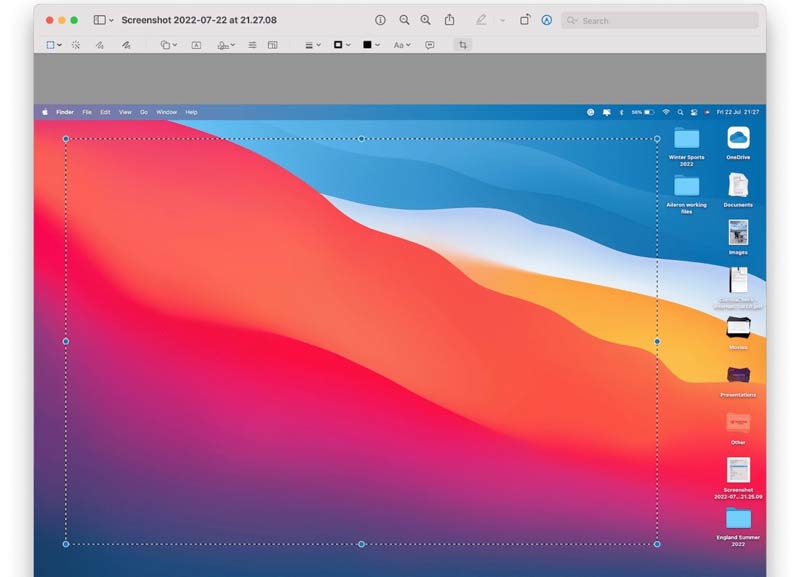
Download and install the application on your Mac and launch it. Choose the Video Recorder option. Click and expand the Screen Capture menu at the top right corner, and choose a proper option. To snapshot a web page or long window, select Scroll Window. If you want to capture a popup dialog, choose Popup Menu Capture. The Screen Capture option is used to record a specific area on your screen. Once you select an option, set the screenshot area or click the desired window.
Edit the screenshot
As long as you release your mouse, the screenshot will open in the editor window. Here you can crop the screenshot, add shapes or/and text to the screenshot, and more.
Save the screenshot
At last, click the Save button on the right pane to save the screenshot as an image to your Mac. Or hit the Clipboard icon and paste the screenshot to another application.
Part 2: Introduce Mac Screenshot Shortcuts and Menu
Of course, you can take a screenshot on macOS with shortcuts. It is the easiest way to do the job; however, remembering the combinations is difficult for beginners. We list the shortcuts below to clarify the functionality of each of them.
| Shortcuts | Screenshots |
|---|---|
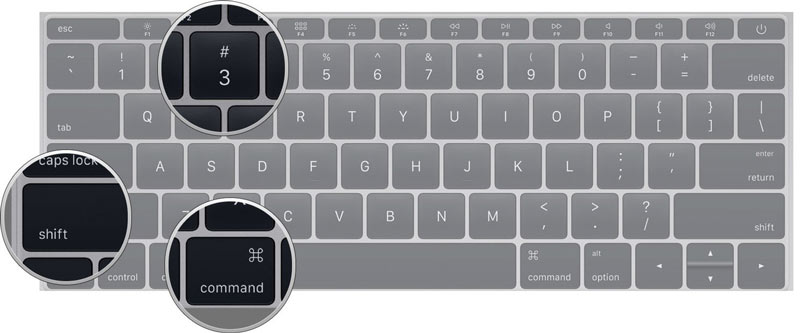
| Shift+Command+3 | Grab entire screen and save as an image on your desktop |
| Ctrl+Shift+Command+3 | Screenshot entire screen and save to clipboard |
| Shift+Command+4 | Capture selected area on your screen and save as an image |
| Ctrl+Shift+Command+4 | Grab selected area and save to clipboard |
| Shift+Command+4+Space bar | Capture an active window and save as an image |
| Shift+Command+5 | Launch the Screenshot menu bar |
| Shift+Command+6 | Take screenshot of the Touch Bar and save as an image |
| Ctrl+Shift+Command+6 | Screenshot the Touch Bar and save to clipboard |
If you take a screenshot successfully with the shortcuts, you will hear a camera shutter sound effect through your speaker. By default, the image will be saved to your desktop.
Part 3: Screenshot the Entire Webpage on Mac
The button combinations are the easiest way to take a screenshot on MacBook Pro. They are available if you want to save a webpage. However, the shortcut cannot capture a long webpage. Alternatively, most major web browsers integrate the capability to grab a screenshot for an entire webpage on Mac.
How to Screenshot Entire Webpage on Mac in Safari
Run your Safari browser when you need to screenshot the entire webpage on your Mac. Visit the webpage that you want to grab. Go to the Safari menu, and choose Preferences.
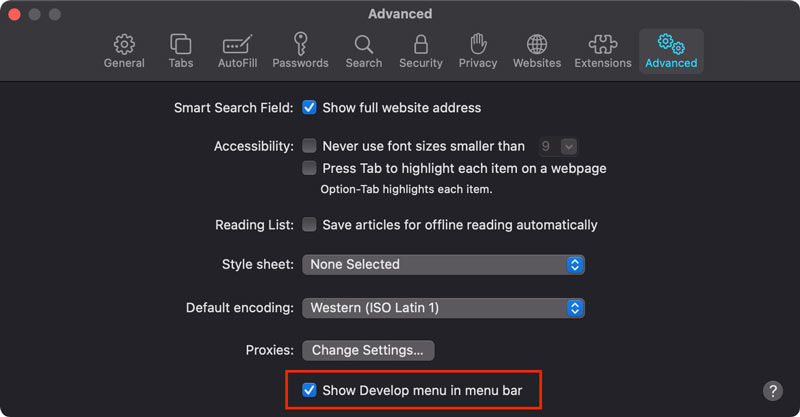
Switch to the Advanced tab, and toggle on the Show Develop menu in menu bar option.
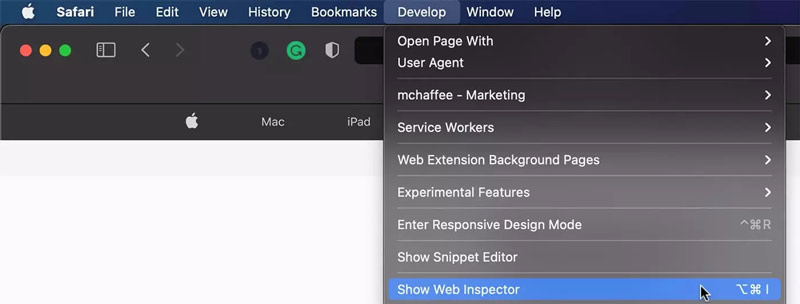
Now, you will see the Develop menu on the menu bar. Click and open it, and choose Show Web Inspector. Head to the Elements tab, and right-click on the command that begins with <html. Choose Capture Screenshot.
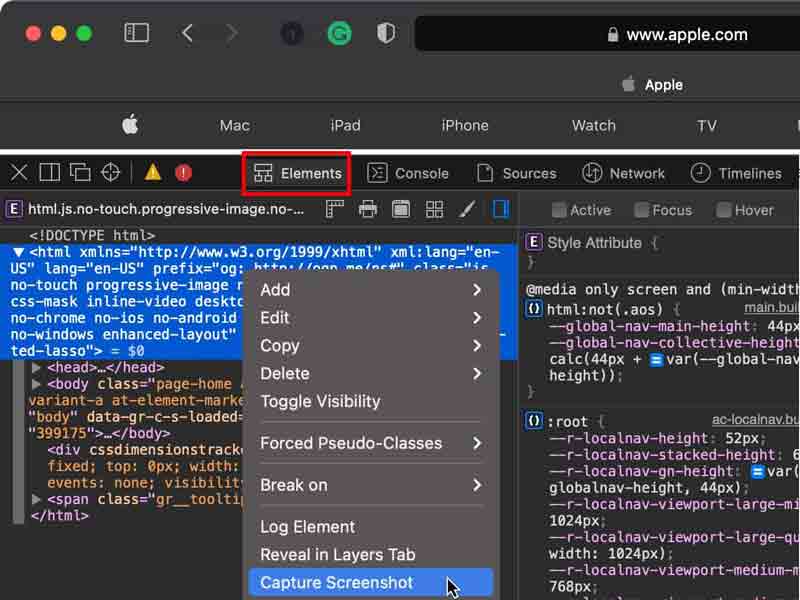
Write down a filename, and set the output location in Document. That is all.
How to Screenshot Entire Webpage on Mac in Firefox
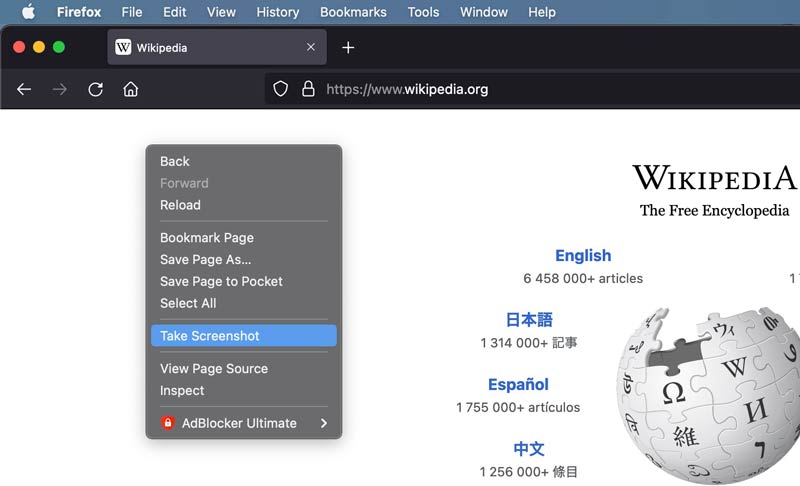
Open the webpage to screenshot on Mac in your Firefox browser.
Right-click the blank area on the page, and choose Take Screenshot.
Choose the Save full page option on the box. Then choose Copy or Download.
The former will save the webpage screenshot to the clipboard and the latter saves the screenshot as a PNG file.
How to Screenshot Entire Webpage on Mac in Chrome
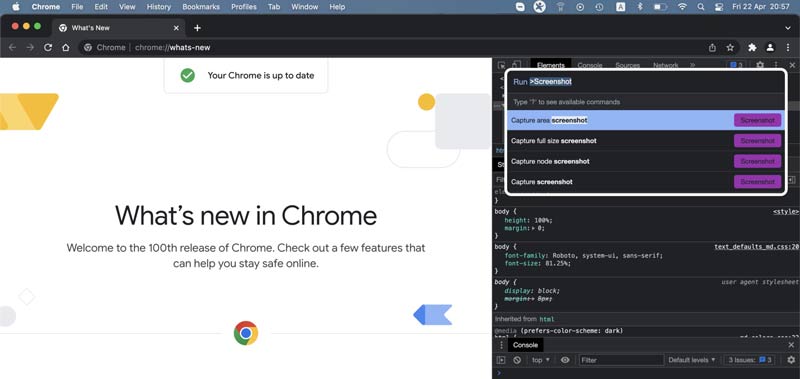
Visit the desired webpage in Chrome if you want to make a scrolling screenshot on Mac.
Press the Cmd + Option + I buttons on your keyboard at the same time. Then you will be presented with a pane on the right side.
Next, press Cmd + Shift + P, and type Screenshot in the Run field. Now, you will get several options. Choose Capture full size screenshot.
The screenshot will be saved in the Chrome download folder.
Part 4: How to Screenshot a Section on Mac
Users have multiple ways to take a screenshot of a section on their Mac computer. The button combination, for example, is an easy way. The screenshot menu bar is another choice. The Touch Bar is a quick way to do the job too if your MacBook has one.
Way 1: Take a Screenshot for a Section by Shortcuts
Put the document, image, webpage, or anything that you want to screenshot on your screen.
Press Shift + Command + 4 buttons on your keyboard if you want to create a static image. It will be saved to your desktop.
To use the screenshot on another app on Mac, press Control + Shift + Command + 4. Then open the target app, and paste the screenshot.
Way 2: Grab a Screenshot for a Section with Screenshot Menu Bar
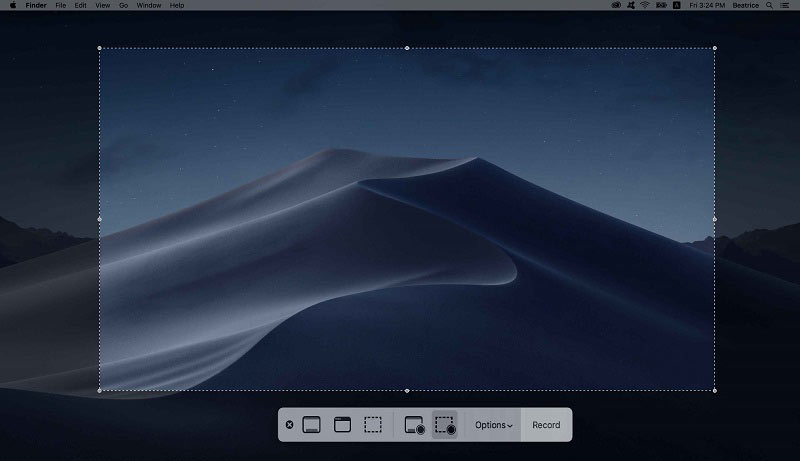
Press Shift + Command + 5 to open the Screenshot Menu bar.
Choose the third button on the menu bar.
Drag the crosshair icon to select the desired area.
Note: If you want to use a timer when taking a screenshot on Mac, pull down the Options menu, and choose a proper one under the Timer section.
Way 3: Take a Screenshot for a Section via Touch Bar
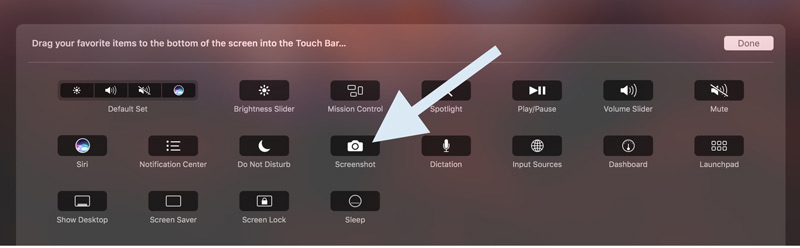
If you want to take a partial screenshot on Mac using your Touch Bar, Open System Preferences, click Keyboard, and head to the Keyboard tab.
Click the Customize Control Strip button, click and drag the Screenshot icon into your Touch Bar.
Then once you click the camera icon on the Touch Bar the Screenshot Menu bar will open.
Part 5: How to Crop a Screenshot on Mac
Can you crop a screenshot on Mac? Yes, but you need an extra application to complete the job no matter if you take a screenshot with a shortcut or menu bar. Fortunately, both Preview and Photos apps are available.
How to Crop a Screenshot on Mac with Preview
Open the Finder app, locate the screenshot, and open it with the Preview app.
Click the Show Markup Toolbar button with a pencil icon. Hit the Crop icon on the toolbar. Then select the desired area on the screenshot.
o to the Tool menu on the top menu bar, and choose Crop. Or press the Command + K buttons on your keyboard.
How to Edit a Screenshot on Mac via Photos
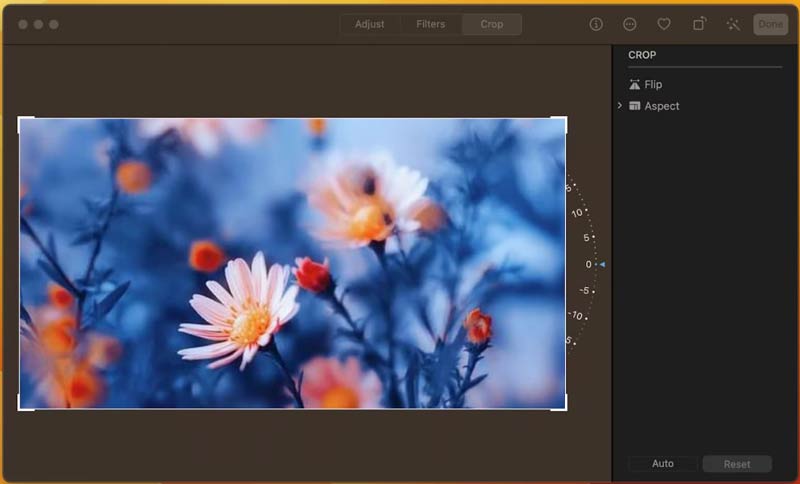
Open the Photos app, go to the File menu, and choose Import.
Import the screenshot that you want to edit. Then click the Edit button at the upper right corner.
Choose Crop at the top and adjust the cropping box until you are satisfied. At last, click the Done button and save the changes.
Part 6: Where to Find Screenshots on Mac
Where does the Mac screenshot go? The answer is determined by your action. In fact, lots of users do not understand where to find the images. That is why they feel depressed when taking screenshots on their macOS.
Situation 1: By default, the screenshots will be saved to your desktop as PNG files if you use the shortcuts. If you press the Control button with other shortcuts, your screenshots will be sent to the clipboard.
Situation 2: In macOS Mojave or later, you can change the default location. Hit the Options menu on the Screenshot Menu bar, and choose Other Location to change it according to your preference.
Situation 3: If you take a screenshot using Safari's built-in feature, you can set the output location manually. Chrome will save the screenshots to the Chrome download folder on your Mac. For Firefox, screenshots will be saved to your Downloads folder. Alternatively, you can find the screenshots on the download list in Chrome or Firefox browser.
Situation 4: Some people prefer third-party screenshot tools. Most applications let you decide where screenshots go on your Mac.
Part 7: FAQs about Taking a Screenshot on Mac
Can I take a screenshot on Mac without a keyboard?
Even if your Mac keyboard is not working or you forgot the shortcuts, you can still take screenshots on your Mac. Open the Screenshot Menu bar and you will find all commands you need. The first button is used to grab the entire screen, the second can capture an active window or menu, and the third button takes a portion of your screen. You can also set a timer, change the screenshot location, and more with the Options menu on the bar.
Why won't my Mac screenshot?
There are lots of reasons why you cannot take screenshots on a Mac. The main reasons include: 1. Wrong settings of shortcuts. You can check the shortcuts and reset them on the System Preferences dialog. 2. When your Mac gets stuck on a certain screen, you cannot grab a screenshot. The solution is restarting your machine. 3. If the shortcuts are still not working, you can try the Screenshot Menu bar or third-party tools.
Is it legal to take screenshots on Mac?
Generally speaking, it is unlikely that taking a screenshot without permission would be considered illegal unless it infringes on privacy or copyright regulations. In fact, some streaming websites will block screenshots or video capture, such as Netflix. You will only get a black image if you screenshot Netflix videos.
Conclusion
Now, you should understand how to take a screenshot on macOS in a variety of situations. The shortcuts enable you to capture the entire screen, a portion of your desktop, or an active window. Moreover, the Screenshot Menu bar provides more custom options. However, we suggest beginners and average people try ArkThinker Screen Recorder for Mac since it is easier to use. More questions? Please feel free to contact us by leaving your message below.
What do you think of this post? Click to rate this post.
Excellent
Rating: 4.9 / 5 (based on 351 votes)
Find More Solutions
Quick Ways to Record Facetime With Audio on Apple Devices 3 Best Ways to Tell You How to Screen Record on Chromebook Best Screen Recorders for Windows, Mac, iPhone, and Android Best Game Recorder to Capture Gameplay [Reliable Tools + Reviews] Detailed Guide to Record Screen or Videos on Mac Computers AZ Screen Recorder: Screencasting Application for Android DevicesRelative Articles
- Edit Image
- Best GIF Editor Tools Suitable to Any Computers and Devices
- How to Make GIF from Images on Desktop and Mobile Phone
- Quick Steps on How to Add Text to a GIF Using Caption Maker Tools
- Add Music to GIF: Incorporate Music to Your GIF After Converting
- GIF Resizer: Ultimate Tools to Resize Your Animated GIF
- [6 Tools] How to Set a GIF Loop Change and Play It Forever
- GIF Cutter: How to Cut GIF with Easy and Fast Methods
- Easy Guidelines on How to Trim a Video on Snapchat
- Easiest Ways to Shorten a Video on Different Devices
- 3 Ways to Add Text to Video Using Online and Offline Tools