


Guide
- Get Started
- Main Features
- More Editing Tools Media Metadata Editor Video Compressor Video Watermark Remover GIF Maker 3D Maker Video Enhancer Video Trimmer Video Merger Video Cropper Video Watermark Color Correction Video Speed Controller Video Reverser Video Rotator Volume Booster Audio Sync Audio Compressor Noise Remover Image Converter File Date Changer Video Player
Get Started
Introduction
Arkthinker Video Converter Ultimate is your all-in-one solution specially developed for converting video/audio files. It supports a wide range of formats, including MP4, AVI, MKV, MOV, WMV, etc. Even more, you can convert video files like 4K videos to popular and new formats without losing any quality.
Additionally, this software integrates more practical functions. It enables you to trim, crop, rotate, adjust the resolution, volume, speed, brightness, add subtitles and watermark, and so much more. There are also features, including Video Compressor, Video Enhancer, GIF Maker, Media Metadata Editor, Video Reverser, etc. Indeed, it is a powerful program for your media converting and editing needs.
The tutorial below will walk you through the process of how to use ArkThinker Video Converter Ultimate.
Download/Install
Acquire the latest version program by downloading the program. There are installer packages for both Windows and Mac. Install and launch ArkThinker Video Converter Ultimate on your PC and launch it.
Register
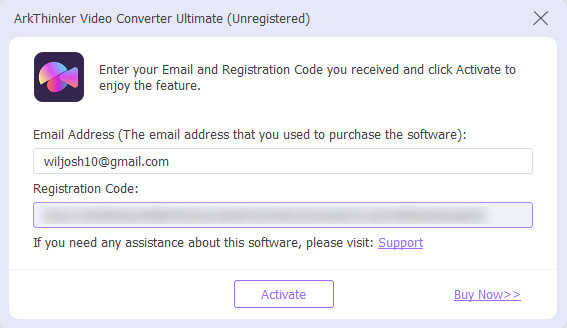
ArkThinker Video Converter Ultimate’s trial version comes with limitations. But you can enjoy its full features by upgrading to the premium version.
Simply click on the Register icon represented by a key icon at the top right corner. By then, you will see the Registration Center.
Now, enter your email address and the registration code sent to your email. Click the Activate button to upgrade to premium. Be sure that your computer is connected to a stable cyber connection.
Check Update
In case you are wondering if the program version you have is in its latest version, you can check for its updates. Aside from getting the latest version, you will be informed about the fixes and improvements or added app features.
Here is how you can check for the update on the program:
Click on the Menu option and look for the Check Update option.
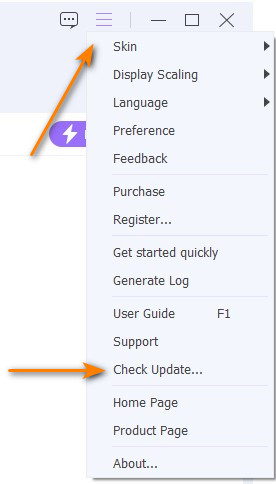
You should see if there is an update or if the version you have is up to date. Install if there is an update available.
Note: You can visit the official webpage of ArkThinker Video Converter Ultimate to get the latest version by downloading it again.
Preferences
You can also set some preferences or change the default configuration that fits your requirements. There are five options you can modify.
Navigate to the Preferences window by clicking on the Menu icon. Then, select the Preference option.
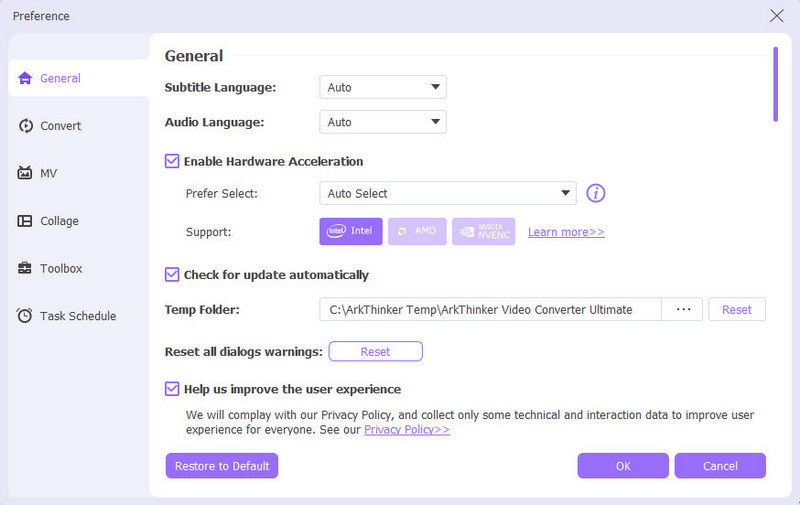
General: Under the General tab, you are granted the option to tweak settings, including the Subtitle Language and Audio Language. Also, you can enable the Hardware Acceleration and configure the Update settings as you like.
Convert: There are options for setting the output folder, snapshot folder, snapshot format, and more settings in the Convert tab for improved user experience.
MV: The MV tab is where you are allowed to set the MV output folder.
Collage: Same as with MV, the Collage tab enables you to change the directory where you would want the resulting file to be saved.
Toolbox: You can set the output folder for the GIF and compressed files in the Toolbox tab.
Task Schedule: Using the Task Schedule option, you decide the action to occur right after the task is completed.
Main Features
Convert Video & Audio
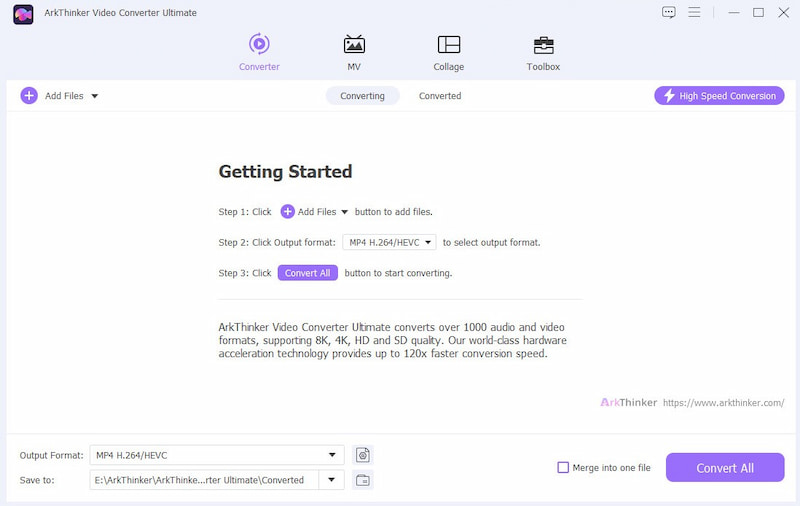
After downloading and installing the program, launch it on your computer. Now, follow the steps below to learn how to convert videos using the ArkThinker Video Converter Ultimate.
Import a video/audio file
Next, click on the Plus symbol in the middle of the interface and look for the media file you wish to convert. You can also utilize the drag-and-drop feature of the program to import media files directly and quickly.

If you convert a folder of media files, you can upload them by ticking the Add Files button at the top left section of the interface.
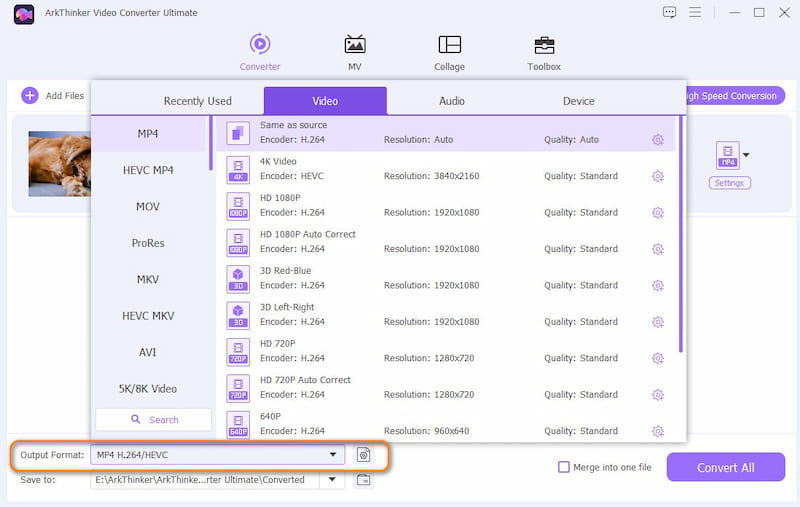
Select an output format
This time, expand the Profile menu. Choose tabs depending on the media file you uploaded. There are Video, Audio, and Device tabs. After that, choose your target format.
Set a file destination
After choosing your target format, set an output folder where you wish to save the resulting file. Click on the drop-down menu at the bottom and choose Browse and Select folder.

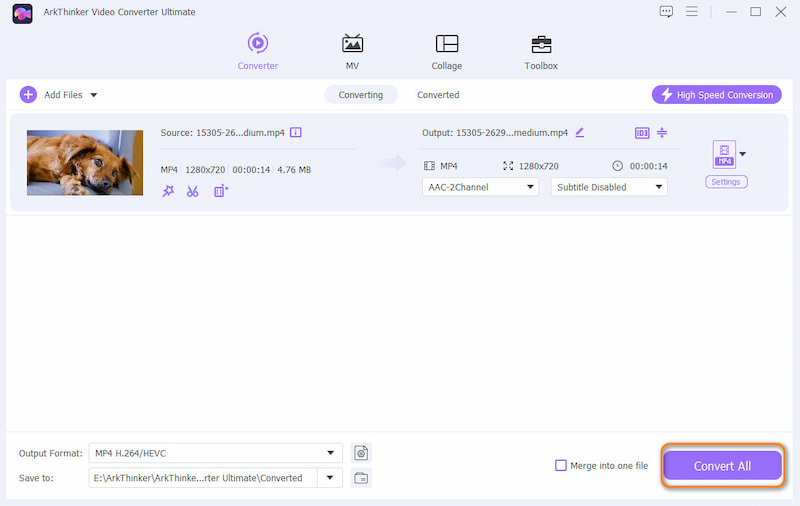
Convert media files
Once all is set, click on the Convert All button at the bottom right corner to begin the conversion process.
Check the converted files
In a few minutes or hours, the process will be done. Yet, depending on the length or size of the file, the time for finishing the conversion may vary. You can locate the final output from the output path you set.
Edit Video & Audio
ArkThinker Video Converter Ultimate is also a very comprehensive tool. You can even use it to edit video or audio. The detailed steps are following.
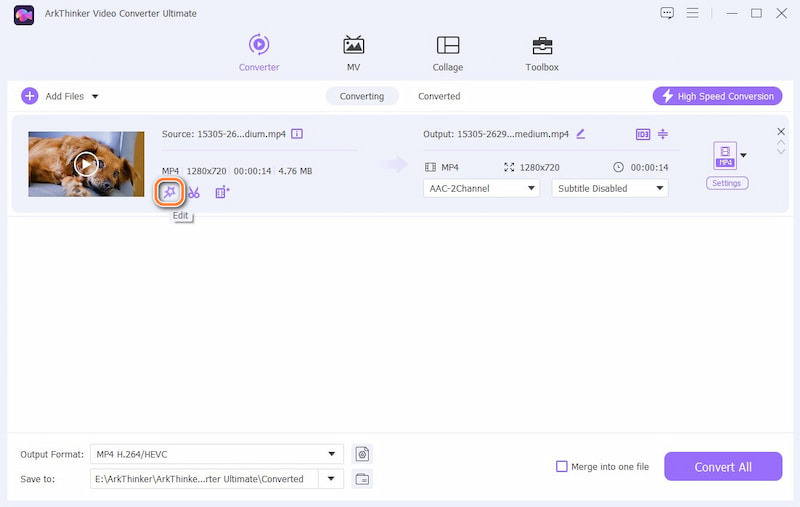
Import a video/audio file
First, import the video or audio file you want to edit. Once the file is imported, clicking on the marked icon in the image will take you to the edit function.
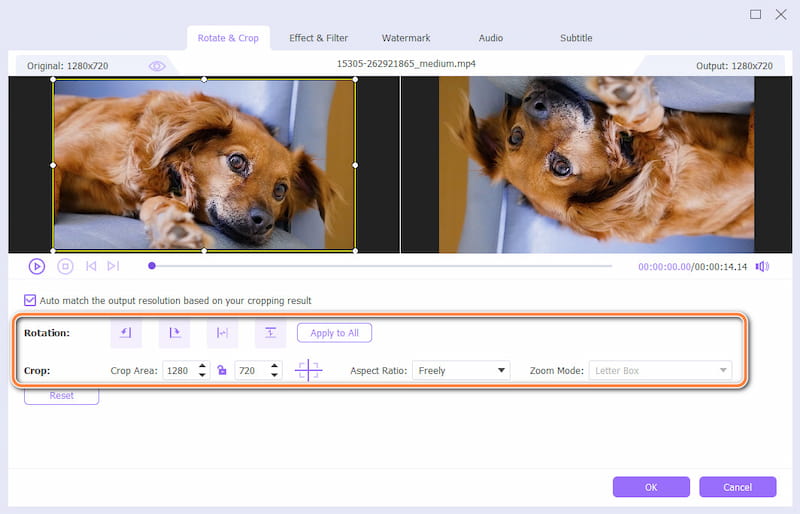
Rotate or crop your video
Now, you’re on to the first editing feature, rotate and crop. Here, you can set the desired data, such as the crop area and aspect ratio. In the meantime, you can also rotate your video in any direction.
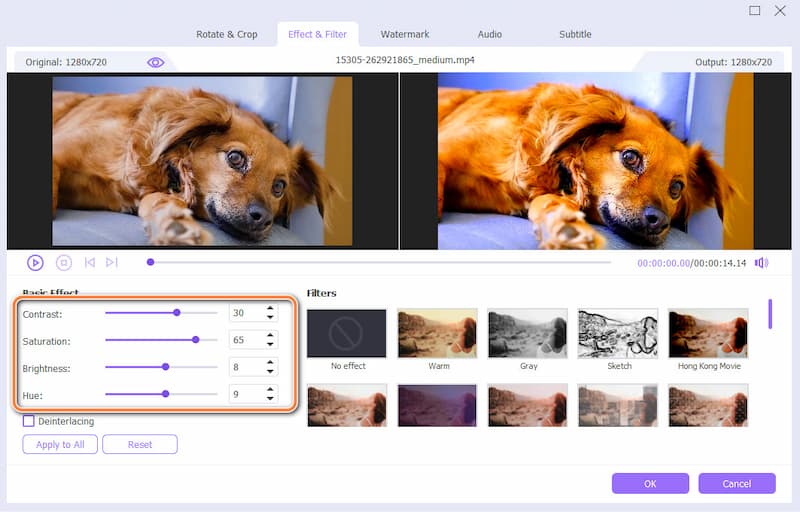
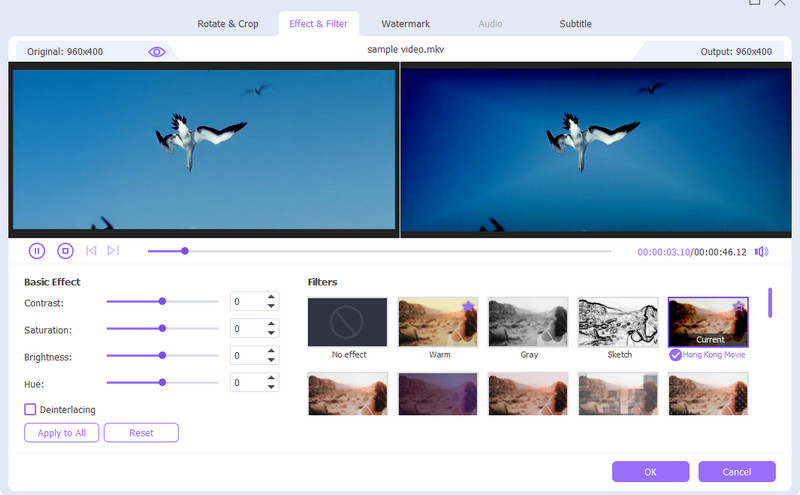
Add effect or filter to the video
In this function, you can set the effects and filters of the video yourself. You can set contrast, saturation, brightness, and hue to make your video more beautiful and vivid.
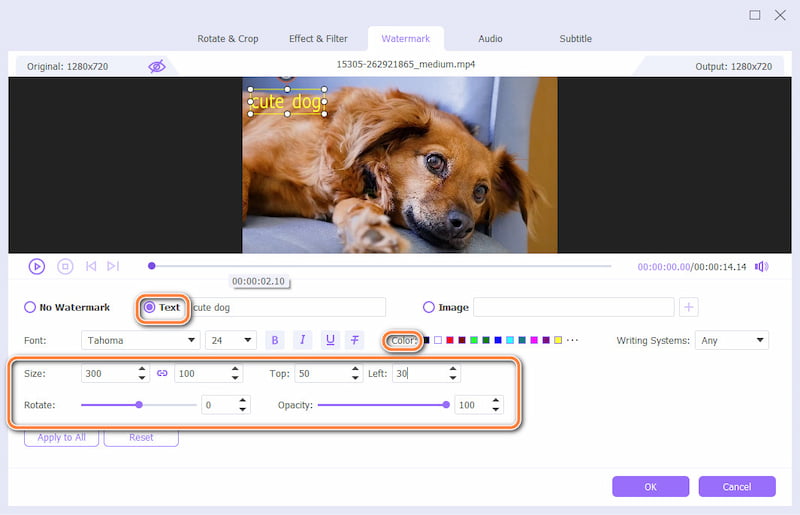
Set your watermark
In this part, you can set the personalized watermark. You have many options, such as no watermarks, custom text, or image watermarks. At the same time, you can adjust the size, color, and position of the watermark content. The image below is a text watermark.
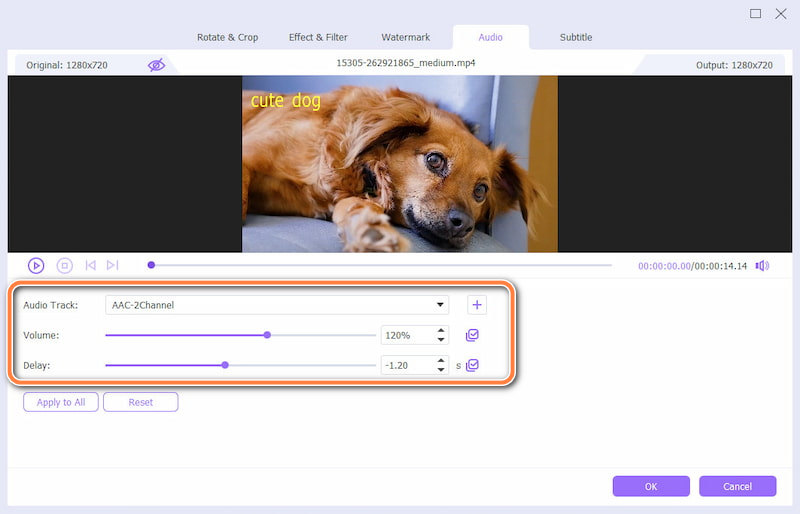
Adjust audio settings
Moreover, if your video has problems such as blurry background sound or out-of-sync audio and picture, you can adjust it yourself to achieve the desired effect. You can also import the audio track you want from your local area.
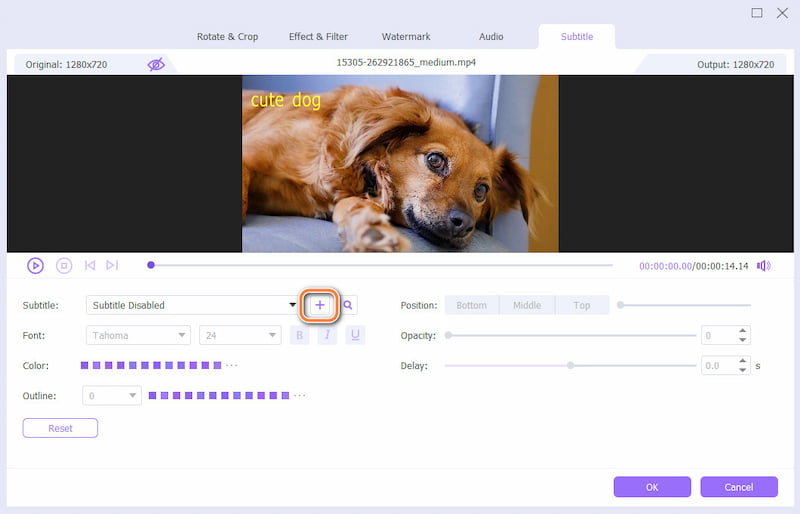
Add a subtitle to your video
This tool can do the same if you want to add subtitles to your videos. Click on the plus sign marked to import your subtitle text.
Create MV
ArkThinker Video Converter Ultimate is a flexible program that allows you to create professional videos. You can achieve this using your local videos or pictures. Take a look beneath to learn how to use the MV Maker of the program.
Navigate the MV tab
To access the function, go to the MV tab to enter the editing panel.
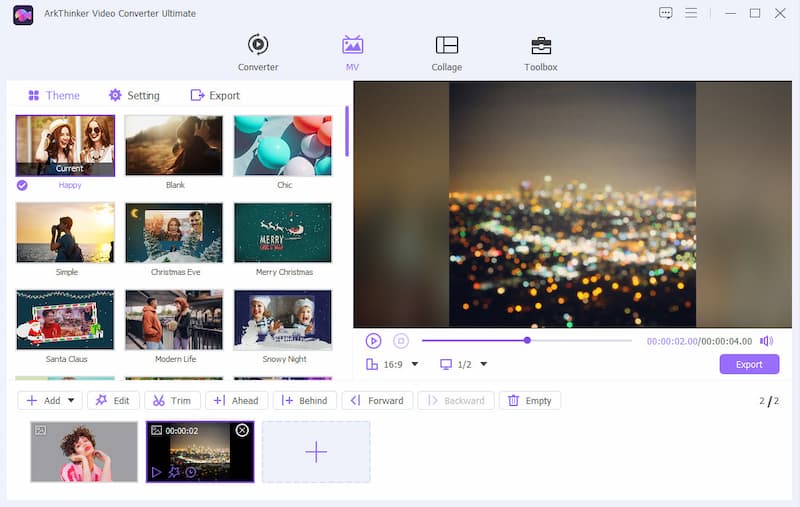
Add pictures or footage
You can import pictures or videos by clicking the Add button at the bottom left corner of the interface. Once done, you can rearrange the pictures, particularly the order of when the footage should appear.

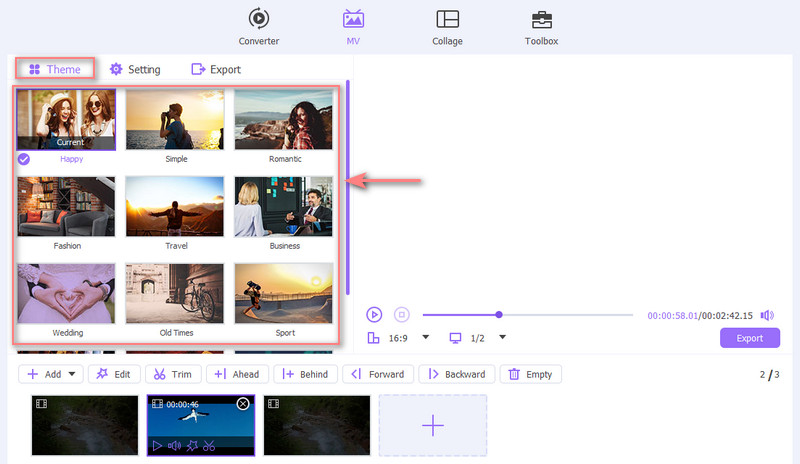
Apple a theme
Under the theme section, various themes are available for different occasions or events. Select a theme that fits your footage or pictures. You will be able to see the changes from the preview section right after selecting a theme.
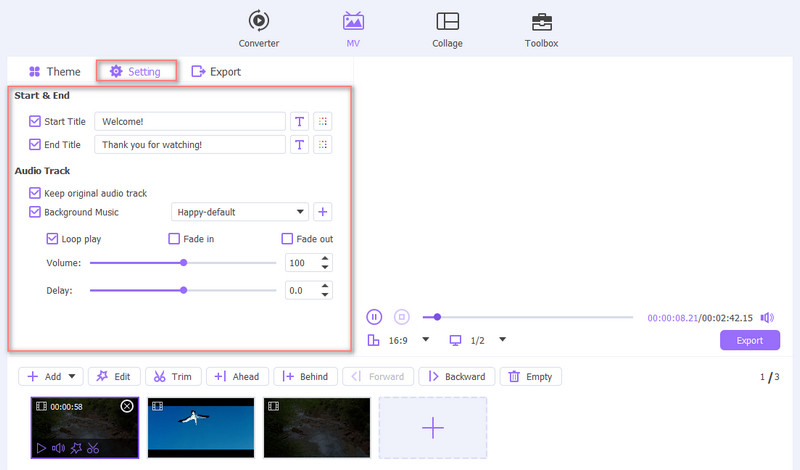
Tweak the title and audio track settings
You further enhance the footage by incorporating your desired starting and ending title. Enter the starting and ending titles. Then, tweak the properties by opening the settings for the Font set and Color set. For Audio Track, you can keep the original track or replace it with the audio of your choice. Also, apply effects, like loop play. Adjust volume, and control the speed of the audio.
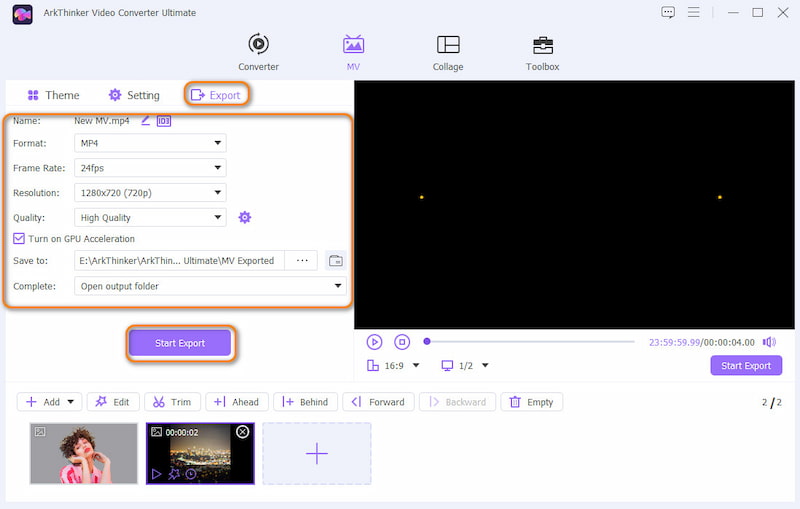
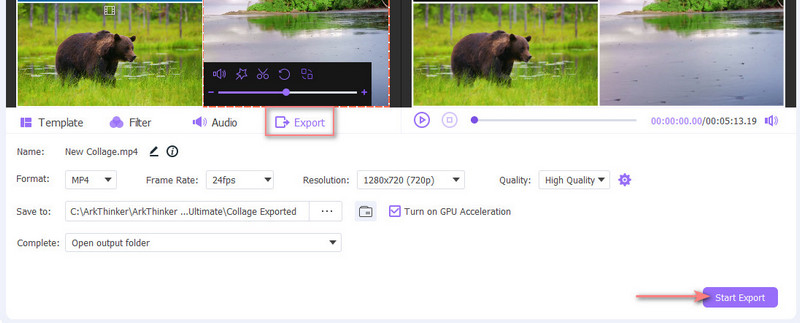
Export MV
The output format is exported to MP4 by default. But if you wish to change to other formats, kindly go to the Export section. You may expand the options for Format, Frame Rate, Resolution, and Quality. Additionally, change the output path and choose actions to happen after the completion of the process. When pleased with the settings, hit the Start Export button.
Make Video Collage
Generating a Video Collage is not as easy as it looks. Yet, with the help of ArkThinker Video Converter Ultimate, everything is simple and easy. See the details below to see how it works.
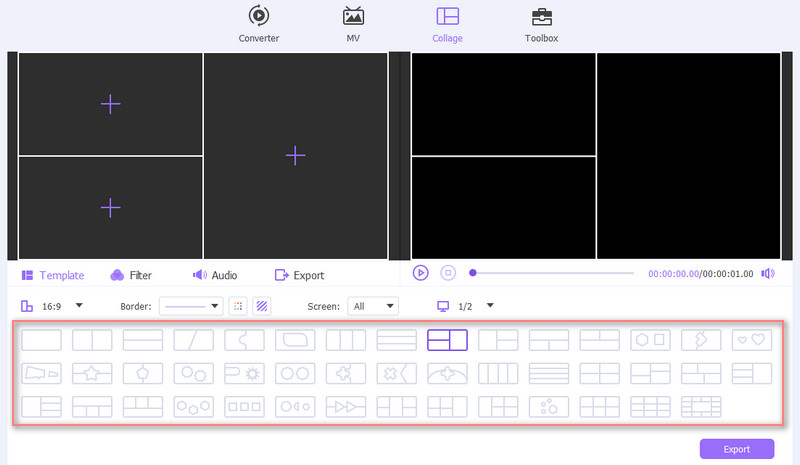
Navigate the Collage tab
Access the Collage tab by selecting it from the menu bar on the top. Select a collage split-screen layout according to your needs.
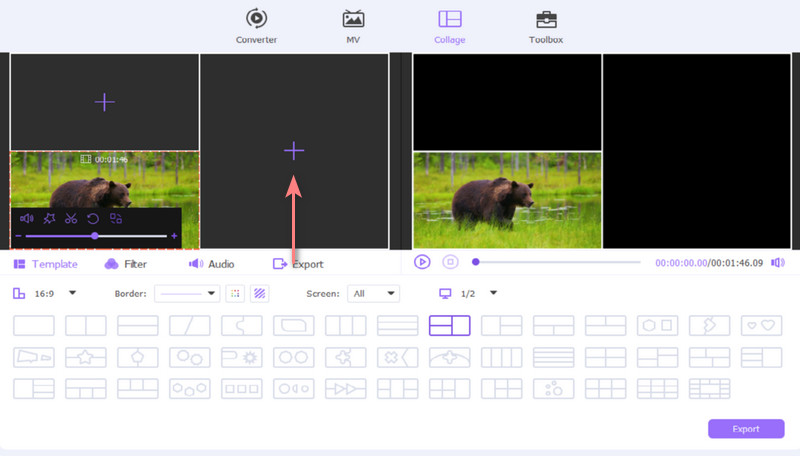
Import video files
Now, click on the Plus button to browse and select video files. Then, modify the video by adjusting the size.
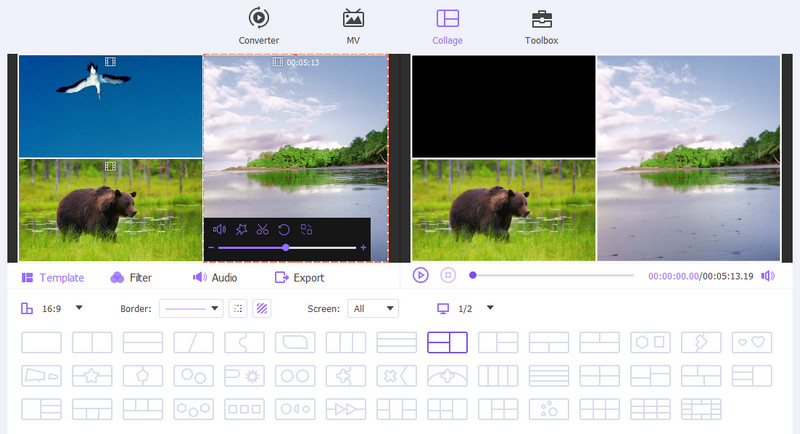
Edit the video collage
You can edit videos individually by hovering your mouse cursor over the selected video. From the menu, you can mute the audio, trim or cut the video, and replace it. After that, apply a filter to make the video collage attractive.
Add background music
Choosing the background music is important. To change the background music, tick on the Background Music option to enable the setting. Then, click on the Add icon and choose your target music. Otherwise, select Keep the original audio track.
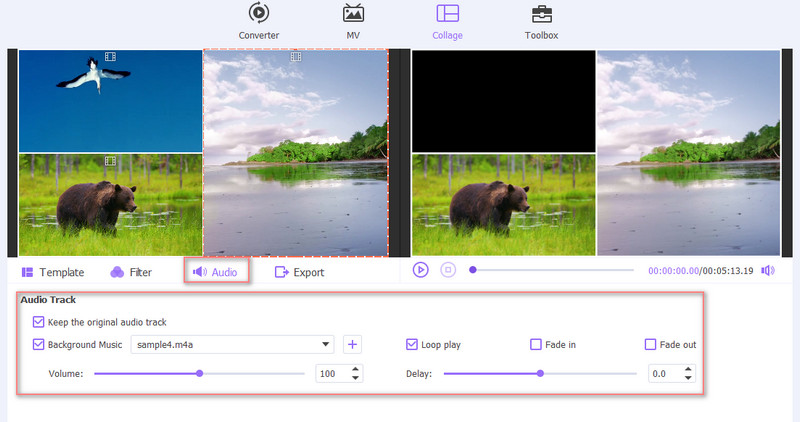
Aside from adding background music, you can apply audio effects, including Loop play, Fade in, and Fade out. Additionally, you can change the delay and volume as you please.
Export the video collage
Now, go to the Export tab and configure the necessary parameters like frame rate, format, resolution, and quality. Hit the Start Export button at the bottom right corner to produce the video collage when all is set. If you prefer, you may share the collage on social media platforms.
More Editing Tools
Since ArkThinker Video Converter Ultimate incorporates added features and functions, it would be best to learn about them. Most of them are located under the Toolbox tab. Below are the tutorials on how to use these functions.
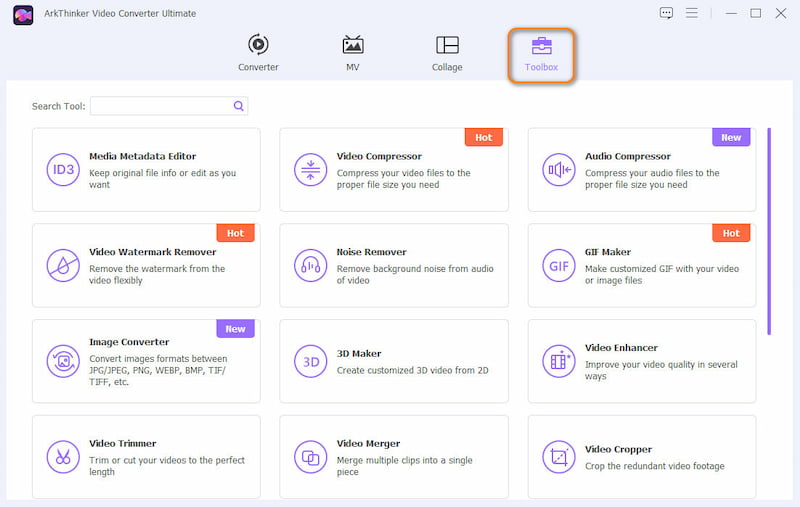
Media Metadata Editor
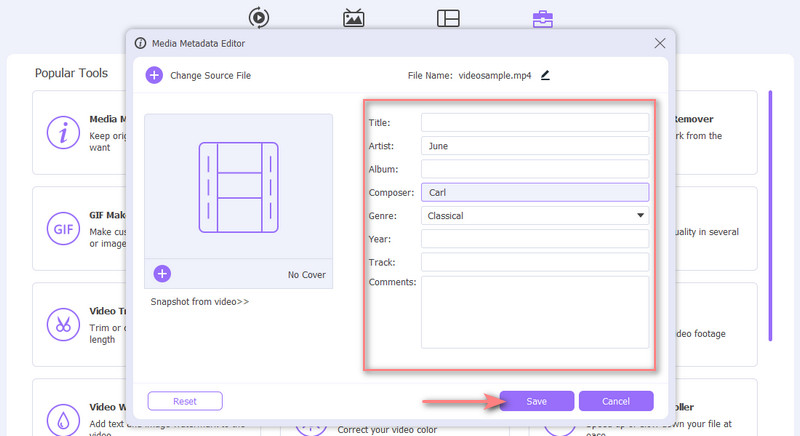
Click on the Toolbox tab on the top menu of the program. Next, select the Media Metadata Editor. The import window will appear.
Add a file that you wish to edit the metadata of. Then, edit the cover, file name, artist, album, track, comments, and year. Also, you can add a thumbnail to the video. Finally, hit the Save button to save the changes.
Video Compressor
Under the Toolbox tab, look for the Video Compressor option. Import a video you wish to compress by clicking the Plus sign button from the appearing window.
Right after, modify the size, format, bitrate, resolution, and bitrate of the video.
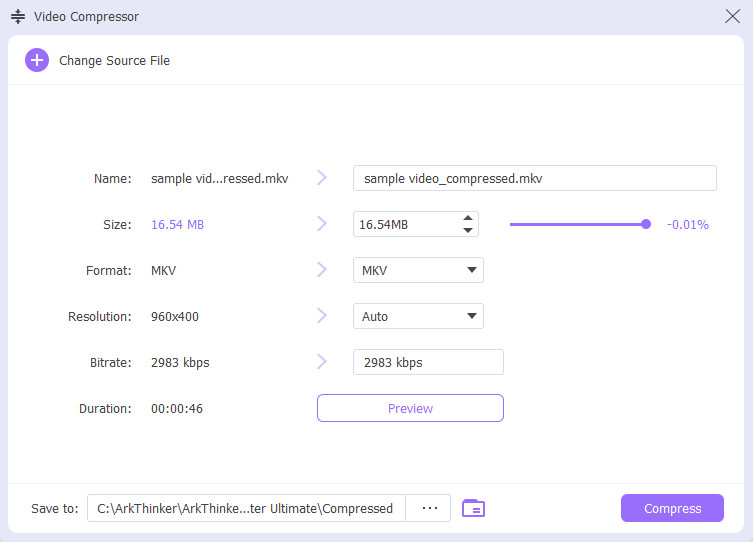
Preview the video. When you are delighted with the result, click on the Compress button to begin the process.
Video Watermark Remover
Access the Video Watermark Remover from Toolbox. From the import panel, click the Plus sign button to load a video.
Click on the Add watermark removing area. Then, drag the frame to the area where the watermark is placed. Then, modify the size and the position of the frame.
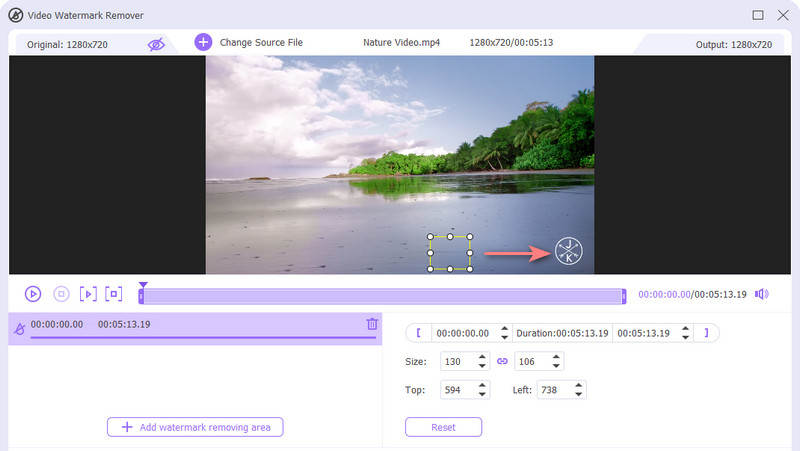
Preview the output result by hitting the Play button. Adjust accordingly by observing closely the area where the frame is placed. Then, hit the Export button to get the final result.
GIF Maker
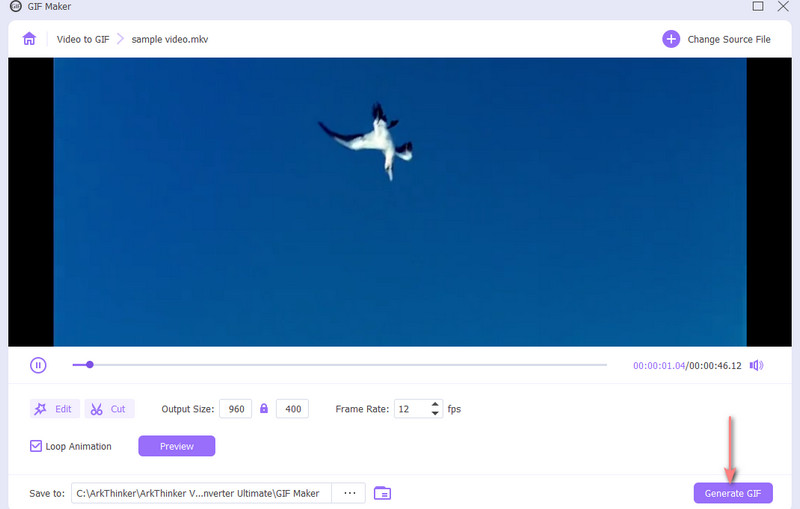
Locate the GIF Maker in the Toolbox tab. Next, select whether you want to make a GIF from a video or make GIF using several pictures. Add a media file based on your selected option.

You can access video editing features like Effect and Filter, Watermark, Audio, Rotate & Crop, and Subtitle.
Hit the Generate GIF button to produce the GIF.
3D Maker
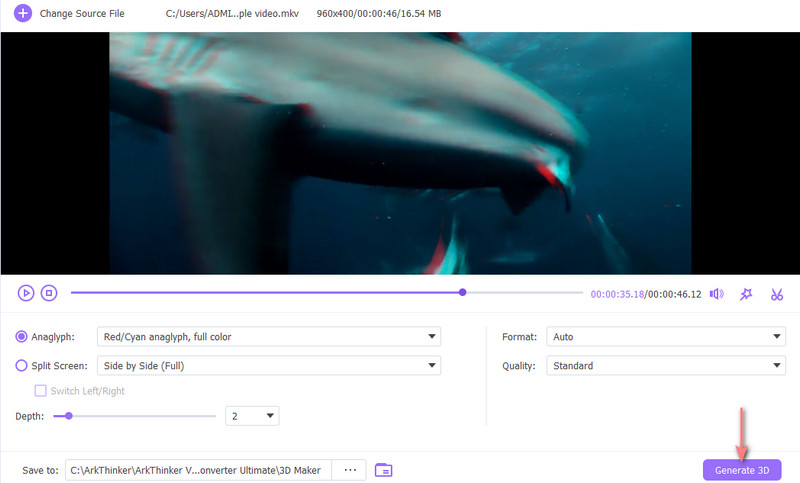
Locate and select 3D Maker in the Toolbox tab. Then, add a video by clicking on the Plus symbol button.
There are several options to make 3D. You can choose among:
Anaglyph: With this option, users have the option to apply the 3D effect from Red/Cyan anaglyph, monochrome/half color/full color/quality Dubois; Green/Magenta anaglyph/half color/full color; Amber/Blue anaglyph, monochrome/half color/full color.
Split Screen: Top and Bottom (Half-Height), Top and Bottom (Full), Side by Side (Half-Width), Side by Side (Full).
Depth: The depth of an anaglyph 3D can be changed from 0 to 15.
Switch Left/Right: You can use the orientation using the Switch Left/Right to change from Left/Right to Right/Left. Or from Right/Left or Left/Right.
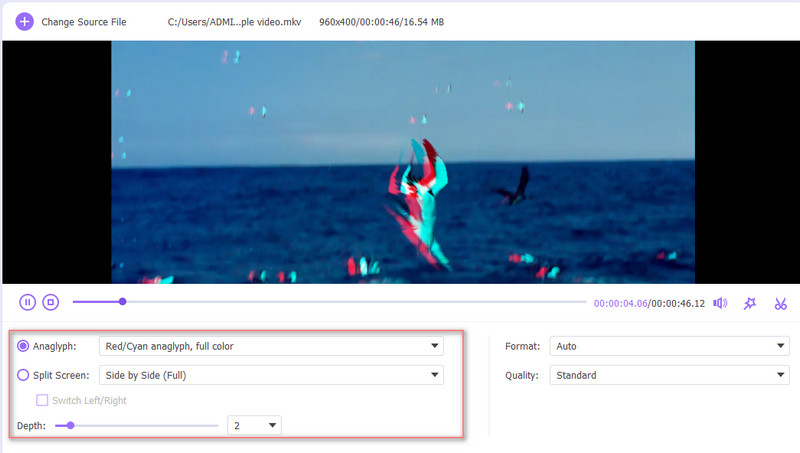
Lastly, tick the Generate 3D to confirm the creation of 3D making.
Video Enhancer
Under the Toolbox tab, look for the Video Enhancer option. Next, import a video that you wish to enhance.
This option offers four options to enhance a video. There is Upscale Resolution, Optimize Brightness and Contrast, Remove Video Noise, and Reduce Video Shaking. Choose from the following options.
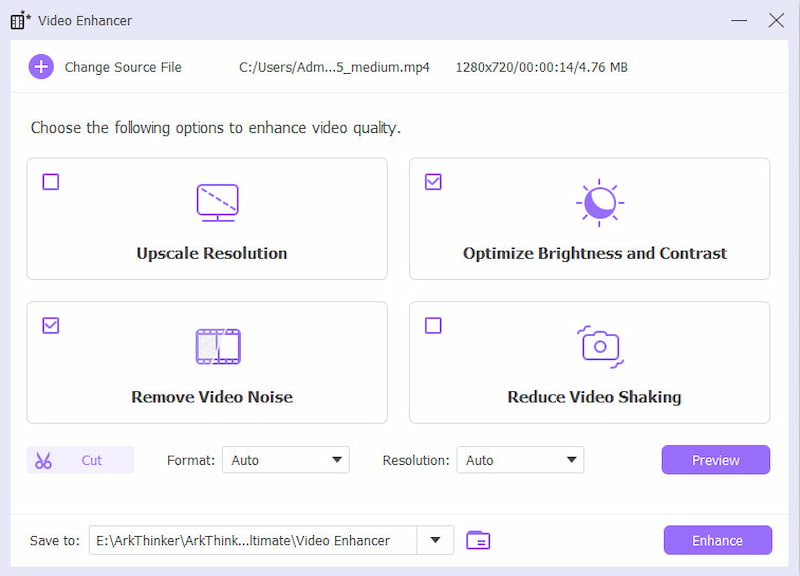
Lastly, click the Enhance button to enhance the video.
Video Trimmer
First off, look for the Video Trimmer option from the Toolbox tab. Next, load a video to trim.
Drag the left and right handlebars on the progress bar or enter the starting and ending points at the bottom of the progress bar.
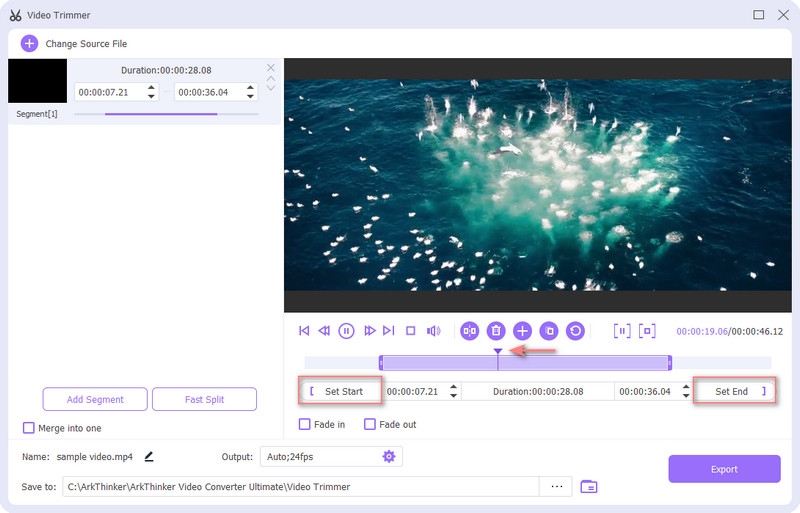
You can add more segments by clicking on the Add Segment button on the left side portion of the interface. Or split a segment individually by time or by average.
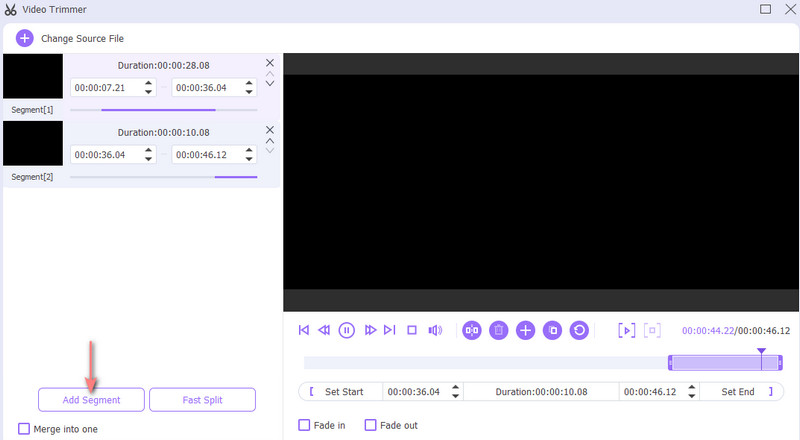
You can also apply effects like the Fade in/out beneath the progress bar. You can modify the output and set a file destination for the final touch. After all these actions, click on the Export button to confirm the process.
Video Merger
Locate and access the Video Merger from the Toolbox. After that, add videos you wish to merge into one by clicking the Plus button at the bottom of the interface.
Next, arrange the order according to your preference. You may drag the clip to its proper position or use the Forward or Background feature. Optionally, you can add ahead or behind a selected clip using the Ahead and Behind features. If you hope to trim and edit a clip, you can also do so.
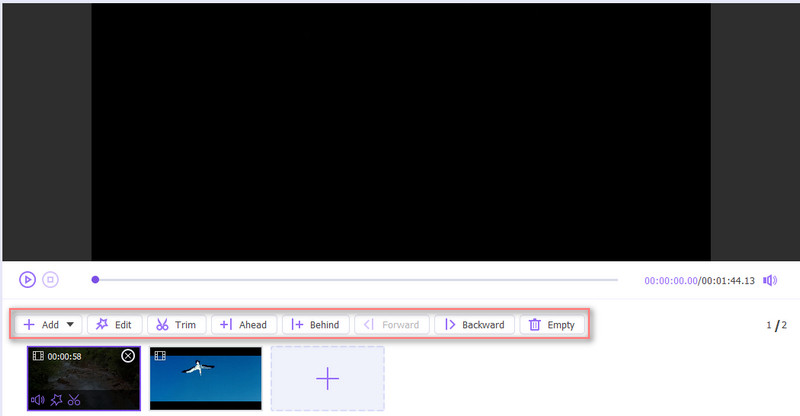
If you have finished the modification, you can move forward to changing the name, output settings, and saving path for the output file. Then, tick the Export button to produce the merged videos.
Video Cropper
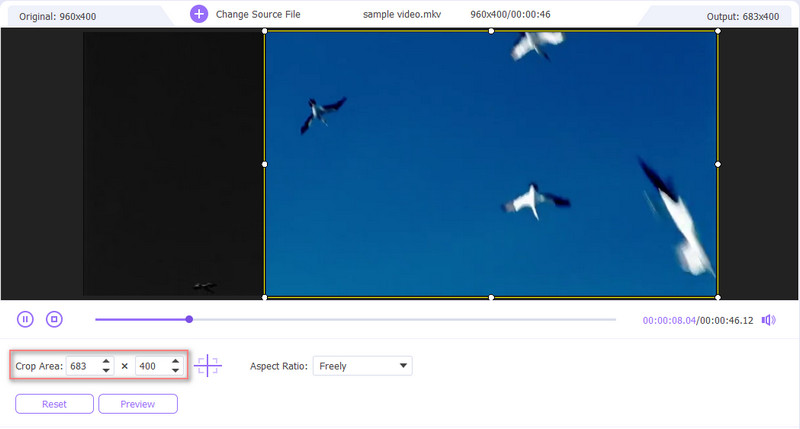
Access the Toolbox tab and choose Video Cropper from the options.
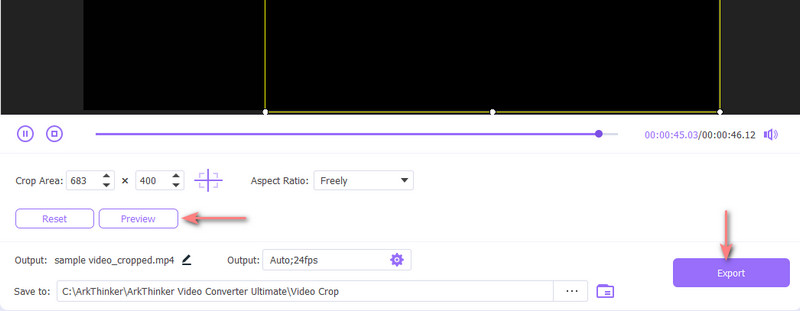
Now, drag the aspect ratio and adjust the points to retain the chosen areas of the video. Optionally, you can set a value of Crop Area to adjust the aspect ratio.
Hit Preview to see the resulting file in advance. Tick the Export button to save the cropped video if you are delighted.
Video Watermark
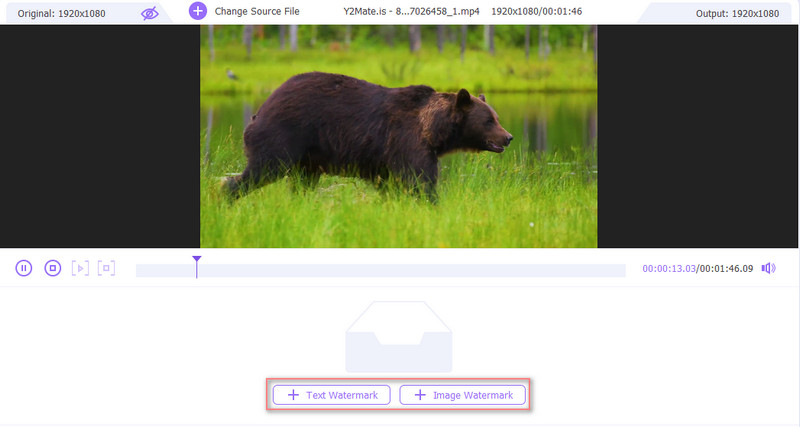
From the Toolbox tab, choose the Video Watermark option. Then, import a video.
Choose Text Watermark to add a watermark to text. Also, you can add a logo by clicking on the Image Watermark. If you wish, you can also add both text and image watermarks to a video.
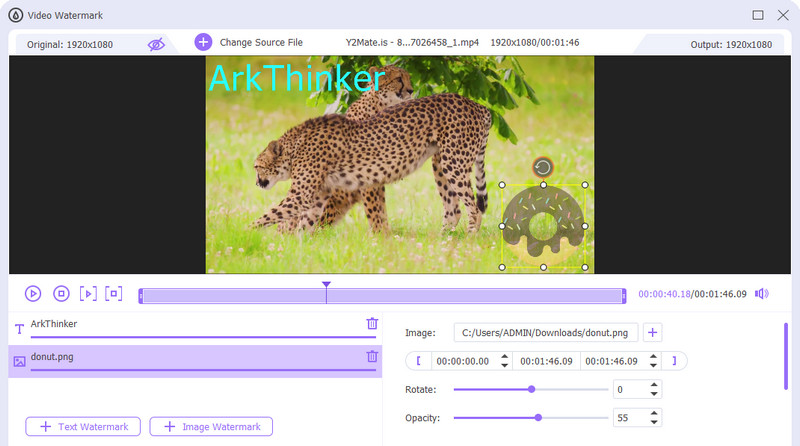
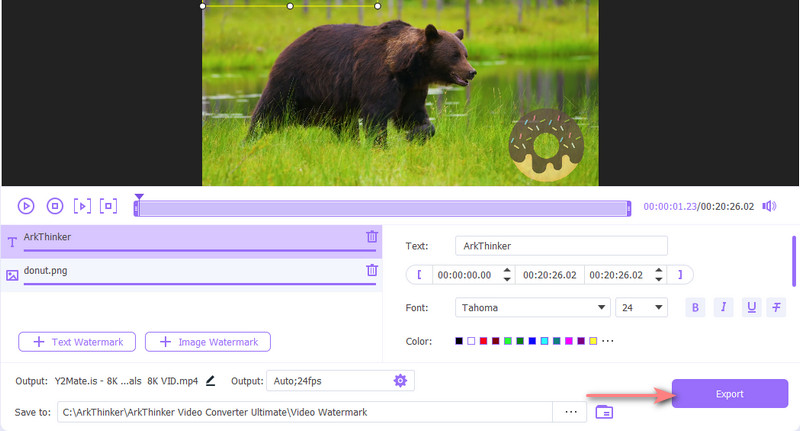
The text and image are highly customizable. You can modify the font, color, and the duration period when and how long it should appear in the video. For the image, rotating and adjusting the opacity is possible. Along with this, you can also adjust the duration time of the image watermark.
Once everything is set, click on the Export button to save your copy of the edited video.
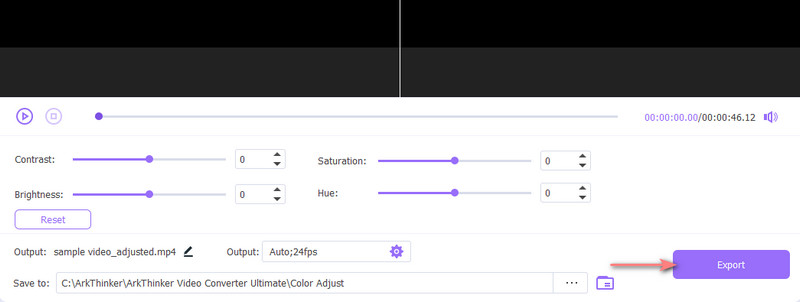
Color Correction
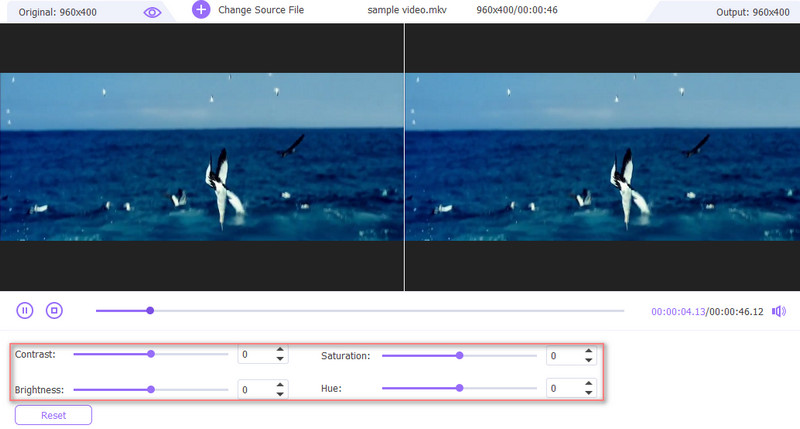
Access the Color Correction and add a video you wish to correct the color of.
In the editing panel, you can alter the Contrast, Saturation, Brightness, and Hue according to your requirements. See the final version of the video by clicking the Preview button.
If you are delighted with the results, tick the Export button.
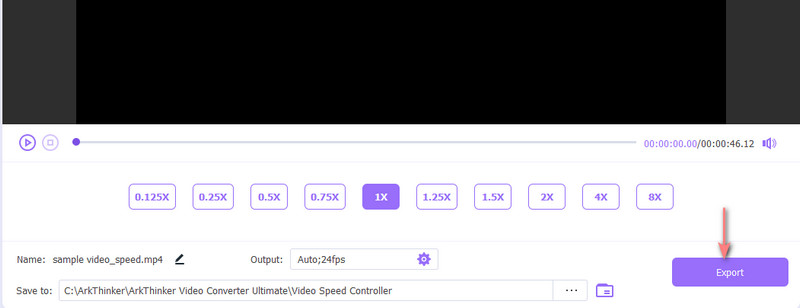
Video Speed Controller
Select Video Speed Controller in the Toolbox tab. After finding the option, immediately add a video by clicking the Plus button from the import window.
You will see several playback speed options by then. Choose one that suits your preferences well.
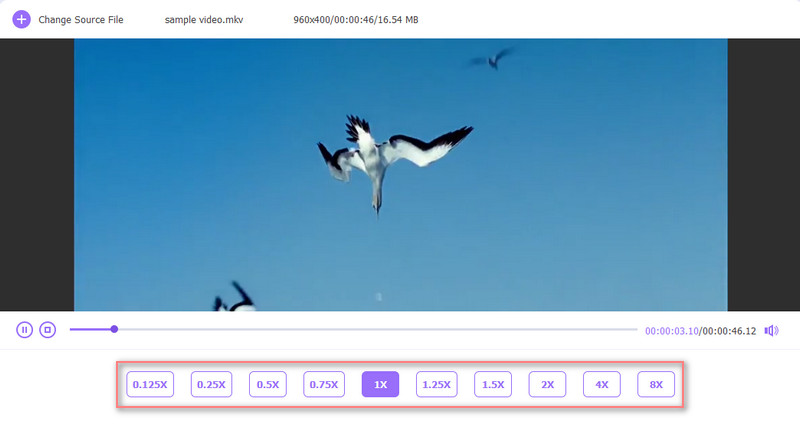
Before exporting, you may modify the video/audio settings and the file destination of the output video. Lastly, click the Export button to get the edited video.
Video Reverser
From the Toolbox tab, choose Video Reverser. Immediately add a video.
Select the part of the video that you wish to reverse using the handlebars or set the duration period.
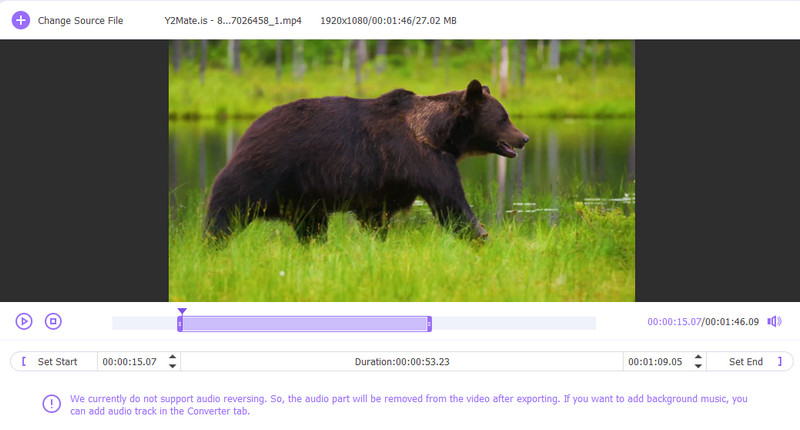
Finally, click the Export button to get the reversed video.
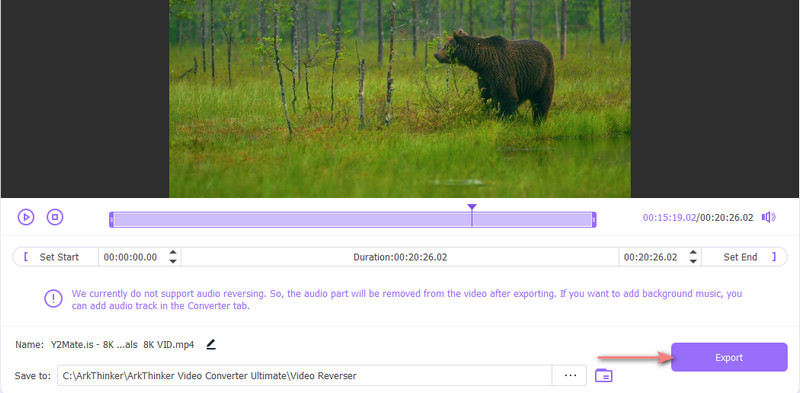
Note: Be reminded that the program does not support reversing the audio. Instead, it removes the audio of the video. Nevertheless, you can still add background music using the tool.
Video Rotator
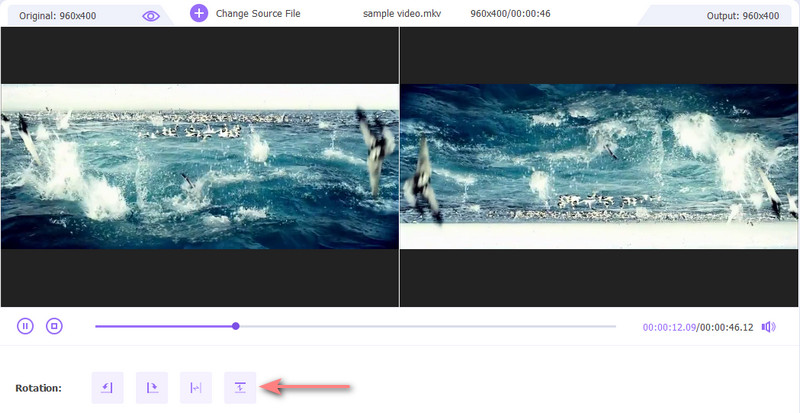
Locate and access the Video Rotator in the Toolbox tab. Then, load the video you wish to rotate.
You can change the orientation from the Video Rotator window by flipping the video horizontally and vertically. Also, you may rotate the video to 90 degrees, 180 degrees, or 270 degrees clockwise or counterclockwise.
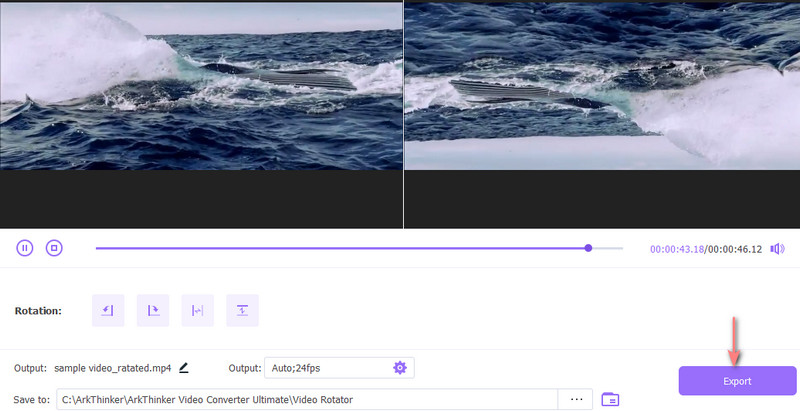
Rename the video, modify the output settings and set a saving path. Finally, click the Export button to produce the rotated video.
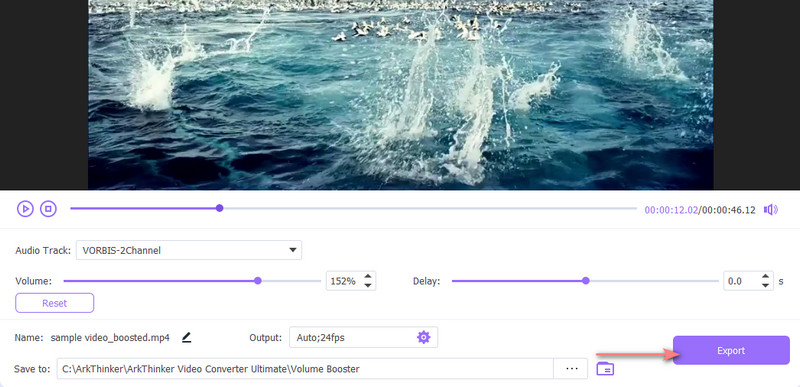
Volume Booster
Choose Volume Booster in the Toolbox tab and import your target video.
Depending on the video, whether loud or inaudible, you can adjust the volume accordingly. Drag the Volume slider to the left to reduce the volume, or drag to the right to increase the volume.
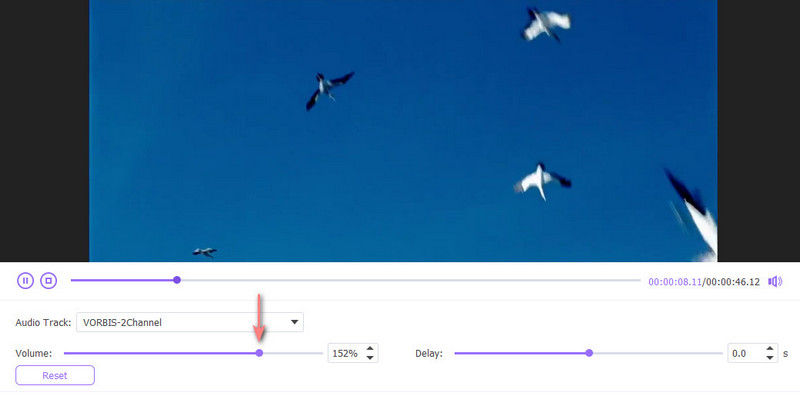
Finally, set a file destination and hit the Export button to produce the edited video.
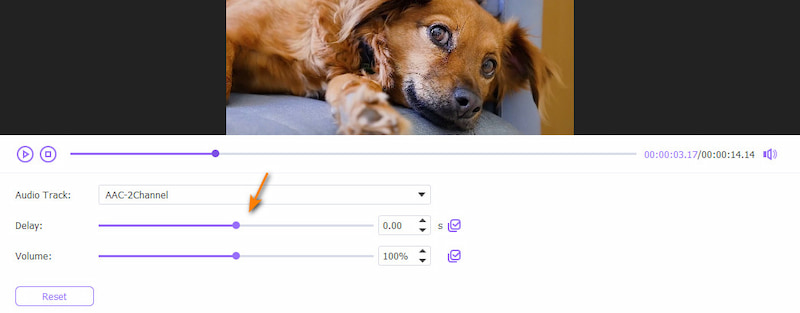
Audio Sync
Access Audio Sync from the Toolbox tab and load the video to Audio Sync.
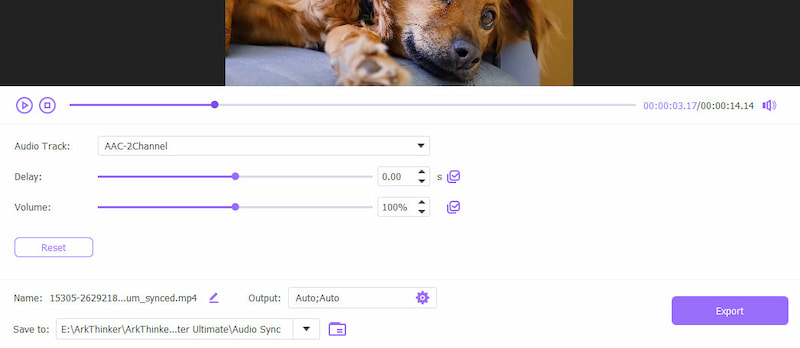
Simply drag the Delay slider left to slow down the audio or drag to the right to speed up and sync the audio with the video.
Once done, you can consider editing the name settings and output folder. Finally, click the Export button to get the edited video.
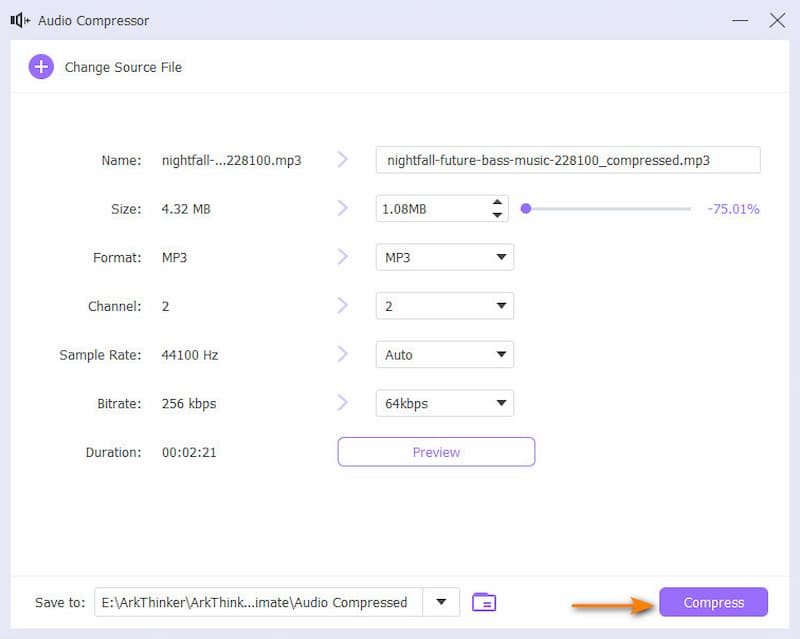
Audio Compressor
Click on the Toolbox tab on the top menu of the program. Next, select the Audio Compressor. The import window will appear.
Add an audio file you want to compress. Then, you can edit the audio size, format, channel, sample rate, and bitrate. Then Hit the compress button to save the changes.
Noise Remover
Access the Noise Remover from the Toolbox. From the import panel, add the video you want to compress to the import window.
In the setting window, you can choose the Enable audio noise reduction, change Volume and Delay. Then click Export to save your work.
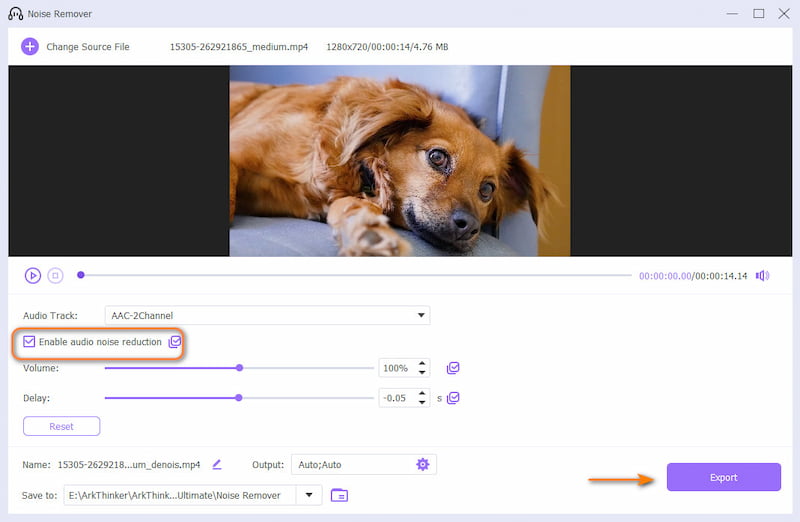
Image Converter
Locate and select Image Converter in the Toolbox tab. Then, add a video by clicking on the plus symbol button.
Choose the image format you want form the Convert All to function. And then click Convert All button.

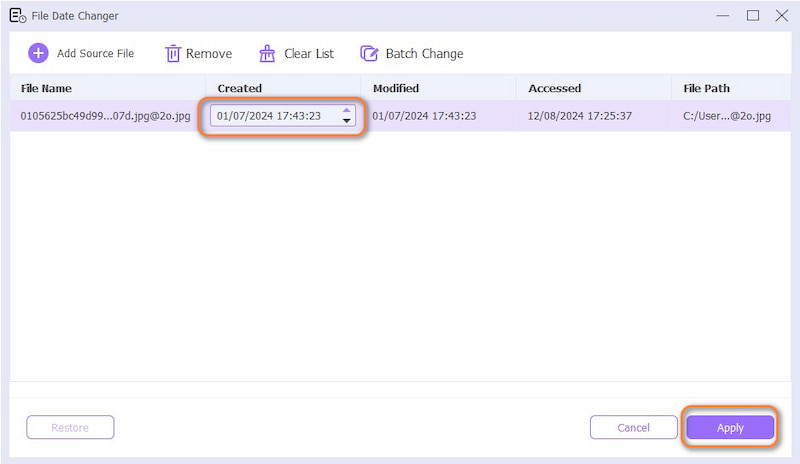
File Date Changer
Choose the File Date Changer tool under Toolbox, Then, add an image by clicking on the plus symbol button.
Then you can edit the date under Created, after you set all done, you can click Apply to finish the final editing.
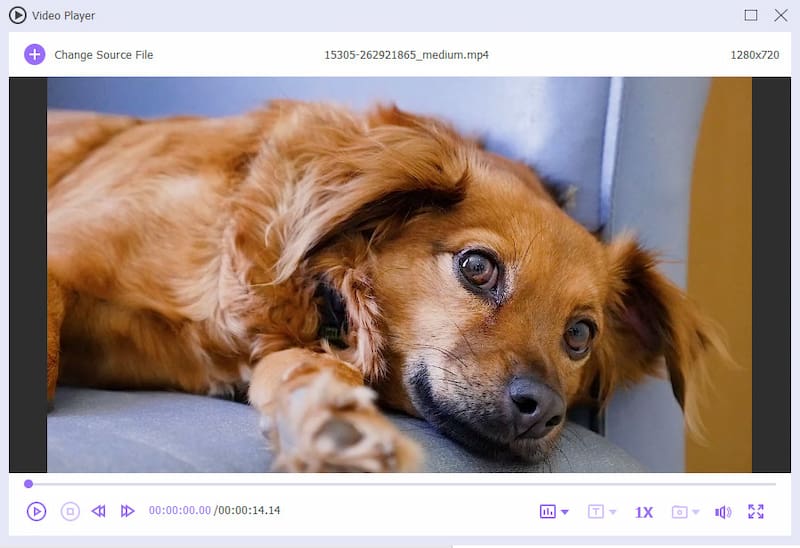
Video Player
Under the Toolbox tab, look for the Video Player option. Next, import a video that you want to play.
Then your video can successfully play, and you can see all the buttons you can adjust the video if you need.
Guide
Get Started
Introduction
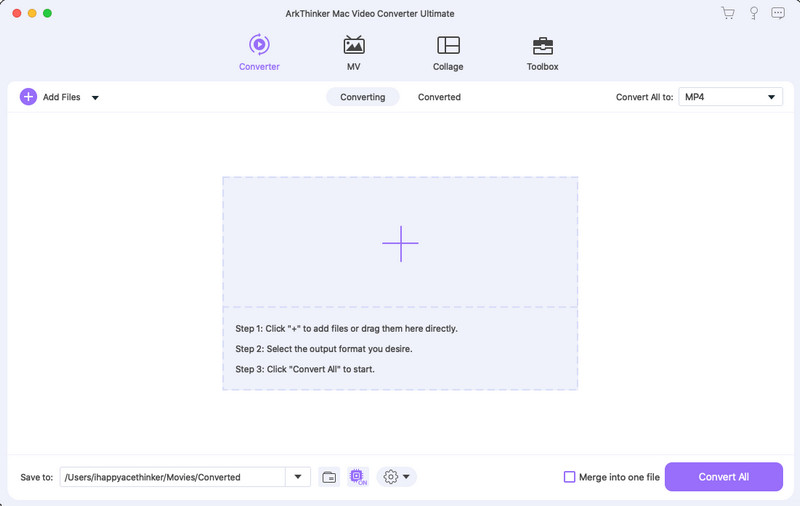
ArkThinker Mac Video Converter Ultimate is a powerful and easy-to-use solution for your media converting and editing needs. You will get the best of both worlds. Additionally, it packs the practical and necessary options to help you improve your productivity. It supports a vast number of video and audio formats. Moreover, the tool is compatible with the latest Mac OS. You can utilize the tool’s video trimmer, rotator, cropper, compressor, enhancer, etc. Aside from that, there are also features like GIF Maker, MV Maker, Media Metadata Editor, Video Reverser, and a lot more. Certainly, ArkThinker is one of the most innovative and robust media solutions.
Download/Install
Get the latest version of ArkThinker Mac Video Converter Ultimate by going to the official page. Then, follow the on-screen instructions to install the program on your computer.
Register
The free version of the ArkThinker Mac Video Converter Ultimate offers some limitations. Better yet, upgrade to its premium version to get the most out of it. Here is how:
Click on the Help button from the menu bar at the top of your Mac screen. Then, select Register. This will bring you to the Registration Center window.
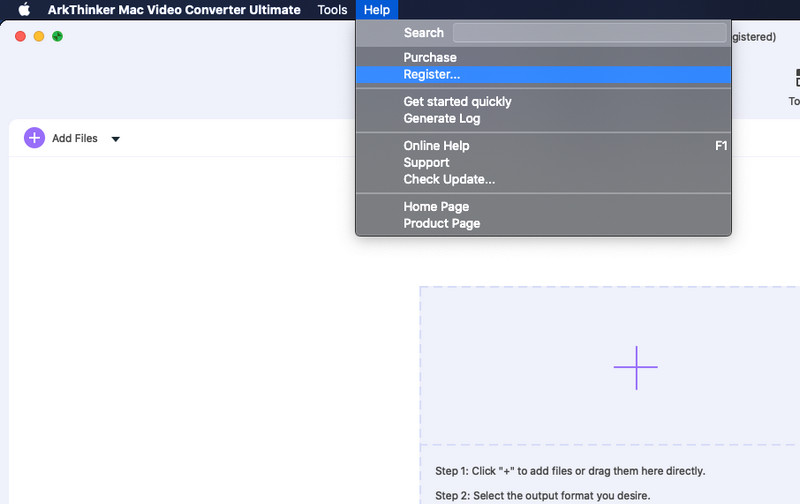
Type your email address on the Email text field and enter the registration code you received from your email. Then, hit the Activate button to upgrade to the premium mode. By then, you can use the full service of the app.

Note: Make sure you are connected to the internet connection when doing this operation.
Check Update
To double-check that your app version is up to date, the following are the steps how to do it.
Click on the Help button that runs along with the top menu of your screen and select the Check Update option.
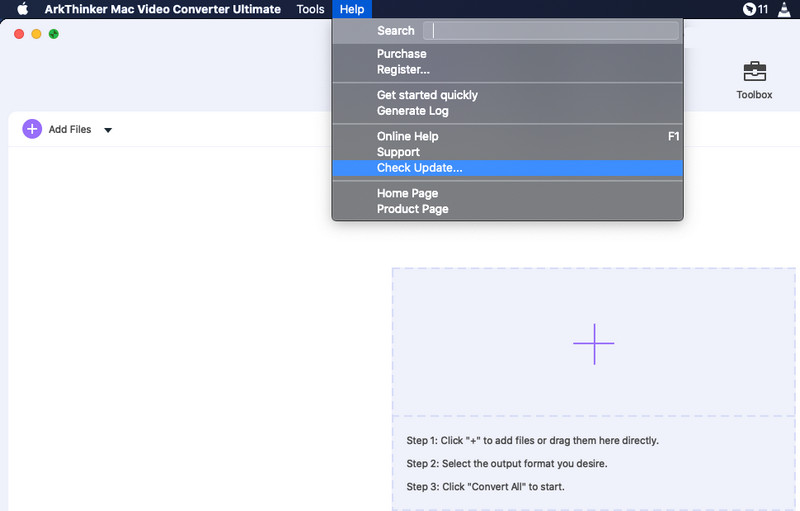
A notification window will appear stating if you have an up-to-date version of the program or not. On the other hand, download the program from the official website to get its latest version.
Note: By downloading the app’s latest version, you will have the perks of enjoying the added features and fixes to some bugs.
Preferences
Before you start operating the program, you can set some preferences according to your needs.
Click the product icon menu, and find Preferences. and the Preference window will appear showing various options you can modify.
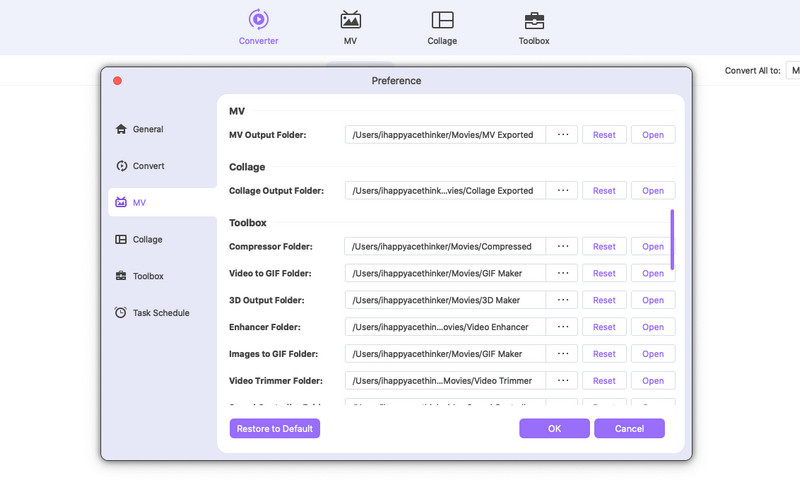
Here are the following options.
General: This tab allows you to tweak options, such as Subtitle Language and Audio Language, you can choose the Auto or pick the one you prefer. This tab also gives you access to Hardware Acceleration and Update Settings.
Convert: The Convert tab allows you to set the output folder for the converted and screenshots taken. Also, you can tweak the format and maximum convert tasks. Other options include enabling the removal of a source file and keeping the creation date of source file options.
MV: In the MV tab, you can set a saving path, where you wish to save the exported files from MV Maker.
Collage: You can also change the output folder for the exported files in Collage Maker from this tab.
Toolbox: The Toolbox tab allows you to set the file destination for the output files of different tools, like compressor, GIF maker, enhancer, 3D maker, trimmer, etc.
Task Schedule: In the Task Schedule option, you are given options for what happens next when the task is finished. The actions include opening the output folder, shutting down the computer, exit the program, or do nothing.
Main Features
Convert Video & Audio
After downloading and installing the program, launch it on your computer. Now, follow the steps below to learn how to convert videos using the ArkThinker Video Converter Ultimate.
Import a video/audio file
Next, click on the Plus symbol in the middle of the interface and look for the media file you wish to convert. You can also utilize the drag-and-drop feature of the program to import media files directly and quickly.
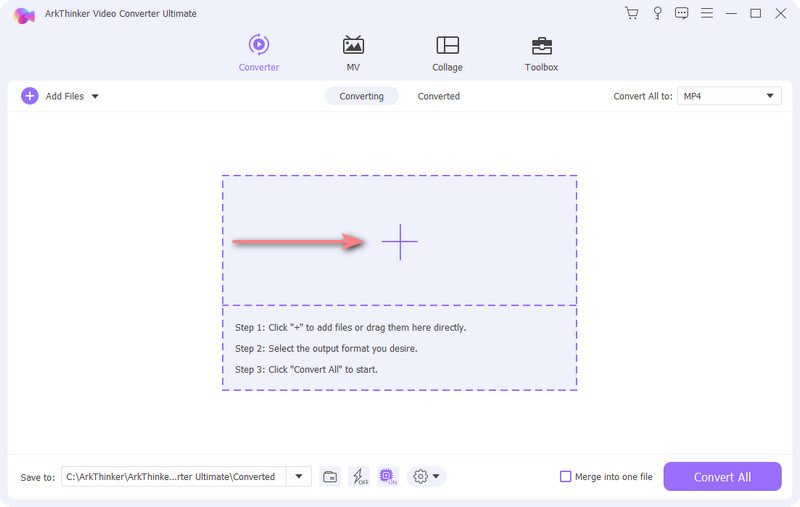
If you convert a folder of media files, you can upload them by ticking the Add Files button at the top left section of the interface.
Select an output fo rmat
This time, expand the Profile menu. Choose tabs depending on the media file you uploaded. There are Video, Audio, and Device tabs. After that, choose your target format.
Set a file destination
After choosing your target format, set an output folder where you wish to save the resulting file. Click on the drop-down menu at the bottom and choose Browse and Select folder.
Convert media files
Once all is set, click on the Convert All button at the bottom right corner to begin the conversion process.
Check the converted files
In a few minutes or hours, the process will be done. Yet, depending on the length or size of the file, the time for finishing the conversion may vary. You can locate the final output from the output path you set.
Edit Video & Audio
ArkThinker Video Converter Ultimate is also a very comprehensive tool. You can even use it to edit video or audio. The detailed steps are following.
Import a video/audio file
First, import the video or audio file you want to edit. Once the file is imported, clicking on the marked icon in the image will take you to the edit function.
Rotate or crop your video
Now, you’re on to the first editing feature, rotate and crop. Here, you can set the desired data, such as the crop area and aspect ratio. In the meantime, you can also rotate your video in any direction.
Add effect or filter to the video
In this function, you can set the effects and filters of the video yourself. You can set contrast, saturation, brightness, and hue to make your video more beautiful and vivid.
Set your watermark
In this part, you can set the personalized watermark. You have many options, such as no watermarks, custom text, or image watermarks. At the same time, you can adjust the size, color, and position of the watermark content. The image below is a text watermark.
Adjust audio settings
Moreover, if your video has problems such as blurry background sound or out-of-sync audio and picture, you can adjust it yourself to achieve the desired effect. You can also import the audio track you want from your local area.
Add a subtitle to your video
This tool can do the same if you want to add subtitles to your videos. Click on the plus sign marked to import your subtitle text.
Create MV
ArkThinker Video Converter Ultimate is a flexible program that allows you to create professional videos. You can achieve this using your local videos or pictures. Take a look beneath to learn how to use the MV Maker of the program.
Navigate the MV tab
To access the function, go to the MV tab to enter the editing panel.
Add pictures or footage
You can import pictures or videos by clicking the Add button at the bottom left corner of the interface. Once done, you can rearrange the pictures, particularly the order of when the footage should appear.
Apple a theme
Under the theme section, various themes are available for different occasions or events. Select a theme that fits your footage or pictures. You will be able to see the changes from the preview section right after selecting a theme.
Tweak the title and audio track settings
You further enhance the footage by incorporating your desired starting and ending title. Enter the starting and ending titles. Then, tweak the properties by opening the settings for the Font set and Color set. For Audio Track, you can keep the original track or replace it with the audio of your choice. Also, apply effects, like loop play. Adjust volume, and control the speed of the audio.
Export MV
The output format is exported to MP4 by default. But if you wish to change to other formats, kindly go to the Export section. You may expand the options for Format, Frame Rate, Resolution, and Quality. Additionally, change the output path and choose actions to happen after the completion of the process. When pleased with the settings, hit the Start Export button.
Make Video Collage
Generating a Video Collage is not as easy as it looks. Yet, with the help of ArkThinker Video Converter Ultimate, everything is simple and easy. See the details below to see how it works.
Navigate the Collage tab
Access the Collage tab by selecting it from the menu bar on the top. Select a collage split-screen layout according to your needs.
Import video files
Now, click on the Plus button to browse and select video files. Then, modify the video by adjusting the size.
Edit the video collage
You can edit videos individually by hovering your mouse cursor over the selected video. From the menu, you can mute the audio, trim or cut the video, and replace it. After that, apply a filter to make the video collage attractive.
Add background music
Choosing the background music is important. To change the background music, tick on the Background Music option to enable the setting. Then, click on the Add icon and choose your target music. Otherwise, select Keep the original audio track.
Aside from adding background music, you can apply audio effects, including Loop play, Fade in, and Fade out. Additionally, you can change the delay and volume as you please.
Export the video collage
Now, go to the Export tab and configure the necessary parameters like frame rate, format, resolution, and quality. Hit the Start Export button at the bottom right corner to produce the video collage when all is set. If you prefer, you may share the collage on social media platforms.
More Editing Tools
Since ArkThinker Video Converter Ultimate incorporates added features and functions, it would be best to learn about them. Most of them are located under the Toolbox tab. Below are the tutorials on how to use these functions.
Media Metadata Editor
Click on the Toolbox tab on the top menu of the program. Next, select the Media Metadata Editor. The import window will appear.
Add a file that you wish to edit the metadata of. Then, edit the cover, file name, artist, album, track, comments, and year. Also, you can add a thumbnail to the video. Finally, hit the Save button to save the changes.
Video Compressor
Under the Toolbox tab, look for the Video Compressor option. Import a video you wish to compress by clicking the Plus sign button from the appearing window.
Right after, modify the size, format, bitrate, resolution, and bitrate of the video.
Preview the video. When you are delighted with the result, click on the Compress button to begin the process.
Video Watermark Remover
Access the Video Watermark Remover from Toolbox. From the import panel, click the Plus sign button to load a video.
Click on the Add watermark removing area. Then, drag the frame to the area where the watermark is placed. Then, modify the size and the position of the frame.
Preview the output result by hitting the Play button. Adjust accordingly by observing closely the area where the frame is placed. Then, hit the Export button to get the final result.
GIF Maker
Locate the GIF Maker in the Toolbox tab. Next, select whether you want to make a GIF from a video or make GIF using several pictures. Add a media file based on your selected option.
You can access video editing features like Effect and Filter, Watermark, Audio, Rotate & Crop, and Subtitle.
Hit the Generate GIF button to produce the GIF.
3D Maker
Locate and select 3D Maker in the Toolbox tab. Then, add a video by clicking on the Plus symbol button.
There are several options to make 3D. You can choose among:
Anaglyph: With this option, users have the option to apply the 3D effect from Red/Cyan anaglyph, monochrome/half color/full color/quality Dubois; Green/Magenta anaglyph/half color/full color; Amber/Blue anaglyph, monochrome/half color/full color.
Split Screen: Top and Bottom (Half-Height), Top and Bottom (Full), Side by Side (Half-Width), Side by Side (Full).
Depth: The depth of an anaglyph 3D can be changed from 0 to 15.
Switch Left/Right: You can use the orientation using the Switch Left/Right to change from Left/Right to Right/Left. Or from Right/Left or Left/Right.
Lastly, tick the Generate 3D to confirm the creation of 3D making.
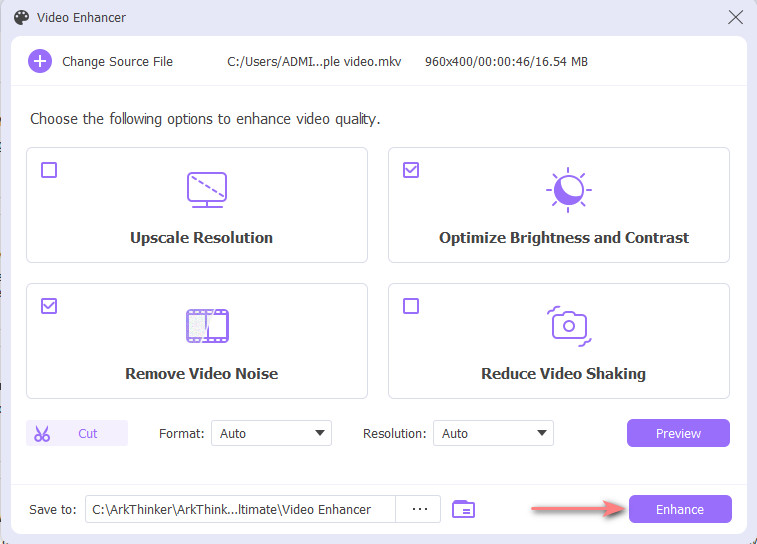
Video Enhancer
Under the Toolbox tab, look for the Video Enhancer option. Next, import a video that you wish to enhance.
This option offers four options to enhance a video. There is Upscale Resolution, Optimize Brightness and Contrast, Remove Video Noise, and Reduce Video Shaking. Choose from the following options.
Lastly, click the Enhance button to enhance the video.
Video Trimmer
First off, look for the Video Trimmer option from the Toolbox tab. Next, load a video to trim.
Drag the left and right handlebars on the progress bar or enter the starting and ending points at the bottom of the progress bar.
You can add more segments by clicking on the Add Segment button on the left side portion of the interface. Or split a segment individually by time or by average.
You can also apply effects like the Fade in/out beneath the progress bar. You can modify the output and set a file destination for the final touch. After all these actions, click on the Export button to confirm the process.
Video Merger
Locate and access the Video Merger from the Toolbox. After that, add videos you wish to merge into one by clicking the Plus button at the bottom of the interface.
Next, arrange the order according to your preference. You may drag the clip to its proper position or use the Forward or Background feature. Optionally, you can add ahead or behind a selected clip using the Ahead and Behind features. If you hope to trim and edit a clip, you can also do so.
If you have finished the modification, you can move forward to changing the name, output settings, and saving path for the output file. Then, tick the Export button to produce the merged videos.
Video Cropper
Access the Toolbox tab and choose Video Cropper from the options.
Now, drag the aspect ratio and adjust the points to retain the chosen areas of the video. Optionally, you can set a value of Crop Area to adjust the aspect ratio.
Hit Preview to see the resulting file in advance. Tick the Export button to save the cropped video if you are delighted.
Video Watermark
From the Toolbox tab, choose the Video Watermark option. Then, import a video.
Choose Text Watermark to add a watermark to text. Also, you can add a logo by clicking on the Image Watermark. If you wish, you can also add both text and image watermarks to a video.
The text and image are highly customizable. You can modify the font, color, and the duration period when and how long it should appear in the video. For the image, rotating and adjusting the opacity is possible. Along with this, you can also adjust the duration time of the image watermark.
Once everything is set, click on the Export button to save your copy of the edited video.
Color Correction
Access the Color Correction and add a video you wish to correct the color of.
In the editing panel, you can alter the Contrast, Saturation, Brightness, and Hue according to your requirements. See the final version of the video by clicking the Preview button.
If you are delighted with the results, tick the Export button.
Video Speed Controller
Select Video Speed Controller in the Toolbox tab. After finding the option, immediately add a video by clicking the Plus button from the import window.
You will see several playback speed options by then. Choose one that suits your preferences well.
Before exporting, you may modify the video/audio settings and the file destination of the output video. Lastly, click the Export button to get the edited video.
Video Reverser
From the Toolbox tab, choose Video Reverser. Immediately add a video.
Select the part of the video that you wish to reverse using the handlebars or set the duration period.
Finally, click the Export button to get the reversed video.
Note: Be reminded that the program does not support reversing the audio. Instead, it removes the audio of the video. Nevertheless, you can still add background music using the tool.
Video Rotator
Locate and access the Video Rotator in the Toolbox tab. Then, load the video you wish to rotate.
You can change the orientation from the Video Rotator window by flipping the video horizontally and vertically. Also, you may rotate the video to 90 degrees, 180 degrees, or 270 degrees clockwise or counterclockwise.
Rename the video, modify the output settings and set a saving path. Finally, click the Export button to produce the rotated video.
Volume Booster
Choose Volume Booster in the Toolbox tab and import your target video.
Depending on the video, whether loud or inaudible, you can adjust the volume accordingly. Drag the Volume slider to the left to reduce the volume, or drag to the right to increase the volume.
Finally, set a file destination and hit the Export button to produce the edited video.
Audio Sync
Access Audio Sync from the Toolbox tab and load the video to Audio Sync.
Simply drag the Delay slider left to slow down the audio or drag to the right to speed up and sync the audio with the video.
Once done, you can consider editing the name settings and output folder. Finally, click the Export button to get the edited video.


