


Android Record Audio: Different Built-in Features to Record Audio
Do you want to record your voice while you are singing? Or listen to your voice while delivering your line in your roleplay? You can also record your audio while practicing what you say in reporting, whether at school or work. All of that is possible to do by using an audio recording tool. The good thing about today is that our mobile devices have built-in audio recording applications, and Android is no exception. Because of that, you do not need to download a recording tool to record your audio. This post will supply different ways how to record audio on Android. It will present different Android phones with a built-in audio recording tool. To get to know them, read more, and proceed to the following parts.

- GUIDE LIST
- Part 1. How to Record Audio on Android
- Part 2. Best Phone Recorder to Grasp Sound with High Quality
- Part 3. FAQs about Android Voice Recorder
Part 1. How to Record Audio on Android
A period reaches when you ought to record audio on your Android device, whether you are a student or an employee. There are cases where you need to practice your speech or report by recording your audio and then listening to it. You can listen to your presentation before presenting it to others. This part will teach you how to record audio on Android with the built-in recorder. To get to know them, proceed to the following information.
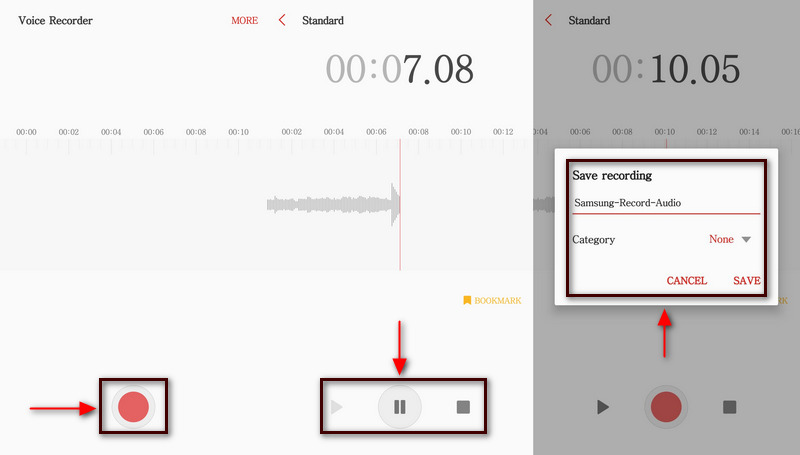
1. Samsung
Head over to the Voice Recorder application on your phone.
You will see a rounded-red button from the lower part of your screen, which signifies recording. Hit that rounded-red button to start the recording process.
If you want to pause your recording, click the Pause button on the lower left of your screen. If you are done recording your audio and want to stop the recording process, click the Square-white button. It is placed in the lower right part corner of your screen.
After that, input your preferred file name to your output before saving it, and it will save as an M4A file. In addition, you can find your recorded audio on your My Files under the Audio section.
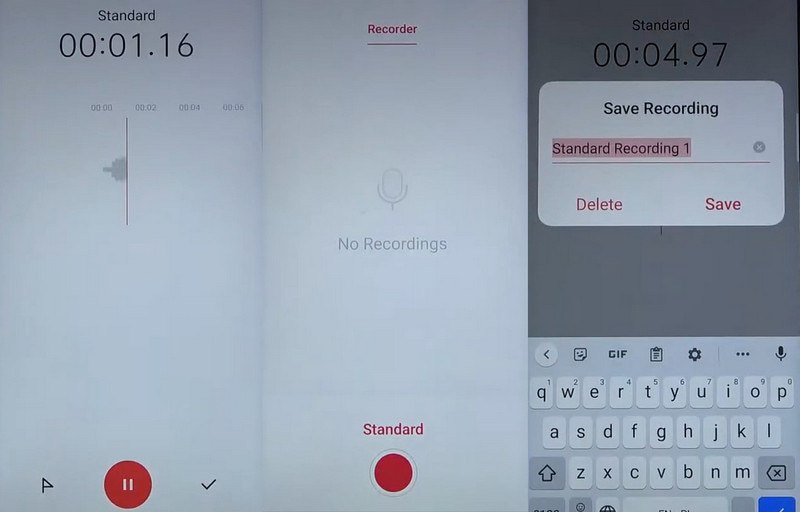
2. Pixel
Using your Pixel phone, open the Recorder application.
On your screen, click the Red-rounded button to start recording your audio. While recording, you will see a text that says Recording in Progress in your notification bar.
If you want to stop the recording process, click the Round red button that represents a pause. Also, if you want to continue the recording again, click the Resume button. In addition, you can also click the Delete button if you want to redo the recording.
Click the Save button if you are done recording your audio and have already said what you want to say. In addition, to name the recording, select Add Title, and the system will suggest keywords for your file name. Also, you can choose your preferred location on your phone, where to save your recorded audio.
3. OnePlus
From your home screen, hit the Recorder application to get started.
You will see the Microphone icon from the lower part of your screen. Hit that icon, and the recording process will start. When you are done recording your audio, in the lower right corner, hit the Stop icon.
A dialogue box will appear on your screen, where you will input your file name. After that, hit the Save button to save your recorded audio in your file folder.
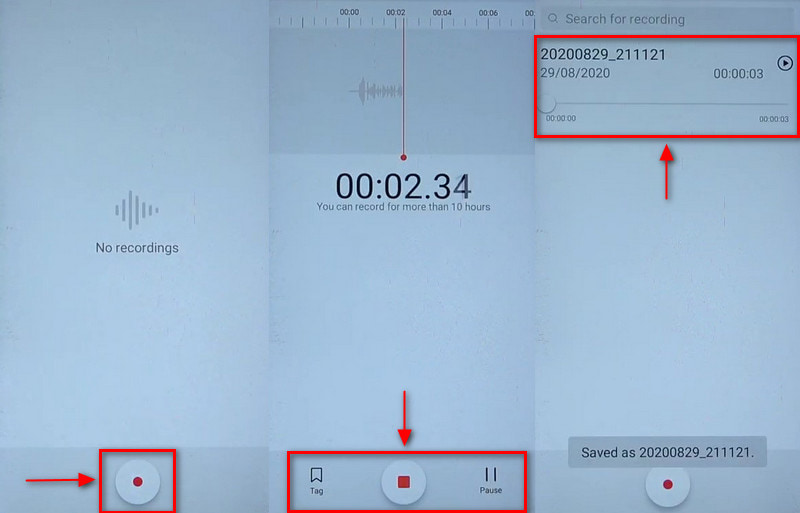
4. Huawei
Locate your Recorder application on your Huawei phone.
On the lower part of your screen, click the Round white circle button to start recording your audio.
While recording, you can click the Tag button to input sound in music or other audio streams. Also, click the Pause button if you want to stop for a while. Once done, click the Rounded-white circle button to stop the recording.
After that, your recorded audio will show on your screen, where you can play and listen to it.
5. Oppo
Using your Oppo phone, look and click the Recorder application.
Click the Rounded-red button and begin to record your audio.
If you want to pause for a moment, click the Pause button in the lower-middle part of your screen. Once you are done recording your audio, click the (✔) button to stop it. After that, enter your file name, and save it.
Part 2. Best Phone Recorder to Grasp Sound with High Quality
If you are looking for a program capable of recording your phone, you can count on ArkThinker Screen Recorder. This program has a straightforward interface, where you can easy to navigate and master it. It is easy to use if you are a beginner, as it guarantees you accomplish your goal in minutes. This program has a built-in feature to record your screen activities and audio, whether you are an iOS or Android User. To successfully record your phone audio and screen, you will need to download an application to your phone. To get to know that and begin the process, proceed to the following guide.
Download and Install ArkThinker Screen Recorder
To have complete access, download and install the program to your desktop computer. After the installation process, proceed to open the program.
Open Phone Recorder
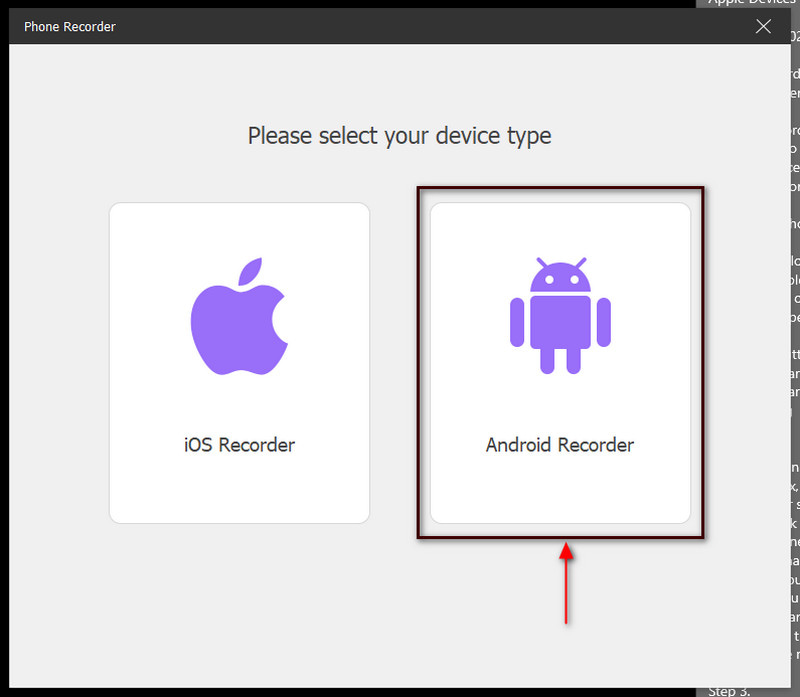
From the program's main interface, locate the Phone inside the box, where Window and Webcam are also located. Next, on your screen, it will ask you to select your device type and click the Android Recorder button. It will ask you to download the Fonelab Mirror application on your phone. Remember that your Android phone and desktop computer should be connected on the same WLAN. After that, open your Android phone, and select a way to cast the screen. You can tap the Detect icon, enter the PIN code, or scan the QR code. Afterward, your phone screen will be mirrored to your desktop computer.
Start Audio Recording
Below the preview window, click the Recording Content. From there, uncheck the Screen, tick the box beside the Speaker button, and select Phone Microphone. Once done, hit the Record button to start the recording process.

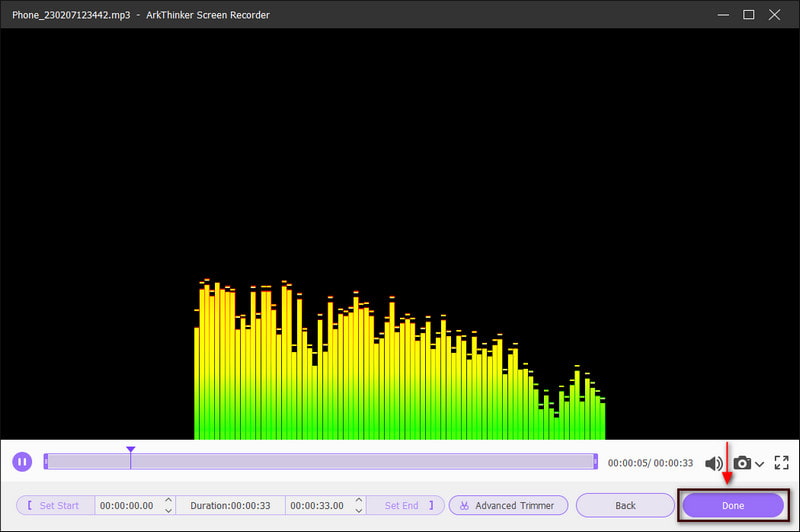
Save Audio Recorded
Click the Pause button if you want to pause for a while, and click the Resume button if you want to continue again. When you are done recording your audio, proceed to the Stop button. After that, you can listen to your recorded audio and hit the Done button to save it.
Find More Solutions
4 Easy Methods to Edit Audio Files on Windows and Mac Audio Cutters: Offline and Online Tools to Cut Audio FilesPart 3. FAQs about Audio Voice Recorder
What is the best way to record audio on Android?
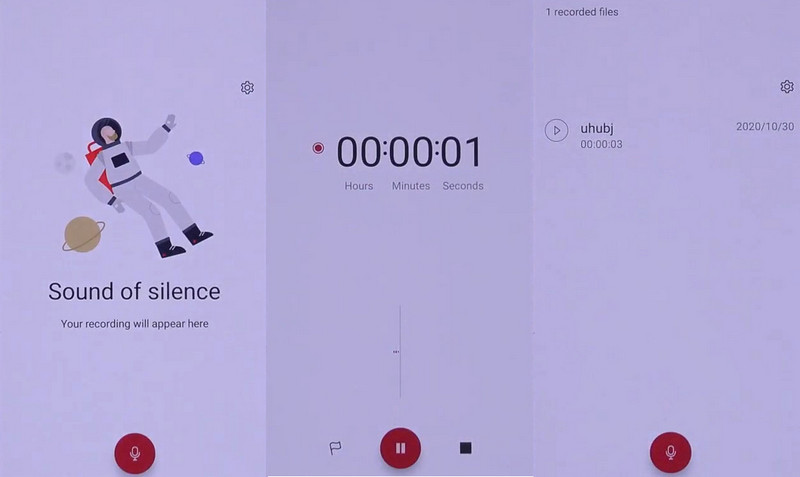
Your Android device has a built-in voice recorder application. If you want to use it, search Sound Recorder in the list of your application. But if you are using an older version of Android, swipe up your phone's home screen. The built-in Sound recorder application can record your audio and plays back audio files.
How long can Android voice recorder record?
Your Android device can record up to 18 hours on a single recording. It can record your audio even if your phone is locked or sleeping. Also, you will see currently recording text on your notification section when you are recording.
How long can Samsung voice record for?
An Android voice recorder can record as long as the device has power and space. 100-700mb for an MP3 at 256kpbs, and Mono at 48 is about 4-5gigs per hour in music in a 24bit WAV file. It is important to check the file, audio type, and data rates.
Conclusion
Nowadays, many emerging mobile phones have built-in audio recording tools. Because of that, you can save time searching for another application. Your work will be more accessible because you will record your audio directly on your mobile device. Through this post, you will learn to record audio on Android, as it will also mention different Android devices with steps. In addition, you can also use ArkThinker Screen Recorder to record your audio with high-quality output.
What do you think of this post? Click to rate this post.
Excellent
Rating: 4.9 / 5 (based on 511 votes)
Relative Articles
- Record Audio
- How to Record Vocals in Ableton Live: Step by Step
- Best MP3 Recorder to Record Computer Sound and Microphone
- How to Replace Audio in a Video On Different Devices 2022
- How to Clip Audio in Audacity, WMP, iMovie, Online, Trimmer
- 4 Easiest Ways to Change and Edit Audio Volume on PC and Mac
- 4 Easy Methods to Edit Audio Files on Windows and Mac
- How to Compress Audio Files Without Losing Sound Quality
- How to Combine 2 or More Audio Files on Different Devices
- 5 Best Music Tag Editors for iPhone, Android, PC, and Mac
- Add Album Art to MP3 on Windows, Mac, iPhone, and Android