


Ultimate Guide on How to Screen Record on Windows 11/10/8/7
How to screen record with audio on Windows?
For plenty of reasons, you may want to capture your computer screen. Microsoft brings a built-in screen recording tool in Windows 10 and 11. It is mainly used for capturing gameplay. But you can record other screen activities, such as meetings, webinars, webcams, and more.

This post gives you a detailed guide on how to record screens on Windows. You can use the default Xbox Game Bar to record your gameplay on Windows 10 or 11. Also, you get screen recorder recommendations, including professional and free online ones to capture screen on your Windows PC.
- GUIDE LIST
- Part 1. Screen Record on Windows 11/10 with Game Bar
- Part 2. Best Way to Screen Record with Audio on Windows 11/10/8/7
- Part 3. Start a Screen Recording on Windows 10 and 11 Using OBS Studio
- Part 4. Free Online Recorder to Capture Windows Screen
- Part 5. FAQs of How to Screen Record on Windows
Part 1. How to Screen Record on Windows with Xbox Game Bar
In Windows 10 and 11, you have a pre-installed screen recording utility called Xbox Game Bar. As mentioned above, it is specially designed to record a video of your gameplay. You can also use it in a non-gaming app to record your actions or make a video tutorial on a Windows laptop. You can follow the steps below to record the screen with audio on a Windows 11 or Windows 10 computer using it.
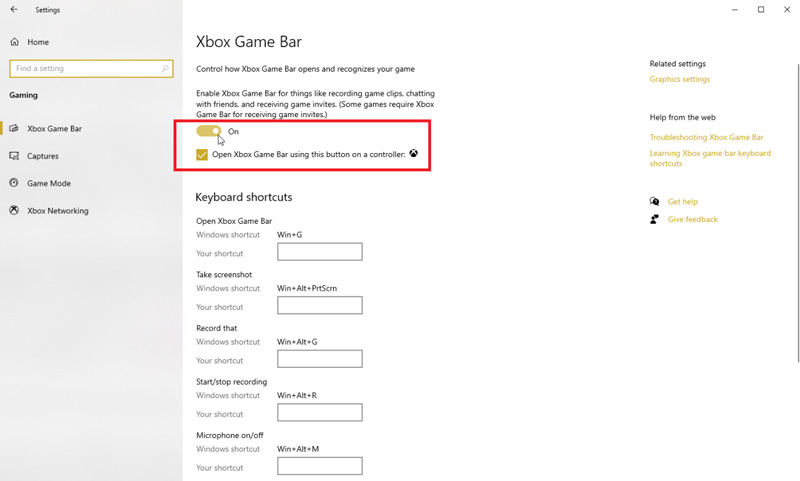
Before you screen record on Windows, you should enable Xbox Game Bar first. You can simultaneously press the Windows + I keys to enter Windows Settings, type Xbox Game Bar in the search field to locate it, and then turn it on by switching its slider to the On position. You can scroll down the page to check related keyboard shortcuts.
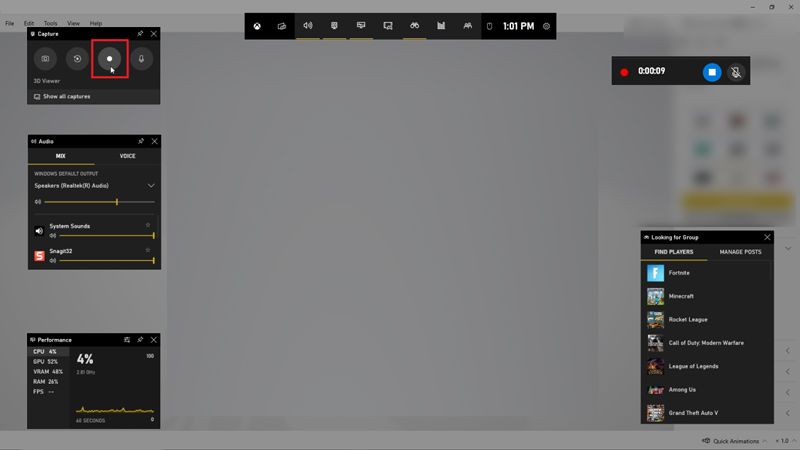
Press Win + G keys simultaneously to display the Game Bar controls. Click the Settings icon, choose Capturing on the left panel, and ensure Game Bar can capture audio when you make a screen recording. It is set to record sounds from your game and the computer microphone. Here you can customize audio recording options based on your need.
When you want to record your Windows screen, press Win + Alt + R keys or click Start Recording to capture your screen activity. You will see a small floating bar appear on the top right of the screen. You can use it to turn on/off the microphone or stop the screen recording. The captured video will be automatically stored on your Windows computer. You can directly view the recording file.
The default frame rate of Game Bar recording is 30 fps. You can improve it to 60 fps. Also, you can set the video quality as standard or high according to your need. This built-in Windows screen recorder has some limitations. Many apps and content can’t be recorded by Xbox Game Bar. For instance, you cannot capture your Windows desktop and File Explorer.
Part 2. Best Way to Screen Record with Audio on Windows 11/10/8/7 Laptops
Suppose you are unsatisfied with the screen recording with Game Bar, or you prefer an all-featured screen recorder with more features, such as high-resolution recording, transitions, editing, and more. You can try using the professional ArkThinker Screen Recorder.
It works well on Windows 11/10/8/7 computers and can capture high-quality screen activities. You can record videos, audio, webcams, specific windows, gameplay, and others. Besides Windows systems, it also supports macOS, iOS, and Android. You can free download it and take the following guide to create a screen recording on Windows.

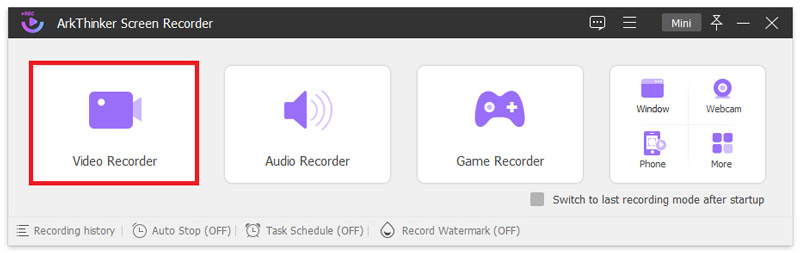
Launch ArkThinker Screen Recorder and select its Video Recorder. You are offered other options to capture audio, webcam, specific window, phone, and gameplay.
It works well on Windows 11/10/8/7 computers and can capture high-quality screen activities. You can record videos, audio, webcams, specific windows, gameplay, and others.
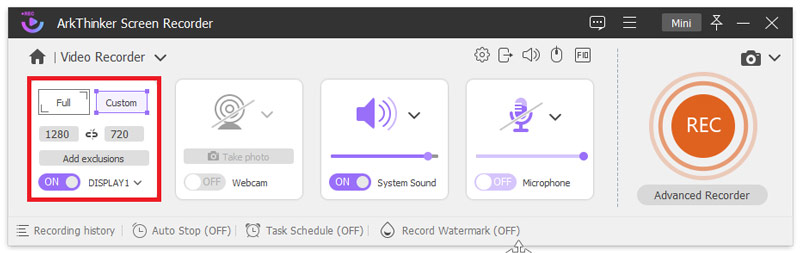
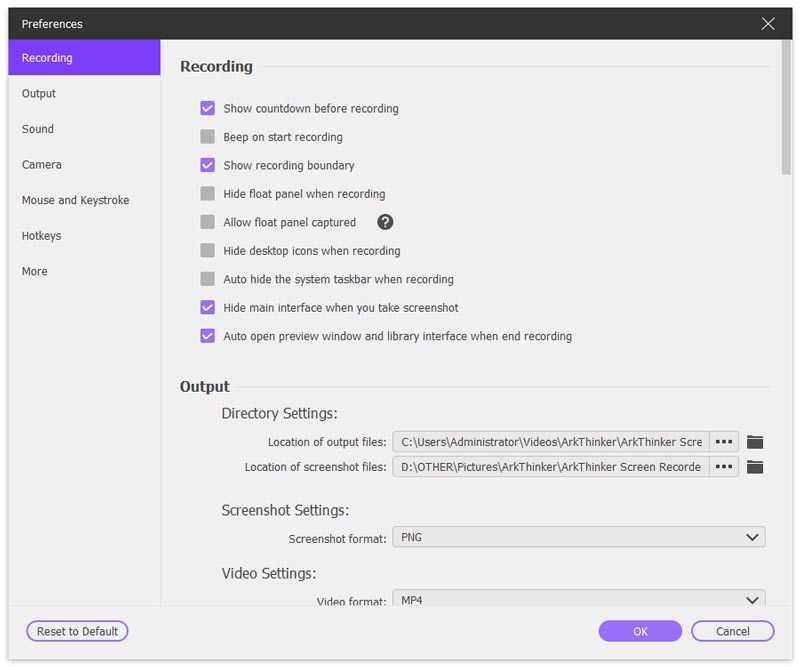
Before screen recording on Windows, click the Record setting icon to enter the Preferences window. You can adjust various recording settings, output, sound, camera, etc.
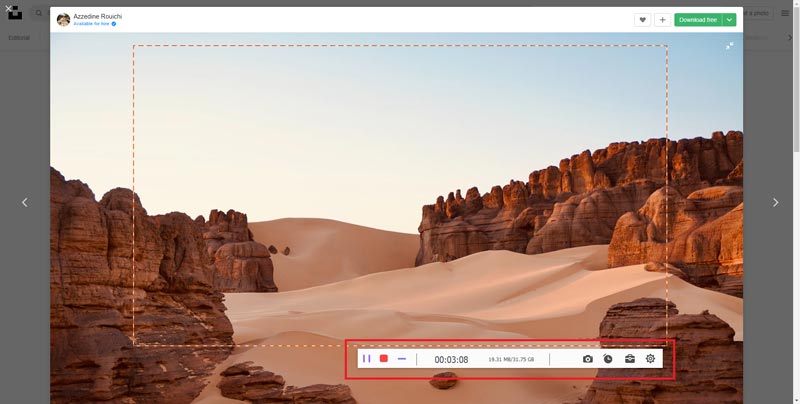
You can simply click the REC button to record the screen on your Windows computer. Click Stop to finish and view your captured video. It allows you to trim the screen recording and remove unwanted content directly.
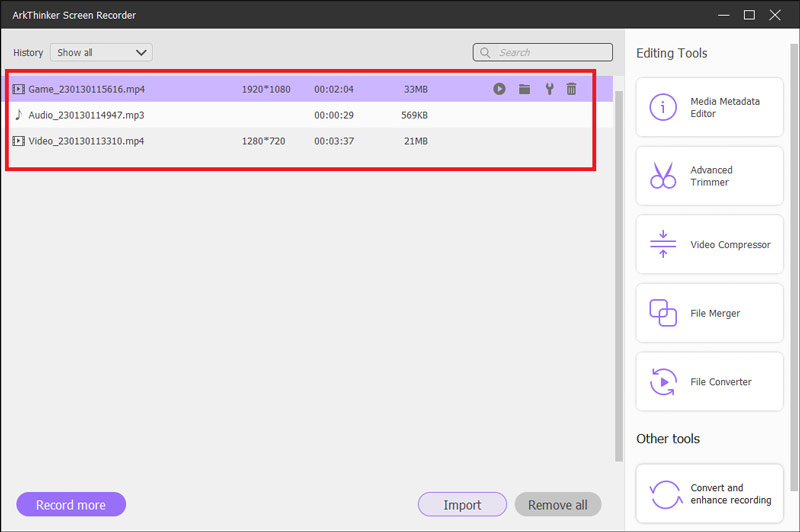
You can click Recording history on the home interface to check your recording files. You can also access more helpful editing tools like Advanced Trimmer, Media Metadata Editor, Video Compressor, File Merger, and more. You can use them to edit your recording and enhance its quality.
Part 3. How to Start a Screen Recording on Windows 10 and 11 Using OBS Studio
OBS Studio is a famous open-source tool for screen recording and live streaming. It lets you capture your Windows, Mac, and Linux computer screen. It can record full screen or selected areas of your Windows 10 or Windows 11 PC. When you install and set up OBS Studio, you can select the best recording quality based on your monitor. It allows you to make high-performance video recordings and mix. Moreover, it lets you use multiple sources to create scenes, including your windows recordings, images, webcams, text, and others.
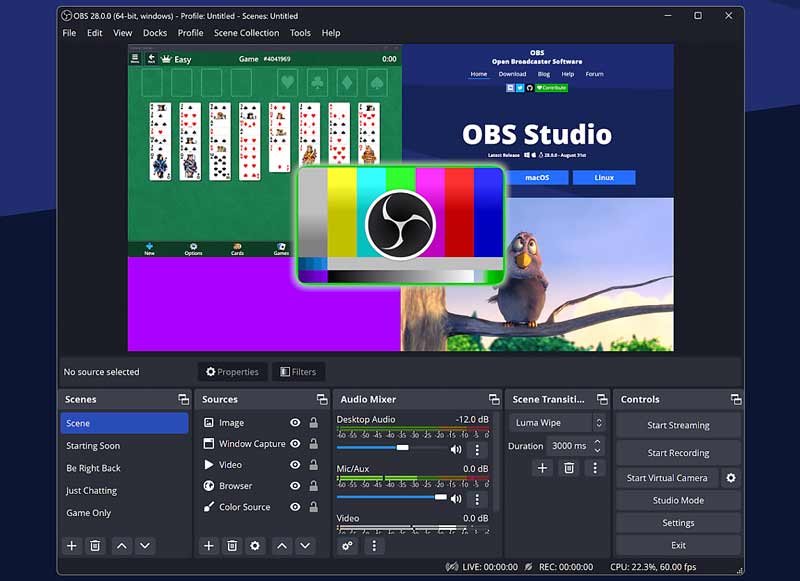
Open OBS Studio, and click the + icon under Sources to display more options. Choose the Display Capture option to add a new source. In the pop-up Create/Select Source window, you can customize the new recording source according to your need.
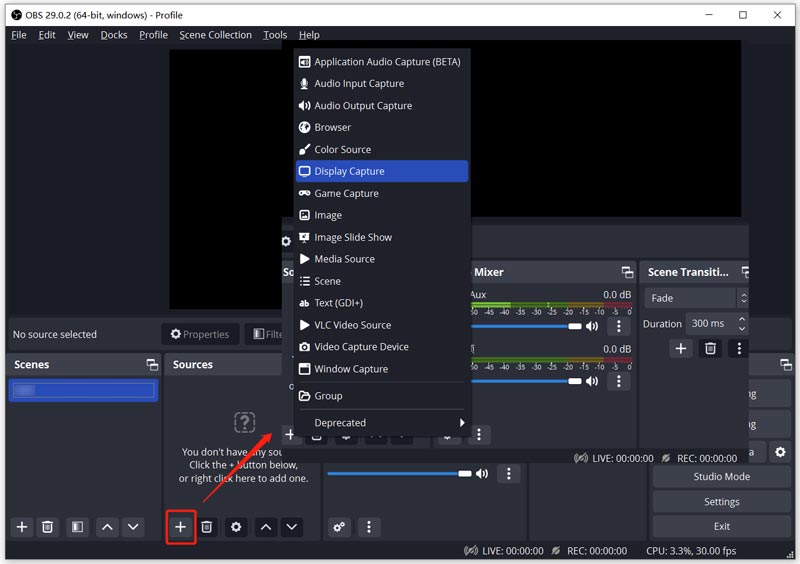
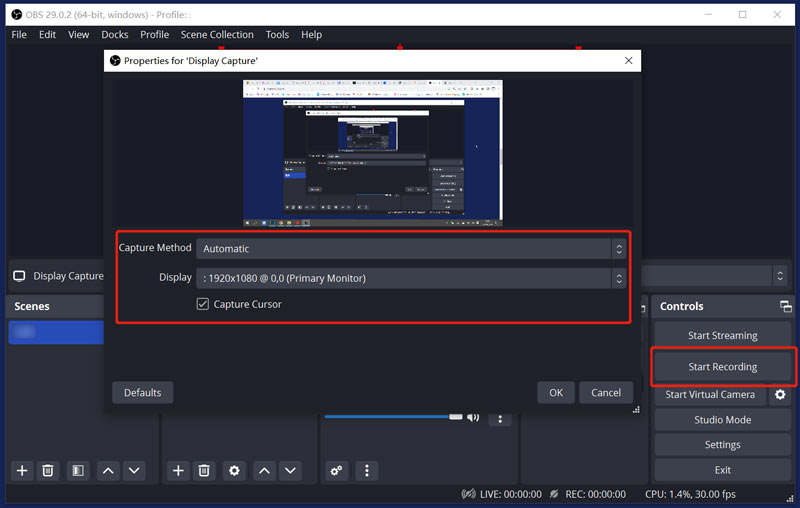
Select your preferred capture method and display. You can enable Capture Cursor if you need. Click OK to save your changes. Then you can click Start Recording to capture your computer screen.
You can freely adjust the Desktop Audio and Mic/Aux under Audio Mixer. You can mute or customize the volume according to the specific recording need. OBS Studio will record sound from running apps and the default Windows audio input device.
You can see the recording time and CPU status on the bottom part of OBS Studio. Click the Stop Recording button when you want to finish the screen recording on Windows.

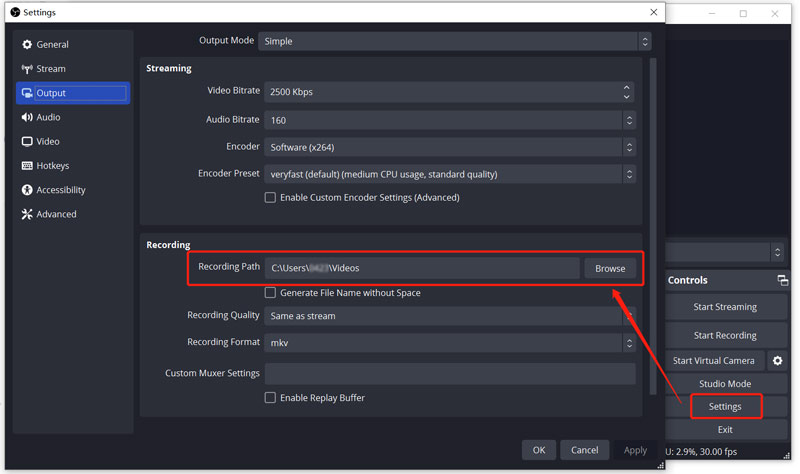
By default, your screen recording file will be automatically stored in the Windows 11/10 Videos folder in MKV format. You can click Settings and Output on the left panel and then click the Browse button to locate it quickly. You can change the recording format to MP4, MOV, FLV, or TS if you prefer another output format.
Part 4. How to Screen Record on Windows Using Free Online Recorders
Besides the screen recordings software recommended above, free recorders can capture your computer screen online. You can easily access many online screen recording tools on the internet. However, most of them are not free and have feature limits. For instance, they may limit the output quality or add a watermark to your recording file. We introduce you to two worth-trying ones to record screens on your Windows 11/10/8/7 PC.
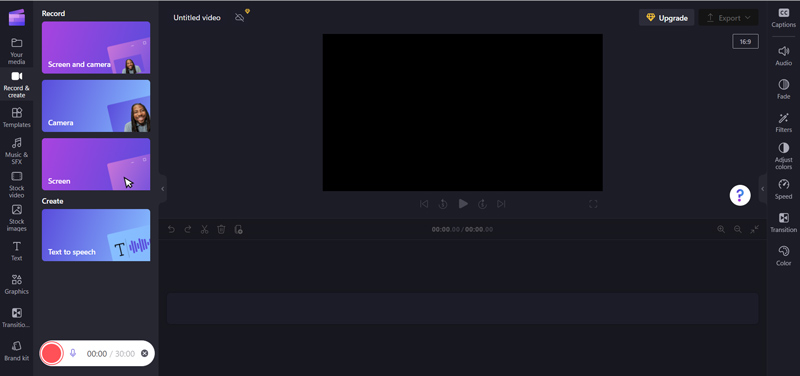
Clipchamp screen and camera recorder
Clipchamp can capture your computer screen and webcam in your web browser. It enables you to record screens with audio on a Windows PC or Mac for up to 30 minutes for free. You can resize the recording to vertical or horizontal aspect ratios to fit your need. Also, you can freely rearrange webcam footage. In addition, Clipchamp allows you to add captions, logos, or personal watermarks to your captured videos. You can select font styles, colors, and sizes as you like.
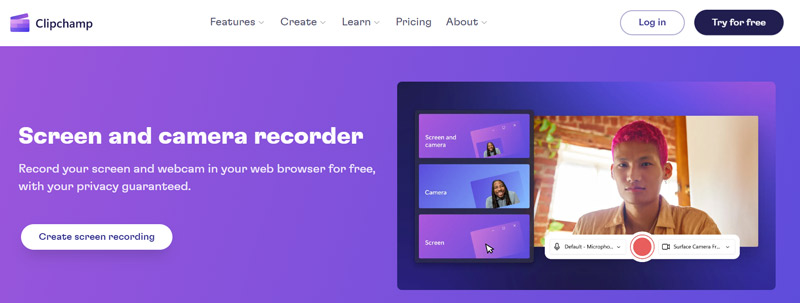
To capture your Windows screen, navigate to the Clipchamp and camera recorder pages and click the Create screen recording button. You need to sign in to an account to use its screen recorder. Afterward, select a suitable recording mode and click the red record button to start. It can capture and export 1080p HD videos with no watermark.
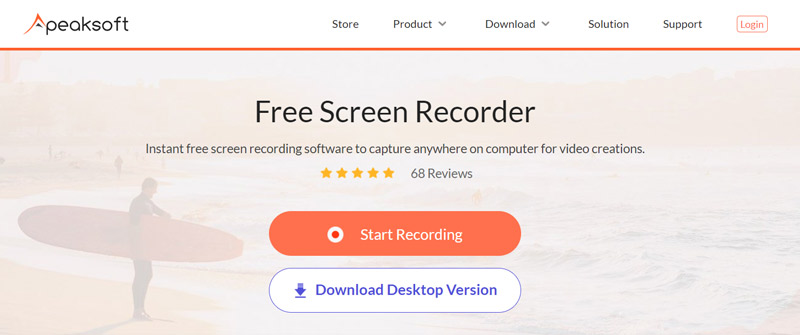
Apeaksoft Free Screen Recorder
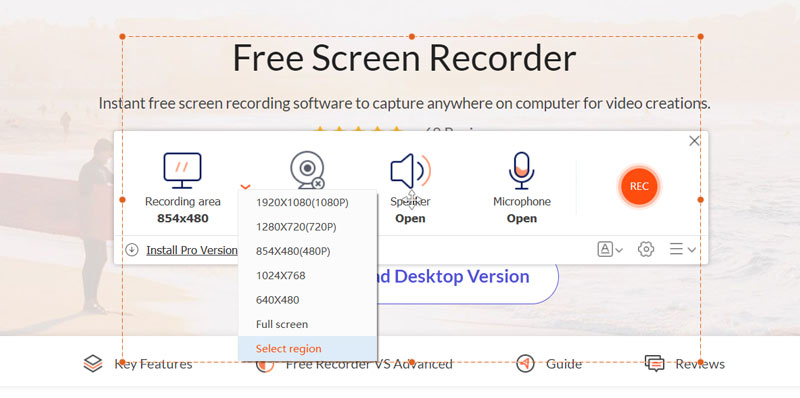
Apeaksoft Free Screen Recorder is a popular video and audio recording tool online. It can help to capture screens on Windows 11/10/8/7 PC, Mac, iPhone, iPad, and Android devices. It has no feature, recording time, account sign-in, and other limits. This online recorder can record high-resolution screens up to 1920 x 1080. It lets you capture the entire screen or customize the region according to your recording needs.
Open a web browser, search for Apeaksoft Free Screen Recorder, and then go to its official website. Click Start Recording to install a small launcher to capture your Windows screen. Adjust the capturing area based on your recording content or window, and click the Record button to start the screen record process. Your recorded video will be automatically stored in MP4 format. You can click the Setting icon to adjust various recording options.
Part 5. FAQs of How to Screen Record on Windows 11/10/8/7
Can VLC record the screen on a Windows computer?
Yes. VLC Media Player is compatible with Windows systems and has a screen recording feature. You can open VLC, click the top Media menu, and select Convert/Save from its dropdown. In the pop-up Open Media window, you can go to the Capture Device tab and select Desktop from Capture mode. Click the Convert/Save button and then set the output recording format. After all these operations, you can click the Record button to record the screen using VLC.
How do you record screens on a Mac for free?
You can easily rely on a free online screen recorder like Apeaksoft to capture your Mac screen. You can also use its pre-installed QuickTime Player to record the screen on your Mac. Launch QuickTime Player, click the top File menu, and then choose the New Screen Recording option to display its screen recorder.
Does iPhone have a built-in screen recorder?
All iPhones with iOS 11 or later have the built-in screen recording feature. You can add it to Control Center and capture your iPhone screen for free. Its iOS screen recorder allows you to capture any activities with audio. It captures sound from your iPhone microphone.
Conclusion
This post gives you a detailed guide on how to screen record on Windows. Whether you use Windows 11/10 or Windows 7/8, you can find a great recorder to capture your computer screen with high quality.
What do you think of this post? Click to rate this post.
Excellent
Rating: 4.9 / 5 (based on 188 votes)
Relative Articles
- Record Video
- Comprehensive Guide to Record Screen or Videos on Mac Computers
- Actionable Methods to Screen Record on Android Phone or Tablet
- 3 Best Ways to Tell You How to Screen Record on Chromebook
- Apowersoft Screen Recorder: Record Screen with Audio at Once
- How to Record TikTok Video on Computer and Mobile
- Thorough Ways to Record Screen With Quicktime on Apple Devices
- OBS Screen Recorder: Powerful Screen and Broadcasting Tool
- How to Fix Audacity Won’t Record Issues in 5 Basic Methods
- How to Enable Google Meet Recording on Your Desktop
- Guidelines on How to Trim a Video on Facebook Effectively