


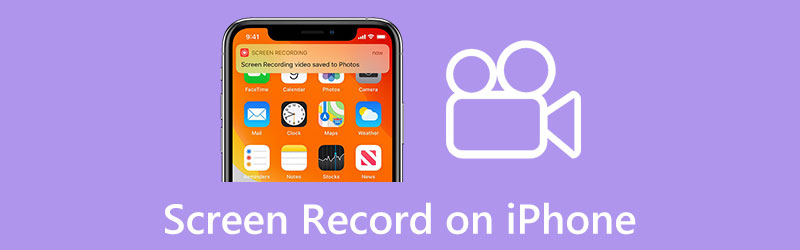
Ultimate Guide on How to Screen Record on iPhone and iPad
iPhone has a built-in screen recording feature designed in iOS to capture any content displayed on its screen. It’s quite useful to record iPhone displays in many contexts. This post tells how to screen record on iPhone 14/13/12/11/XR/X and older models like iPhone SE, iPhone 7, and iPhone 6. Also, you can learn to create a screen recording on your iPad and iPod touch.
- GUIDE LIST
- Part 1. Screen Record on iPhone 14/13/12/11/XR/X
- Part 2. Record iPhone Screen on PC Without Lossing Quality
- Part 3. Create a Screen Recording on iPad
- Part 4. Create Apple Screen Recording with QuickTime
- Part 5. FAQs of How to Screen Record on iPhone and iPad
Part 1. How to Screen Record on iPhone Running iOS 16/15/14/13/12/11
Since iOS 11, you can directly create a screen recording and capture screenshots on your iPhone. This default screen record function is more stable than third-party screen recorder apps. If you are using an iPhone 14/13/12/11/XR/X with iOS 11 or later, you can easily follow the steps below to screen record on your iPhone.
How to add screen record on iPhone
To quickly start screen recording on an iPhone, you should make sure this feature is added to the Control Center. If you don’t see the related button in Control Center, you can take the following guide to add it.
To add screen record on iPhone, you should open the Settings app, scroll down to choose Customize Controls, and then locate Screen Recording under the More Controls tab. You need to tap + ahead of Screen Recording to put it in Control Center. You can freely drag it up or down to arrange its position based on your need.

How to create a screen recording on iPhone 14/13/12/11/X
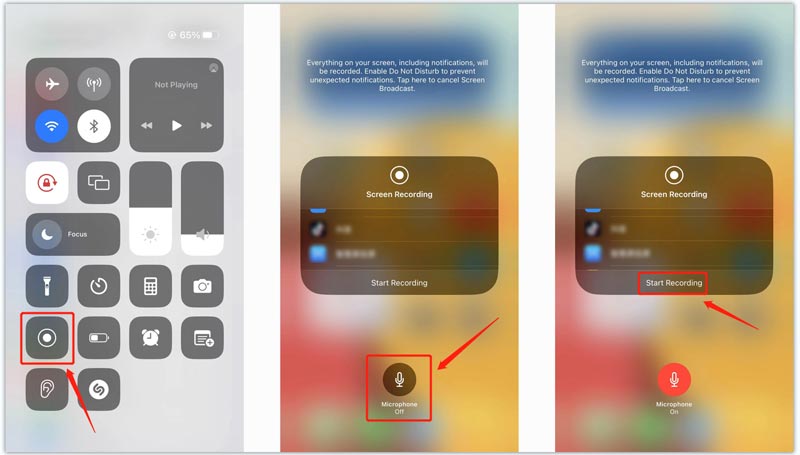
When you want to capture your iPhone screen display, you can open the Control Center menu by swiping down from the top-right corner if your device is iPhone X or later. If your device is iPhone 8 or earlier, you can enter Control Center by swiping up. Locate the Screen Record button and tap it.
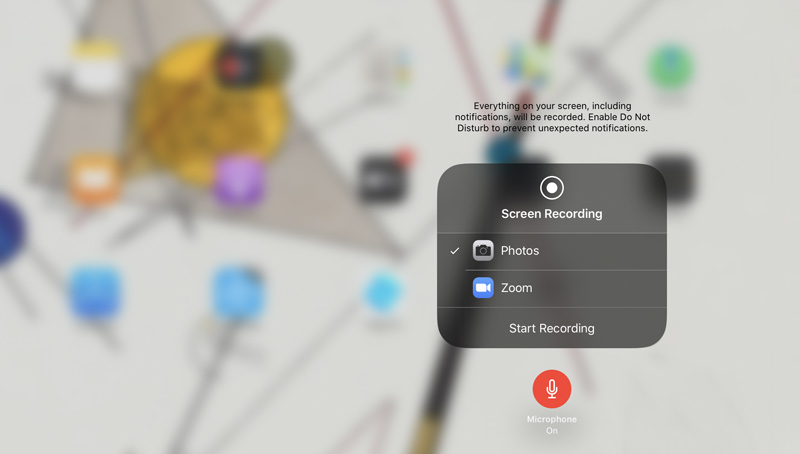
Suppose you want to record your voice or background sound while recording an iPhone screen. You should enable Microphone. You can keep tapping on the Screen Recording button to display Microphone. Tap it to turn on Microphone. After that, you can tap Start Recording to capture your iPhone screen. There will be a three-second countdown before the screen recording.
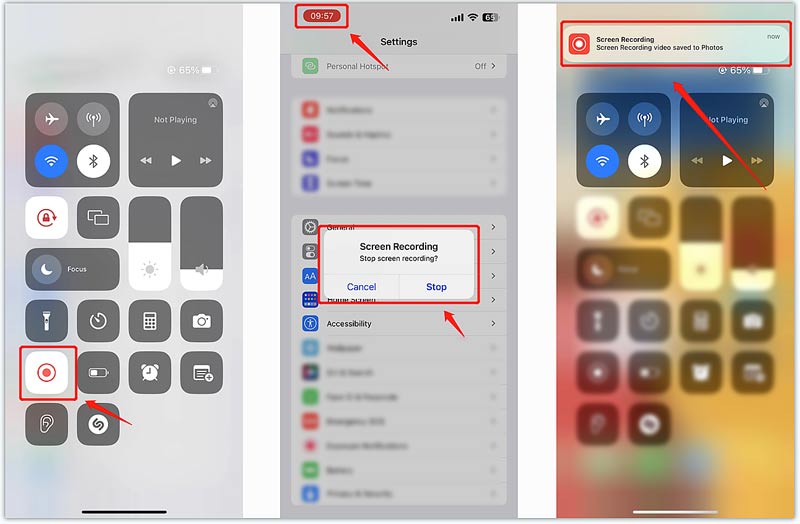
When you want to finish the screen record on your iPhone, you can tap the red status bar in the upper-left corner and then choose Stop. You can also enter Control Center and tap the Screen Recording button. Your iPhone screen recording file will be automatically stored in the Photos app.
iPhone screen recording failed to save due to 5831 or 5823
Generally, you can capture any activities and content displayed on your iPhone screen. While many users reported that they got the error 5823 or 5831 and failed to save their recordings.
When you try recording some content that is copy-protected by its developers, you will see the prompt saying that screen recording failed to save due to 5831. That means the content or certain apps impose limitations on functionality. In some cases, the app may freeze or pause when you want to capture copy-protected content.
You should check your iPhone storage space and try recording again. If you get enough storage for recording on the iPhone and still get the recording failed error, that indicates you are not allowed to do the screen recording.
Part 2. How to Record iPhone Screen on PC Without Lossing Quality
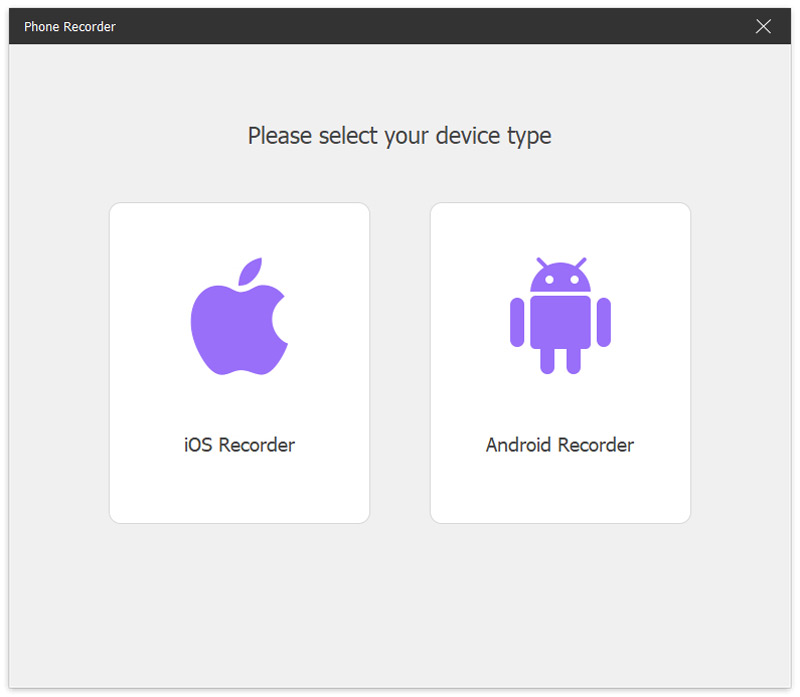
You don't get the built-in screen recording feature if you use an old iPhone 6 that runs iOS 10 or a lower version. In that case, you must rely on third-party screen recording apps to capture your iPhone screen. Here we recommend the easy-to-use ArkThinker Screen Recorder to create a high-quality screen recording on your iPhone.
It can cast your iPhone 6 screen to a Mac or Windows PC and record the iPhone display. Besides old iOS versions like iOS 10/9/8/7, this iPhone screen recorder also supports iOS 16/15/14/13/12/11. You can free download it to make screen record on your iPhone.
To use this iPhone screen recorder, you should connect your computer and iPhone to the same Wi-Fi network. Launch it and choose the Phone option. As you can see, it also allows you to record your Windows or Mac computer screen, gameplay, and webcam.

In the Phone Recorder window, choose iOS Recorder to screen record on iPhone. It gives instructions to help you capture your iPhone screen.
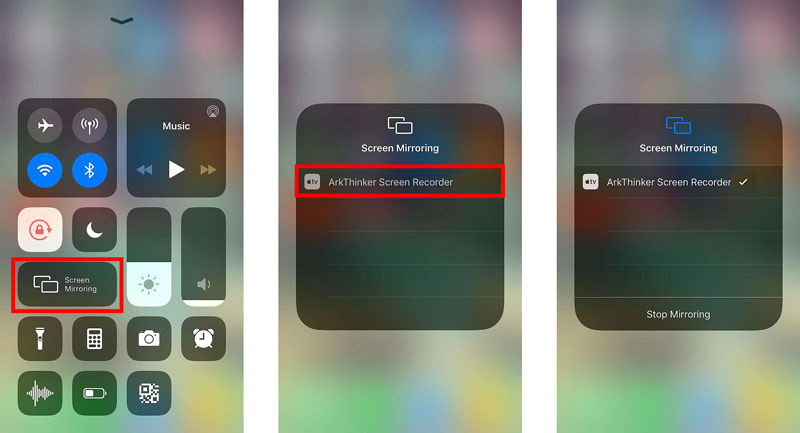
Turn on the AirPlay or Screen Mirroring feature on your iPhone. Go to Control Center and tap the Screen Mirroring icon. Select ArkThinker Screen Recorder from the device list to build the connection between your iPhone and computer.
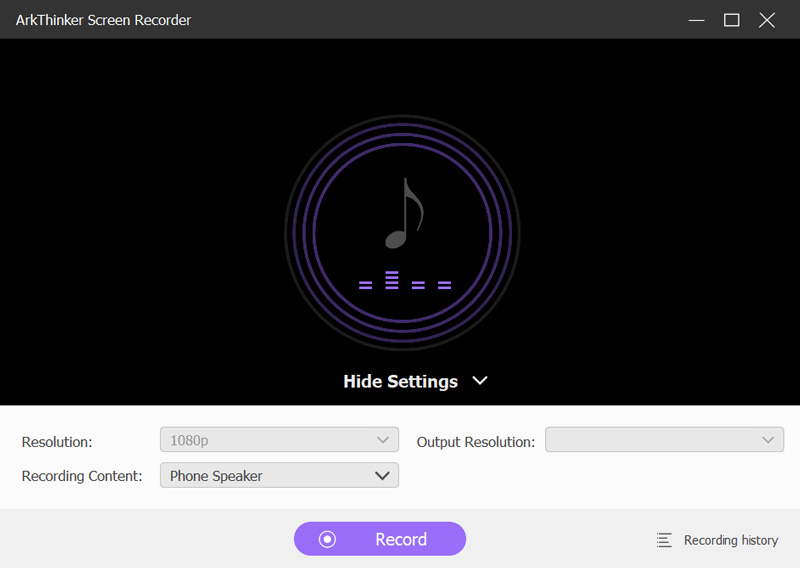
Back to the ArkThinker Screen Recorder and click the Record button to start capturing your iPhone screen. You can customize the recording resolution, output resolution, and recording content according to your need.
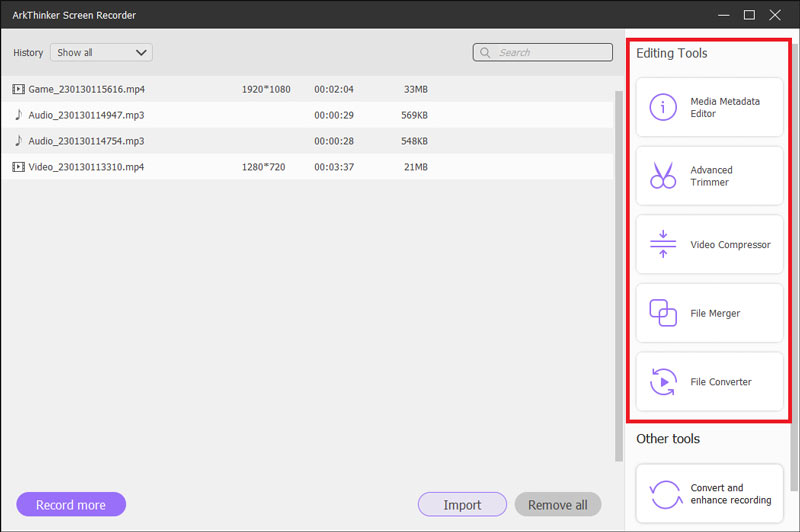
After you screen record on your iPhone, you will be guided to a video trimming window to cut the recording file. You can also visit the Recording History and find other useful tools to edit your captured videos.
Part 3. How to Record Screen on iPad
You can take similar steps to start a screen recording on your iPad if the iPadOS version is 11 or later. It would help if you made sure this screen recording function is added in Control Center, and then take the following guide to capture your iPad screen.
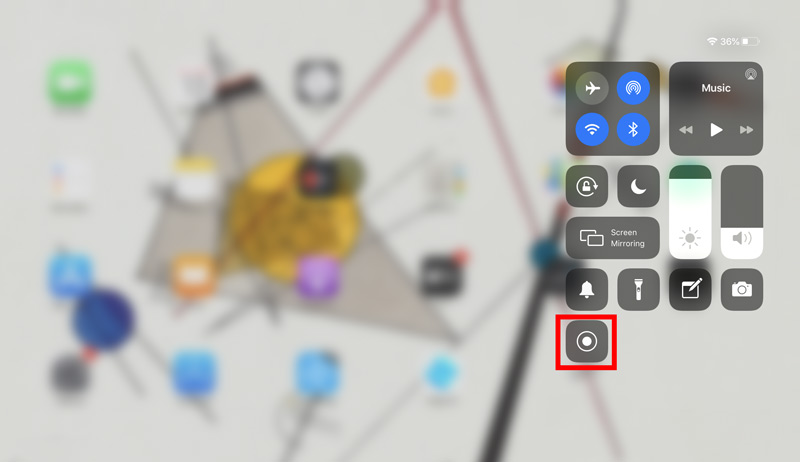
To screen record on iPad, swipe down from the top-right edge of your screen to enter Control Center and select the Screen Recording button. After a three-second countdown, any activities that happened on your iPad screen will be recorded.
To capture the screen with sound on your iPad, keep taping on the Screen Recording icon and turn on Microphone.
When you want to finish the screen recording on your iPad, tap the red status bar on the top screen or the Screen Recording button in Control Center and choose Stop. Your recording file will be saved in Photos. You can go to the Photos app to view and edit it.
Part 4. How to Screen Record iPhone on Mac Using QuickTime Player
As a Mac user, when you want to screen record on an iPhone, you can also capture the iPhone screen display on your Mac through QuickTime Player. QuickTime Player is the official media player for macOS users. It is pre-installed on any Mac for playing videos and music. It also has a screen recording function to make movie recordings. QuickTime Player allows you to mirror your iPhone screen to the Mac and record it.
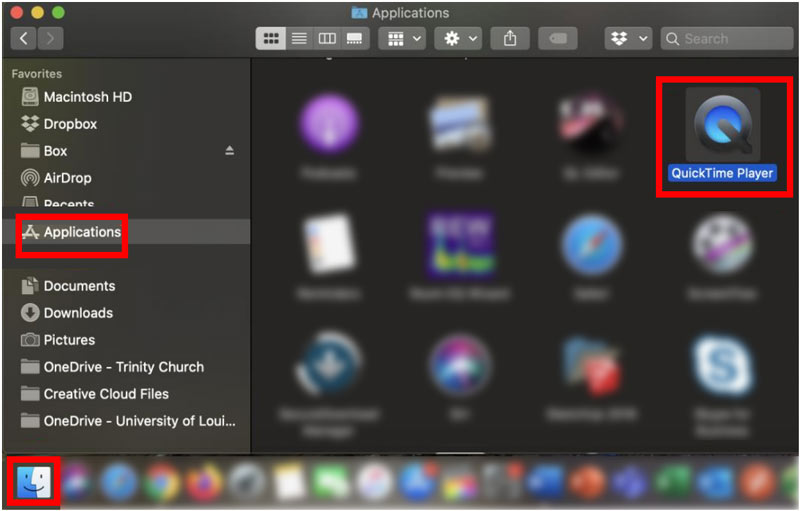
Enter Finder on your Mac and open the Applications folder. Find the app icon of QuickTime Player and double-click to launch it. Then, please connect your iPhone to your Mac via a lightning USB cable.
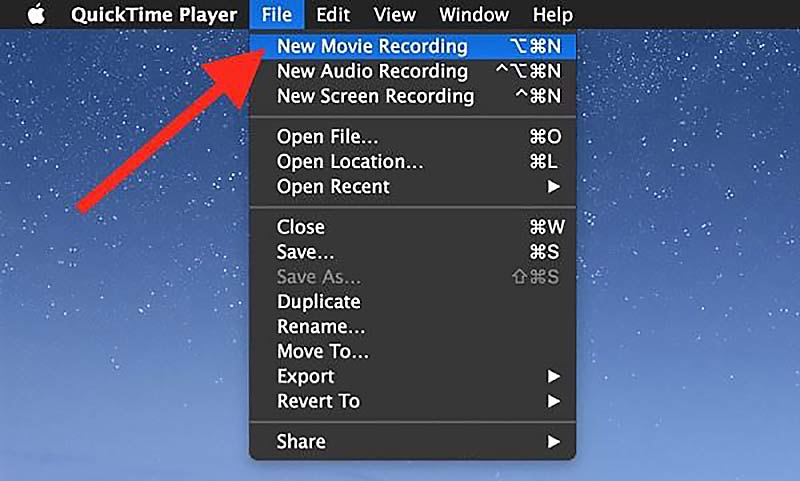
Click the top File menu and choose the New Screen Recording option from its dropdown. That will display the screen recording window of QuickTime Player.
Click the Downward icon next to the red Record button and select your iPhone under the Camera option. This operation will cast your iPhone screen to your Mac. You can adjust the audio recording settings based on your need.
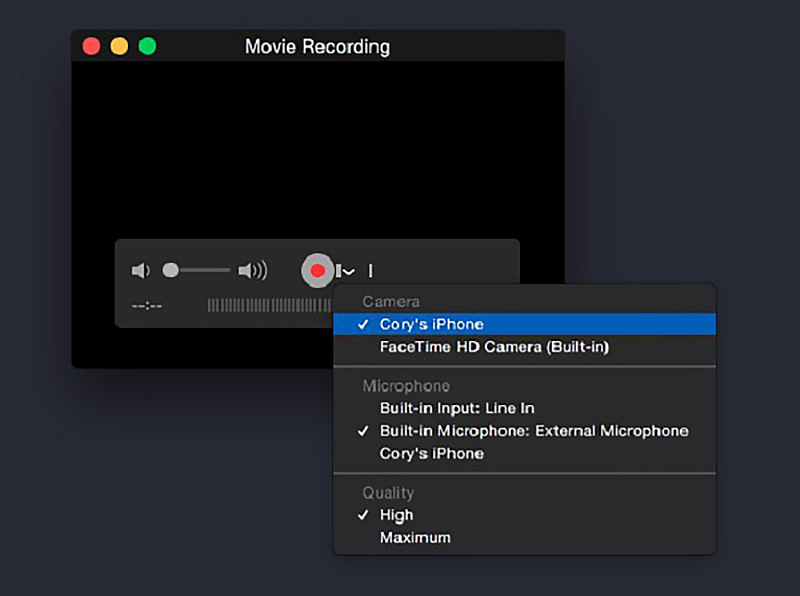
QuickTime Player also allows you to mirror your iPad screen to a Mac and record it. You can use similar steps to connect your iPad to QuickTime and choose the iPad device under the Camera option.
When you want to screen record on your iPhone, you can click the Record button of QuickTime. You can click the Stop Recording button when you like to finish the iPhone screen recording. You also can crop your recorded videos with QuickTime.
Part 5. FAQs of How to Screen Record on iPhone and iPad
How do you take a screenshot on an iPhone?
As mentioned above, iPhone has a built-in feature to take screenshots. If you use an iPhone with a Face ID, you can simultaneously press the side and volume up buttons to take a screenshot of the current iPhone screen quickly. On an older iPhone with a Home button, you can press the Home button and side button at the same time to screenshot your iPhone screen. Your screenshots will be automatically stored in the Photos app. After you take a screenshot on your iPhone, you can tap its thumbnail in the bottom-left corner to edit it.
How long can you screen record on an iPhone?
There is no time limit on your recording on an iPhone. You can capture your iPhone screen as long as you want if you have enough storage and battery life. You can open the Settings app, go to General, and tap iPhone Storage to check the available and used iPhone storage. Also, when you prefer a long screen recording, you should ensure you get your iOS device charged enough.
Should I use a third-party app to screen record on my iPhone?
iPhone offers a convenient and stable way to capture anything displayed on its screen. Compared with most third-party screen recorder apps, this built-in feature can capture iPhone screens with higher quality. There is only one disadvantage of this iOS recording function. You are only allowed to record audio from the microphone. If you prefer to capture high-quality audio, especially when you try recording some music videos, you may turn to a third-party app.
How do you screen record on an Android phone?
If you use an Android phone with Android 12 or later, you can use its built-in screen recorder to capture your Android screen. You can swipe down the Notifications panel twice to display the Quick Settings panel. Here you can use its Silent screen recording or Voiced screen recording to start capturing the screen. If your phone is running a lower Android version, you need to find some third-party screen recorder apps from Google Play Store.
Conclusion
This post gives you a detailed guide on how to screen record on iPhone. After reading this post, you can handily capture your iPhone or iPad screen with four solutions. If you still have questions about the iPhone screen recording, please message us in the comment section below.
What do you think of this post? Click to rate this post.
Excellent
Rating: 4.9 / 5 (based on 147 votes)
Relative Articles
- Record Video
- Comprehensive Guide to Record Screen or Videos on Mac Computers
- Actionable Methods to Screen Record on Android Phone or Tablet
- 3 Best Ways to Tell You How to Screen Record on Chromebook
- Apowersoft Screen Recorder: Record Screen with Audio at Once
- How to Record TikTok Video on Computer and Mobile
- Thorough Ways to Record Screen With Quicktime on Apple Devices
- OBS Screen Recorder: Powerful Screen and Broadcasting Tool
- How to Fix Audacity Won’t Record Issues in 5 Basic Methods
- How to Enable Google Meet Recording on Your Desktop
- Guidelines on How to Trim a Video on Facebook Effectively