


How to Screenshot on Dell Laptops in 4 Options (2026)
Taking screenshots on computers is an essential skill that people have to learn to make sharing information way more practical and efficient. Instead of sharing descriptive texts, sending a visual example from screen captures will make messages way easier to comprehend. In this article, we will provide a detailed guide on how to take screenshots on Dell laptops and other Windows computers. We will discuss a tutorial on the four options available on all Dell computers so that you can choose based on your preferences.

- GUIDE LIST
- Part 1. Things You Should Know Before Taking Screenshots on a Dell
- Part 2. How to Screenshot on a Dell
- Part 3. FAQs About Taking a Screenshot on a Dell
Part 1. Things You Should Know Before Taking Screenshots on a Dell
Before moving on to our tutorial on the four options, let us first discuss what you should know before learning how to screen capture on Dell laptops. The tips below should be helpful for complete beginners who are still unfamiliar with screenshot options.
Moreover, the tips we provide will also be connected to the guide below. As such, these reminders should be considered helpful additions to learning how to use screen capture tools on your Dell computer.
Learn the Keyboard Shortcut for Screenshots
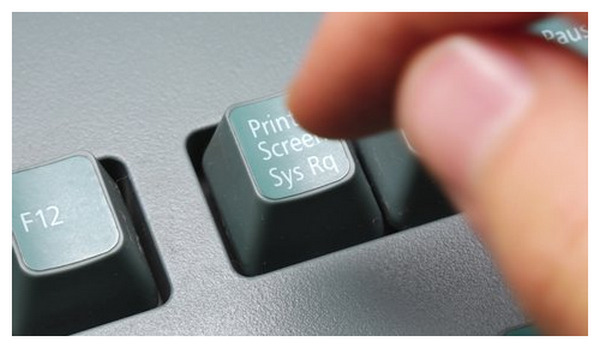
Since Windows computers already have a built-in option for screenshots, all you have to learn is the keyboard combination for specific screenshot modes. To start, find the Print Screen (Prt Sc) key on your keyboard, since it's its main function.
Discover the Built-in Options (Snipping Tool or Game Bar)
Aside from keyboard shortcuts, your computer also includes built-in screenshot software to take screenshots on Windows. In modern Windows devices, you have two options: between Snipping Tool and the Game Bar app.
Use a Third-Party Tool
If you are not satisfied with the built-in options on your computer, you can also use third-party options, which are usually equipped with more practical and advanced screen capture features.
To help our readers learn how to apply these practical tips, the screenshots below demonstrate them. With that in mind, feel free to return to this section as you learn how to take a screenshot on Dell computers.
Part 2. How to Screenshot on a Dell
Use Keyboard Shortcuts
If you plan on using the most basic screenshot option when learning how to screenshot on a Dell desktop, the first thing that you should learn is to know how to use the Print Screen button of your keyboard.
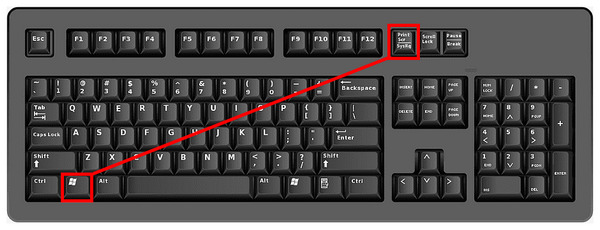
In this guide, we will provide the easiest way to capture screenshots using keyboard shortcuts. To keep it simple, the option highlighted below captures full-screen screenshots.
Press the keyboard combination of Windows + Print Screen keys. The current display of your computer will then be captured.
To find the image, open your file manager, go to the Pictures tab, then open the Screenshots folder.
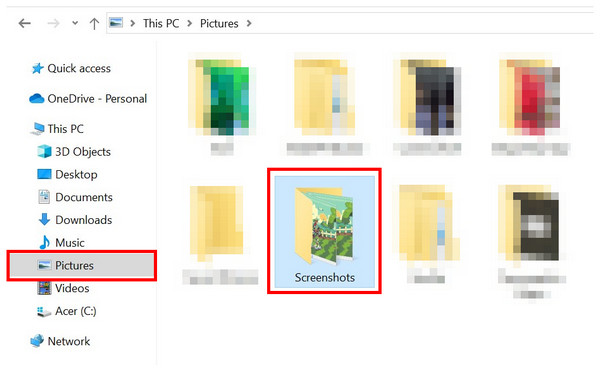
In the folder, you will find the full-screen image you captured.
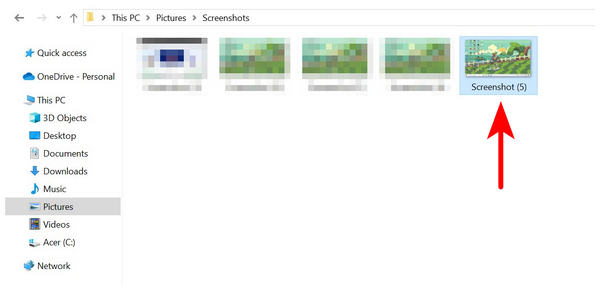
By default, images captured this way are saved in PNG format. A higher-quality file type was used to ensure the full-screen image is of good quality.
Use a Third-party Screenshot Tool
With the quickest way to capture a screenshot now discussed, let us move on to the software that offers higher-quality screenshot options and built-in editing tools when taking images: none other than ArkThinker Screen Recorder.
Equipped with an exclusive Screen Capture tool, ArkThinker Screen Recorder offers instant editing options after capturing an image. This includes practical tools such as Rectangle, Brush, Text, Blur, and Callout tools. All of which are highly useful for producing informative images.
Additionally, it offers multiple screenshot modes, including scrolling, full-screen, and partial-screen. For easier use, you can pin a screen-captured image to the screen, acting as a digital sticky note.
To learn more about what makes ArkThinker Screen Recorder an excellent choice for Dell computers, make sure to read its main features and our full guide below.
Do not forget to download the software first to make it easier to follow our tutorial.
Main Features:
• Screenshot pinning function for saving screen-captured images on-screen.
• Watermark-free screenshots for easier social media posting.
• Built-in editing tools for captured images.
• Equipped with a high-quality screen recorder for capturing screen activity on HD.
• It can capture system audio to ensure your recordings include complete information.
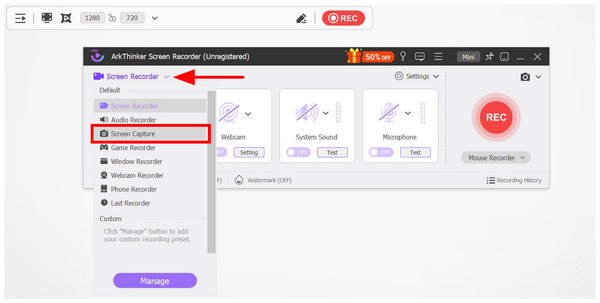
Open ArkThinker Screen Recorder, then click on recording mode to open other recording options. Then, click on Screen Capture.
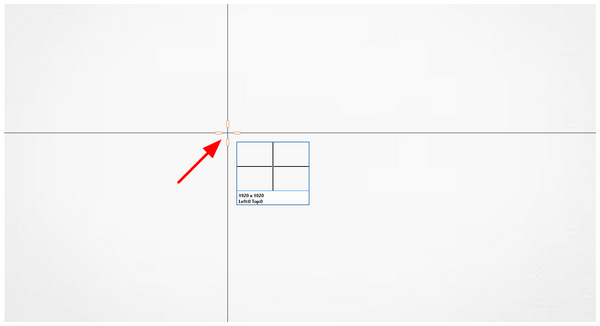
After selecting the Screen Capture mode, your cursor will change into a screenshot tool. Click and drag to select the section of the screen you want to capture.
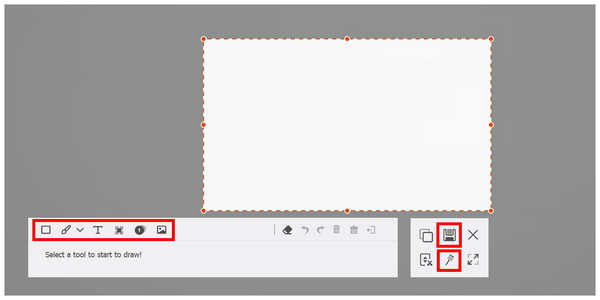
Once you have captured a portion of the screen, the editing tools of ArkThinker Screen Recorder will now pop up. There, you can use the Editing Tools on the screenshot you captured, or click Save to import the image into your file manager. Alternatively, you may click the Pin button to add a digital sticky note to your screen.
Although it is not a built-in tool like the other options on this list, the added practicality of a built-in image editor and more advanced screen capture modes make downloading and setting it up worth it. With that in mind, ArkThinker Screen Recorder is a better option for more advanced screenshots and experienced users.
Use Snipping Tool
If you want more control over which screenshot mode you use, we recommend using the Snipping Tool instead. Unlike the previous keyboard shortcut, which captures the entire screen, the Snipping Tool offers more flexible screenshot modes with Rectangular, Freeform, Window, and Fullscreen.
To learn how to use this option, read our guide below.
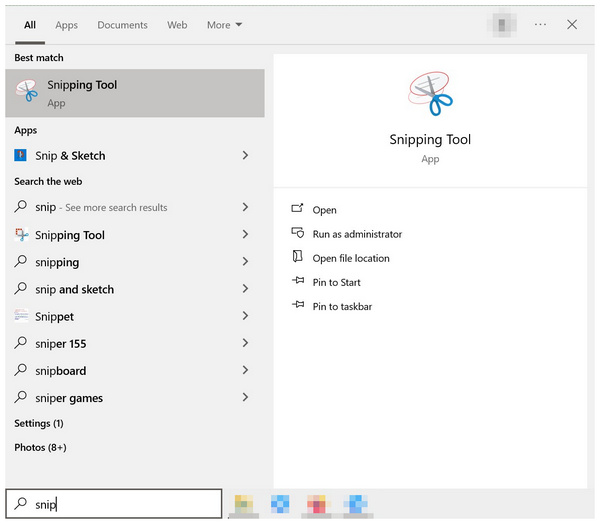
Look for the Snipping Tool in your taskbar’s search tab. This is mandatory since a shortcut for Snipping Tool is not available on the desktop by default.
After opening the Snipping Tool’s main menu, click on Mode to choose among the available screenshot modes you want to use. Once you have selected one, click on the New icon to start taking a screenshot.
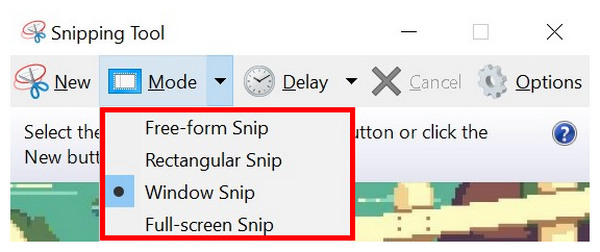
Clicking on New will immediately transform your cursor into the screenshot tool. Simply click and drag to select a portion of the screen to capture.

Among the options on this list, manually using the Snipping Tool might be the most complicated option. Fortunately, you can use it more quickly by pressing the Print Screen key on your computer. This option is much faster because you can bypass opening the snipping tool.
Use the Game Bar
Finally, we will cover the latest screenshot tool available on Dell computers, which is the most advanced option on this list. This screenshot option uses nothing more than Xbox Game Bar, a new addition to Windows 10/11.
Although it's one of the more recent additions, the Xbox Game Bar is still functional and can get the job done. To learn how to use it as well as its limitations, continue reading this section.
Open the Xbox Game Bar using the keyboard combination Windows + G. In the menu that will open, select the Capture button.
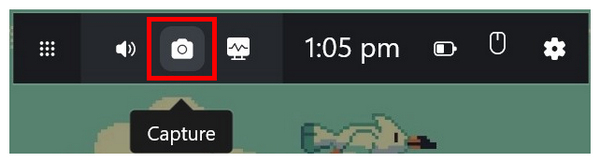
Inside the Capture menu, select the Camera button to take a full-screen screenshot.

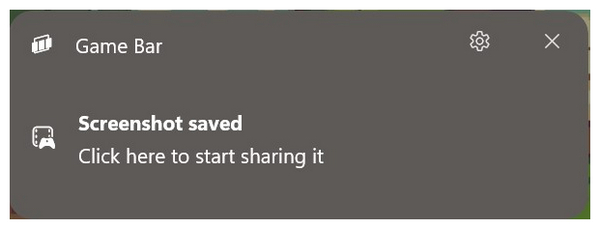
Once you click the Camera button, a notification will appear informing you that a screenshot has been saved. Click on the notification to open the file location where the screenshot is saved.
Primarily designed as a screenshot tool for gamers, Xbox Game Bar can also capture screenshots of any window on your screen. Unfortunately, its background as a game recorder makes it unavailable for desktop screenshotting.
Part 3. FAQs About Taking a Screenshot on a Dell
How to take a screenshot on a Dell desktop?
You have multiple options for taking screenshots on Dell computers. You can use the Print Screen key, Snip & Sketch, or the newly added Xbox Game Bar. If you wish, you may also use third-party screenshot tools such as ArkThinker Screen Recorder.
Is taking screenshots hard on Windows computers?
No, it is not. In fact, there are multiple ways to take screenshots on Windows, and they are all easy to use. The easiest among them is the Print Screen key.
Do third-party screenshots take poor-quality images?
No, they do not. Third-party screenshot programs can capture good-quality images. Among these programs, ArkThinker Screen Recorder is a good example.
Do screenshot tools have built-in editors?
It depends on the screenshot tool you are using. Some programs only capture screenshots and offer minimal editing options. However, some options offer advanced editing tools such as ArkThinker Screen Recorder or Windows’ Snipping Tool.
Can I capture screenshots on Windows laptops?
Yes, you can. Taking screenshots on a PC is possible and actually easy. To learn how to do it yourself, read our guide in this article.
Conclusion
Now that we have covered the basics of taking screenshots on Dell computers, we hope this article will be enough to help you capture high-quality images of your display. Fortunately, the options we have provided in this article are all optimized to be easy to use. For third-party options, consider using ArkThinker Screen Recorder, which you can download via the link below.
What do you think of this post? Click to rate this post.
Excellent
Rating: 4.8 / 5 (based on 488 votes)
Find More Solutions
How to Take a Screenshot on Your Android Phone and Tablet Verified Methods to Take Screenshots on iPhones and iPad Properly Brief Review of Fireshot: An Excellent Web Page Screenshot Program Monosnap Review—Your All-in-One Screen Capture Solution Awesome Screenshot: Detailed Review and Best Alternative Comprehensive Tutorial to Take a Screenshot on Your ChromebookRelative Articles
- Screenshot
- Monosnap Review—Your All-in-One Screen Capture Solution
- Brief Review of Fireshot: An Excellent Web Page Screenshot Program
- Shottr Review: Handy yet Effective Screenshot Software
- Snapdraw Review: Your Versatile Screenshot Factory
- CleanShot: A Powerful and Ultimate Tool for Screenshot
- PicPick Review: A Screenshot Sliver-Bullet to Fix Everything
- Screenpresso Review: Features, Pricing and Alternative (2024)
- FastStone Capture Review – Key Features and the Best Alternative
- The Details and Alternative of Snipaste Review (Objective)
- Gyazo Review: Make Your Screen Recordings Better and Faster